Break Codes
The Break Codes module is part of Global Settings and allows administrators to define and manage standardized break categories for agents (clerks). Each break code specifies the type of break, how long an agent is permitted to stay on that break (Soft Limit), and the absolute maximum time allowed (Hard Limit). Administrators can also control whether each break code is visible to agents when they initiate a break from their clerk panel.
Break codes appear on the agent’s interface when they need to go on a break during a shift. By configuring break codes, supervisors ensure accurate time tracking, consistent break categorization, and meaningful reporting on agent availability.
Prerequisites
Before using the Break Codes module, ensure that:
-
You have administrator privileges.
-
You have access to Global Settings.
1. Break Codes
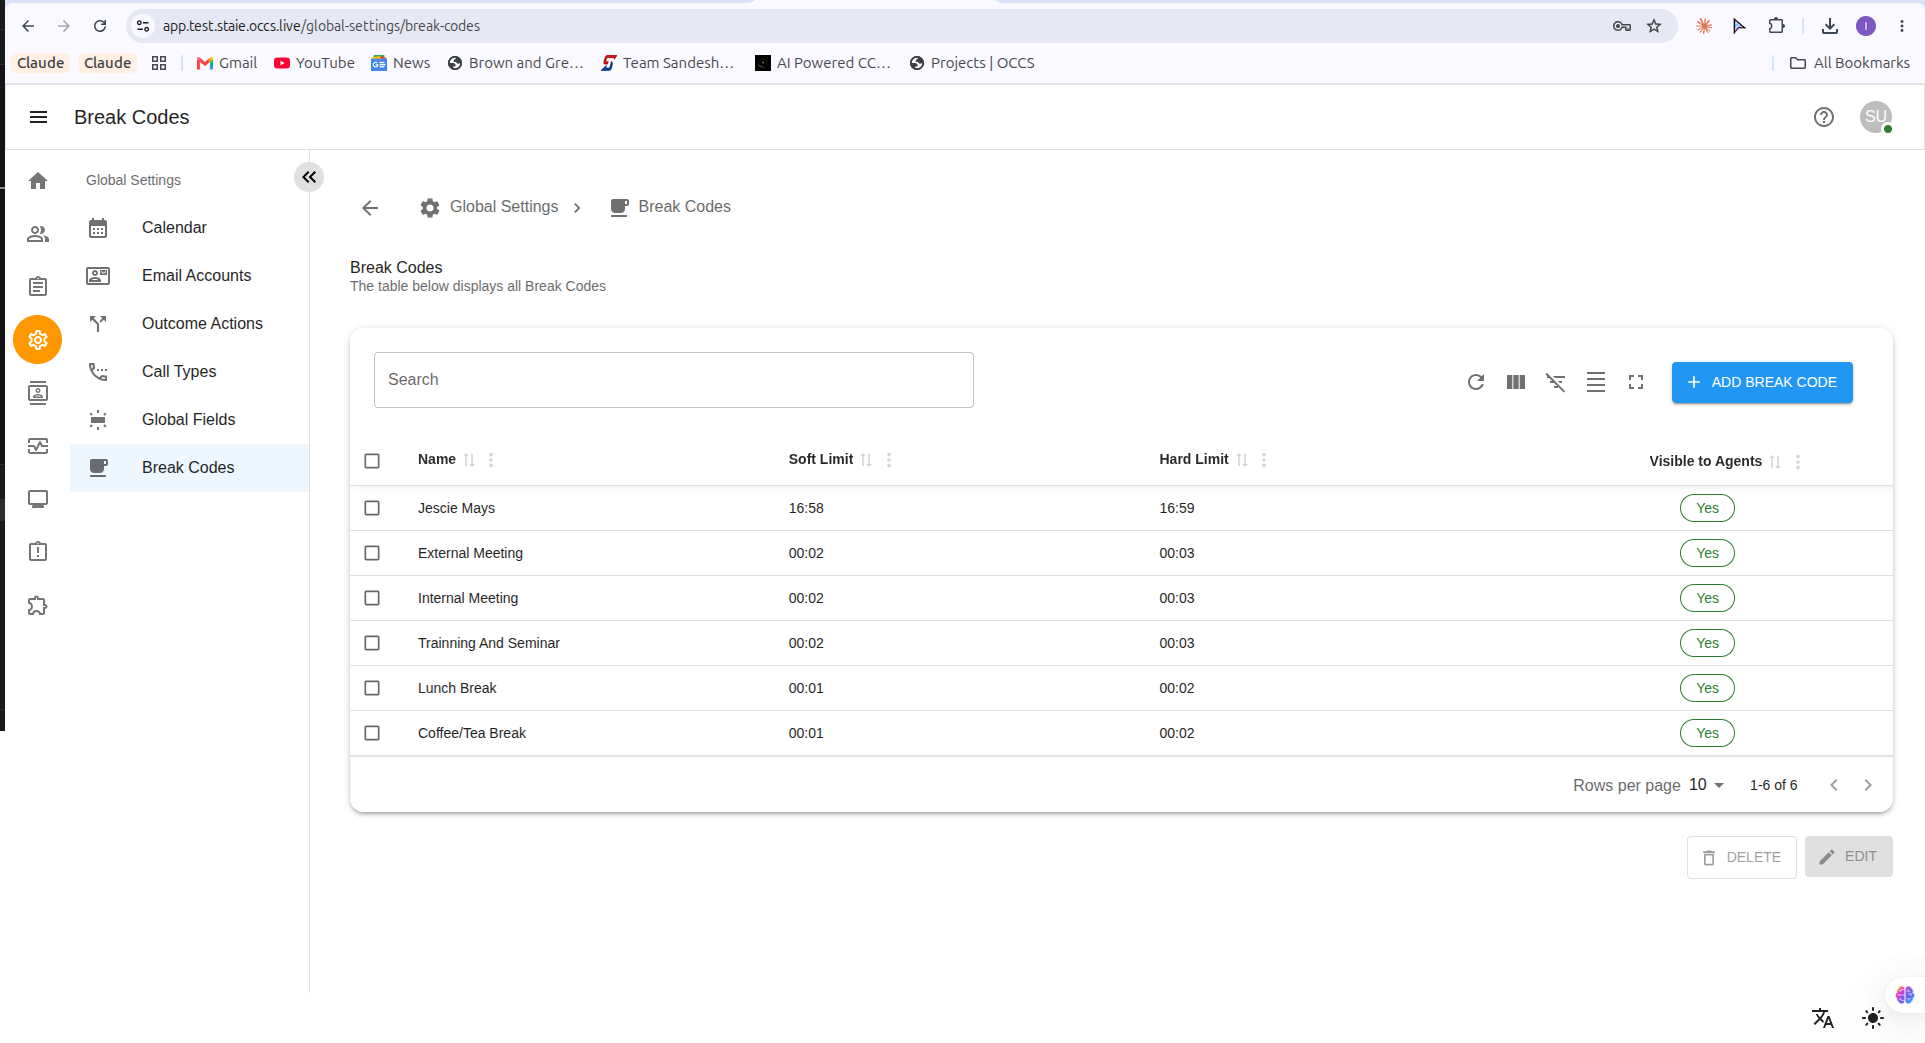
The Break Codes page displays all configured break codes in a sortable, searchable table.
1.1 Break Code Fields in Break Code Management
Inside Break Code Management, each Break Code contains the following key fields:
Name: A descriptive label for the break type (e.g., Lunch Break, Coffee/Tea Break, External Meeting).
Soft Limit:
The recommended maximum duration for this break, in HH:MM format.
A warning or visual cue may be triggered when an agent reaches this time — but the agent is not yet forced off break.
Must be less than or equal to the Hard Limit.
Hard Limit:
The absolute maximum duration for this break, in HH:MM format.
Once reached, the agent must end the break — no further extension is permitted.
Must be greater than or equal to the Soft Limit.
Visible to Agents: Controls whether this break code is shown to agents when they initiate a break. Set to Yes to allow agents to select this break type; set to No to hide it from agents (administrator-use only).
Move Agent to Unavailable When ove Agent to Unavailable toggle is enabled and agent reach the hard limit is reached, the clerk’s status is changed to unavailable.
1.2 Navigating to Break Codes
To access the Break Codes section:
-
Click on the ⚙️ Global Settings icon on the left sidebar.
-
Under Global Settings, click on Break Codes.
This will open the Break Codes interface where existing break codes are displayed and new ones can be added.
1.3 Viewing Break Codes
Once inside the Break Codes page:
A table will display all existing break codes.
Each row shows:
-
Name – The label of the break code (e.g., Lunch Break, Coffee/Tea Break).
-
Soft Limit – The recommended maximum break duration in
HH:MMformat. -
Hard Limit – The enforced maximum break duration in
HH:MMformat. -
Visible to Agents – A Yes or No badge indicating whether agents can see and select this break code.
You can also:
-
Search for break codes using the Search bar.
-
Sort and refresh the table using the toolbar icons.
-
Use pagination at the bottom right to navigate multiple pages.
-
Switch between list view and grid view using the toolbar.
| The DELETE and EDIT buttons at the bottom right are enabled only when one or more break codes are selected using the checkboxes. |
1.4 Adding a New Break Code
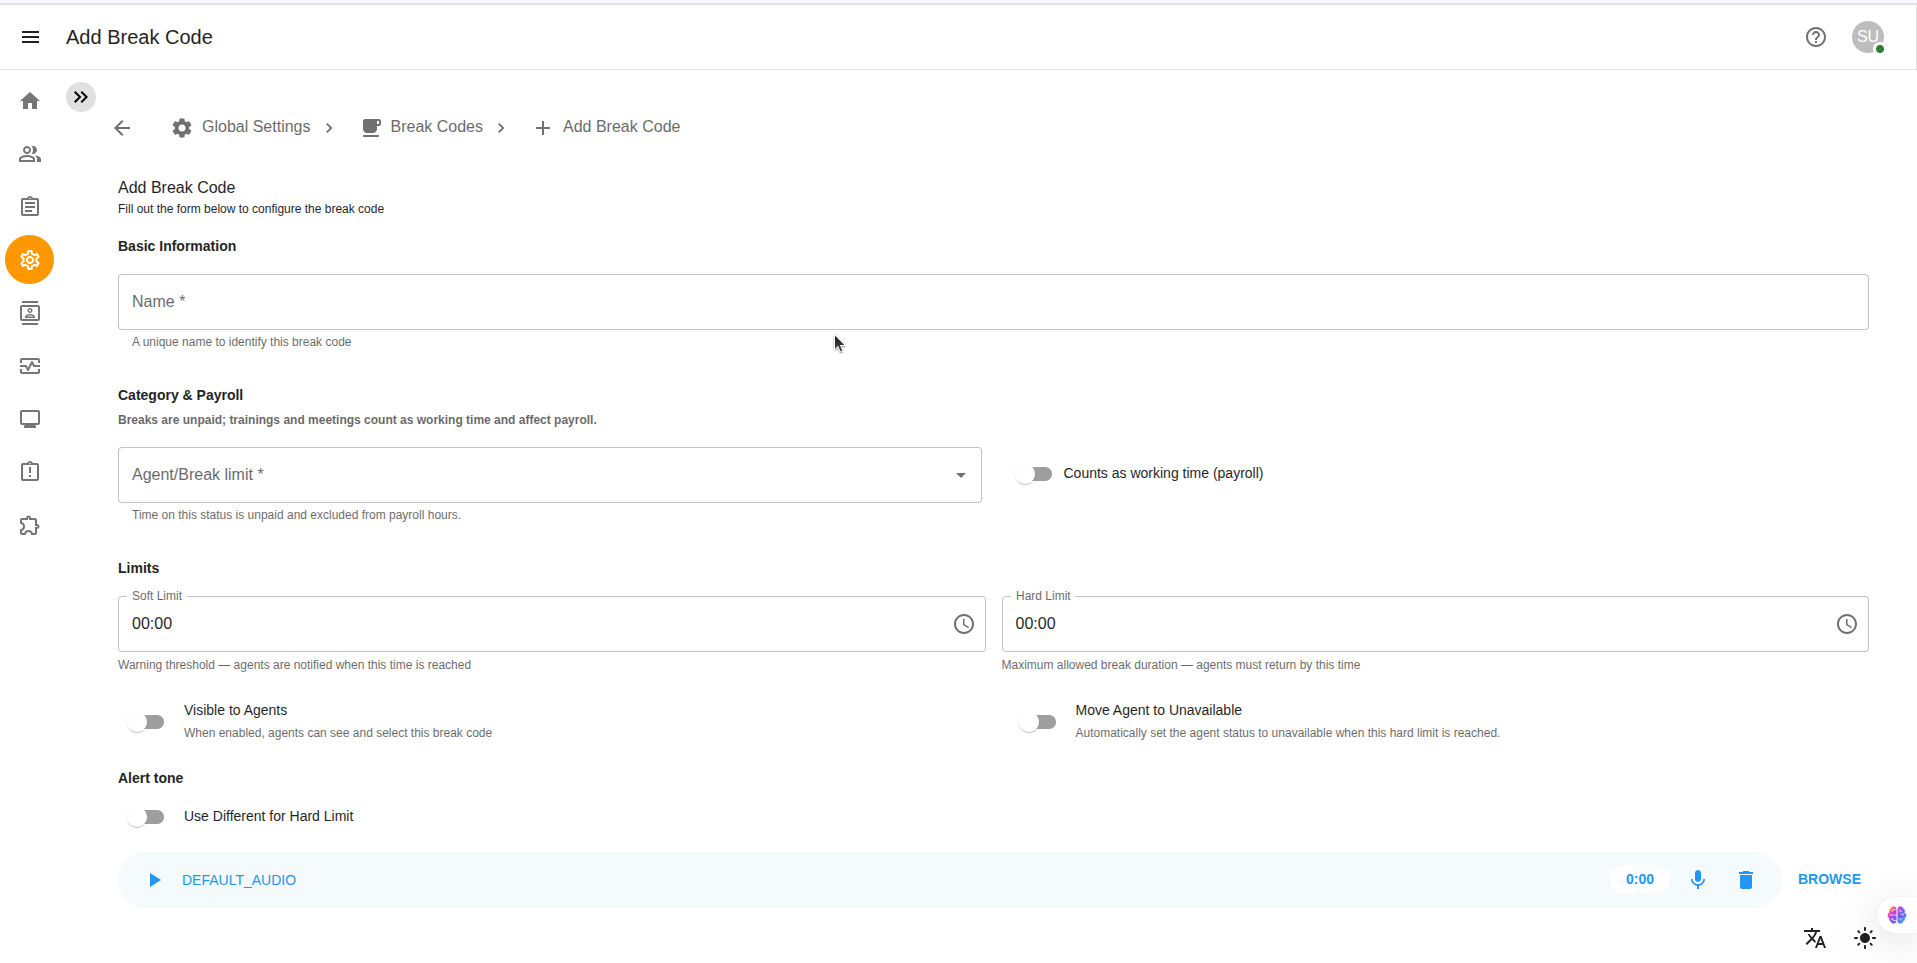
The Create Break Code form allows the Super Admin to configure how a break behaves, including payroll settings, alerts, availability rules, notification sounds, and team assignments.
1.4.1 General Information
To add a new break code:
-
Click the + ADD BREAK CODE button at the top right of the table.
-
A form will appear with the following fields:
| Field | Description |
|---|---|
Break Code Name |
Enter a unique name for the break code. |
Description |
Provide a brief description of the purpose of the break. |
Category |
Select the appropriate break category or type. The selected category is used to classify the break for reporting and management purposes. |
Payroll |
Determines whether the break is counted as working time. When enabled, the employee remains on payroll while taking the break. |
1.4.2 Count as Working Time
Enable the Count as Working Time toggle if the break should be treated as paid working time.
When enabled:
-
The break is considered part of the employee’s paid working hours.
-
The employee remains on payroll while the break is active.
|
Disable this option for unpaid breaks that should not be included in working hours. |
1.4.4 Visible to Agent
Enable the Visible to Agent toggle to notify agents when they exceed the configured break limits.
When enabled:
-
A notification is displayed when the Soft Limit is reached.
-
A notification is displayed when the Hard Limit is reached.
These notifications help agents monitor the duration of their breaks.
1.4.5 Move Agent to Unavailable
Enable the Move Agent to Unavailable toggle to automatically change the agent’s status once the configured Hard Limit is reached.
When enabled:
-
The system automatically changes the agent’s status to Unavailable after the hard limit has been exceeded.
1.4.6 Alert Tone
Configure the audio notification played when break limits are reached.
By default:
-
The same alert tone is used for both the Soft Limit and Hard Limit.
If Use Different Tone for Hard Limit is enabled:
-
A separate audio file can be assigned for the Soft Limit.
-
A different audio file can be assigned for the Hard Limit.
This allows administrators to distinguish between warning and critical notifications.
1.4.7 Agent Group Configuration
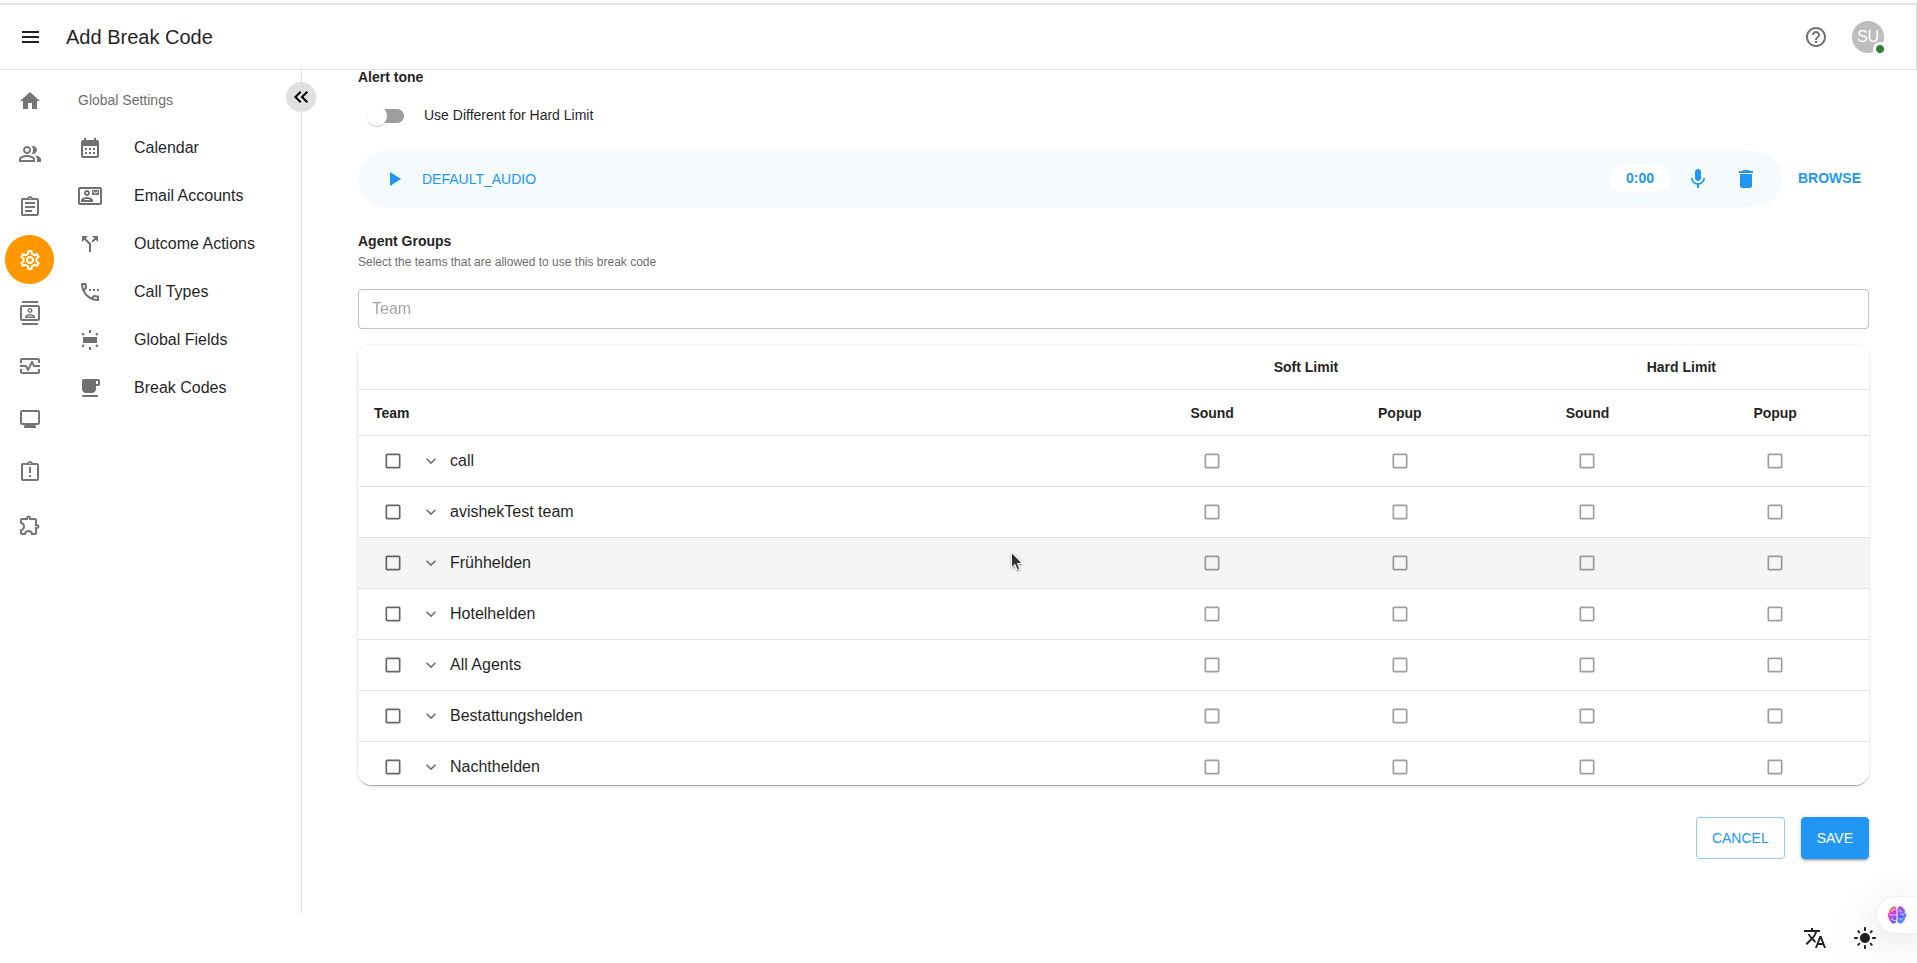
Use the Agent Group section to configure which teams can use the break code.
Administrators can:
-
Assign one or more agent groups.
-
Configure Soft Limit popup notifications.
-
Configure Hard Limit popup notifications.
-
Configure alert sounds for both Soft Limit and Hard Limit notifications.
Only the selected agent groups will have access to the configured break code.
Save the Break Code
After completing the required fields:
-
Review the configuration.
-
Click Save. to create the break code, or CANCEL to exit without saving.
The break code becomes available to the assigned agent groups.
|
Use meaningful break names and configure appropriate soft and hard limits to help agents manage their break durations effectively. |
2. Edit Breakcode
The Edit Break Code feature allows the Super Admin to modify an existing break code’s configuration, including its category, payroll settings, notifications, alert tones, availability rules, and assigned agent groups.
2.1 Edit a Break Code
To edit an existing break code:
-
Navigate to Global Settings → Break Codes.
-
Locate the break code you want to modify.
-
Click the Edit icon corresponding to the break code.
-
Update the required fields.
-
Click Save.
The changes are applied immediately and will affect future use of the break code.
2.2 Editable Fields
| Field | Description |
|---|---|
Break Code Name |
Modify the name of the break code. |
Description |
Update the description of the break code. |
Category |
Change the break category or type used to classify the break. |
Payroll |
Specify whether the break should be counted as working time. |
2.3 Update Payroll Settings
The Count as Working Time toggle determines whether the break is treated as paid working time.
When enabled:
-
The break is counted as working time.
-
The agent remains on payroll while the break is active.
When disabled:
-
The break is treated as unpaid and is excluded from working hours.
2.4 Update Agent Notifications
Use the Visible to Agent toggle to control whether agents receive notifications when break limits are reached.
When enabled:
-
A popup notification is displayed when the Soft Limit is reached.
-
A popup notification is displayed when the Hard Limit is reached.
When disabled:
-
No limit notification is displayed to the agent.
2.5 Update Availability Rule
Use the Move Agent to Unavailable toggle to automatically change an agent’s status after exceeding the configured Hard Limit.
When enabled:
-
The system automatically changes the agent’s status to Unavailable once the Hard Limit is reached.
When disabled:
-
The agent’s status remains unchanged after reaching the Hard Limit.
2.6 Update Alert Tones
Administrators can modify the notification sounds played when break limits are reached.
By default:
-
The same alert tone is used for both Soft Limit and Hard Limit notifications.
If Use Different Tone for Hard Limit is enabled:
-
A separate audio file can be assigned for the Soft Limit.
-
A different audio file can be assigned for the Hard Limit.
2.7 Update Agent Group Configuration
The Agent Group section allows the Super Admin to modify which teams can use the break code.
Administrators can:
-
Add or remove agent groups.
-
Configure popup notifications for Soft Limit and Hard Limit.
-
Configure alert tones for Soft Limit and Hard Limit notifications.
Changes apply only to the selected agent groups.
3. Agent Break Notifications
When the Visible to Agent option is enabled for a break code, agents receive popup notifications as they approach or exceed the configured break limits.
These notifications help agents monitor their break duration and provide audible alerts based on the configured alert tones.
3.1 Soft Limit Notification
When the configured Soft Limit is reached, the system displays a warning popup to notify the agent that they are approaching the maximum allocated break time.
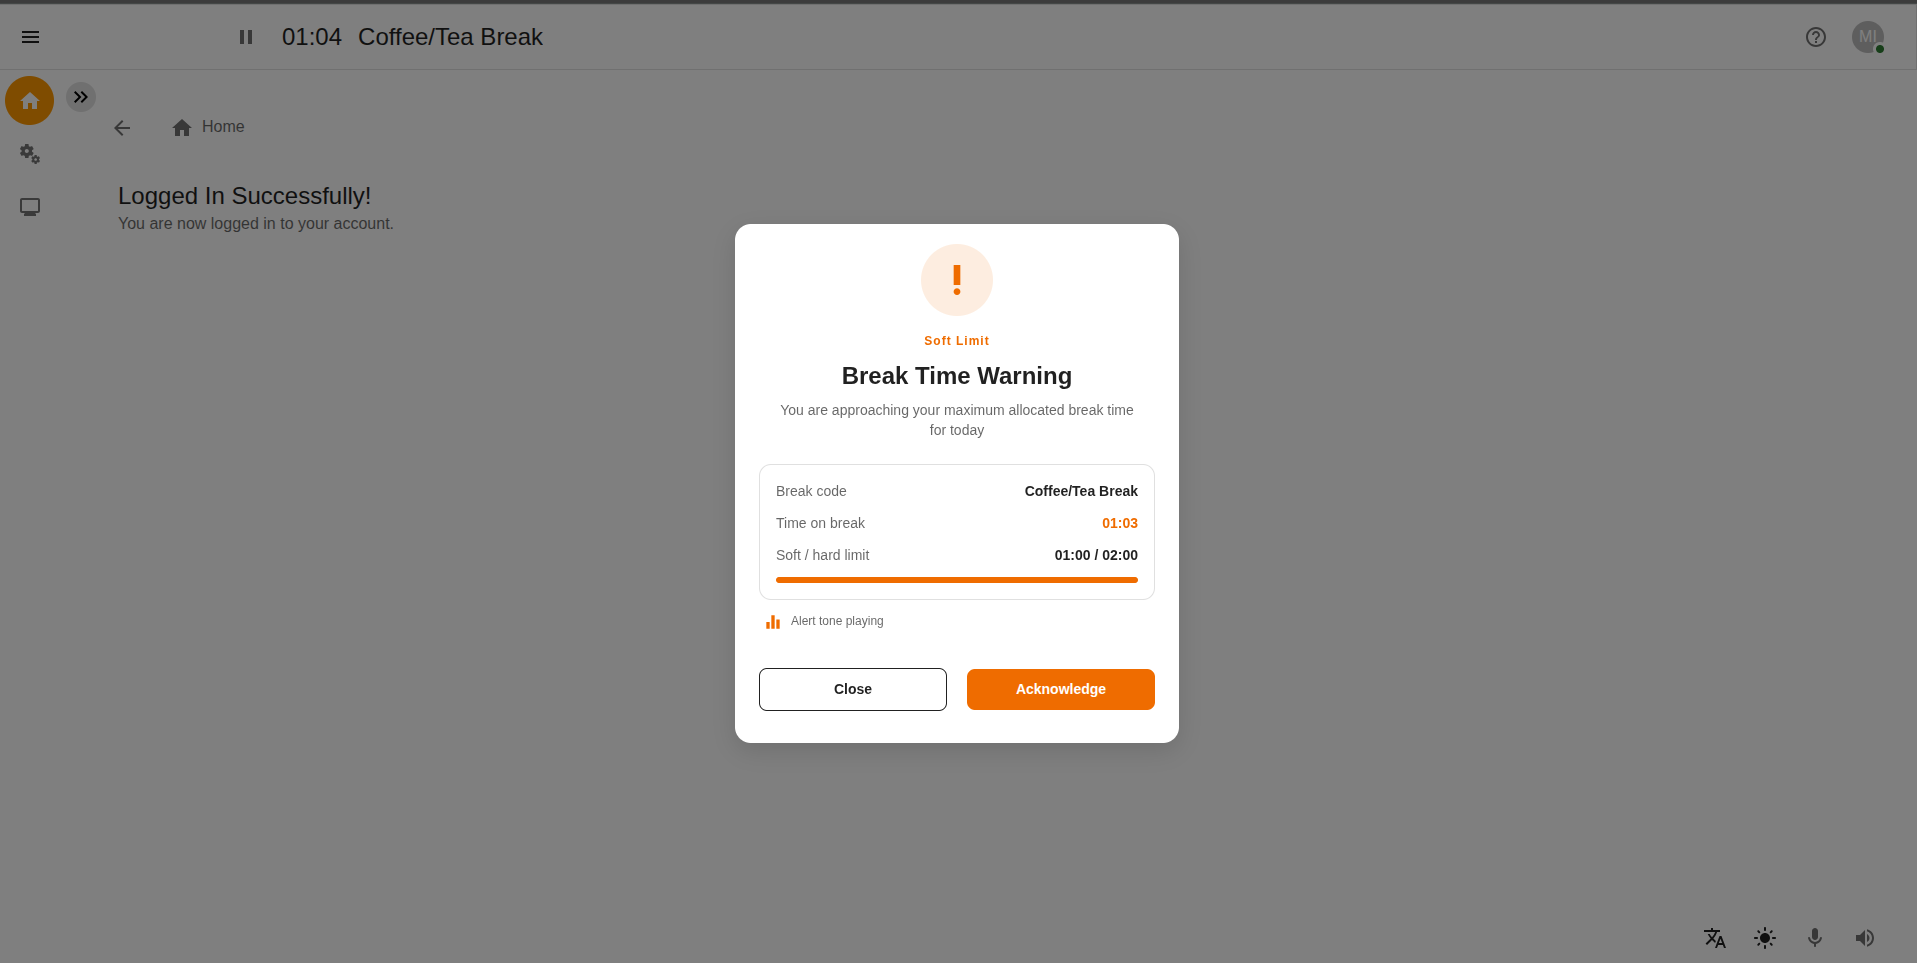
The notification displays:
-
Break code name
-
Current time on break
-
Configured soft and hard limits
-
Alert tone indicator
-
Close button to dismiss the notification
-
Acknowledge button to confirm the warning
|
The Soft Limit notification is informational only. It does not automatically change the agent’s status. |
3.2 Hard Limit Notification
When the configured Hard Limit is reached, the system displays a critical notification indicating that the maximum break duration has been exceeded.
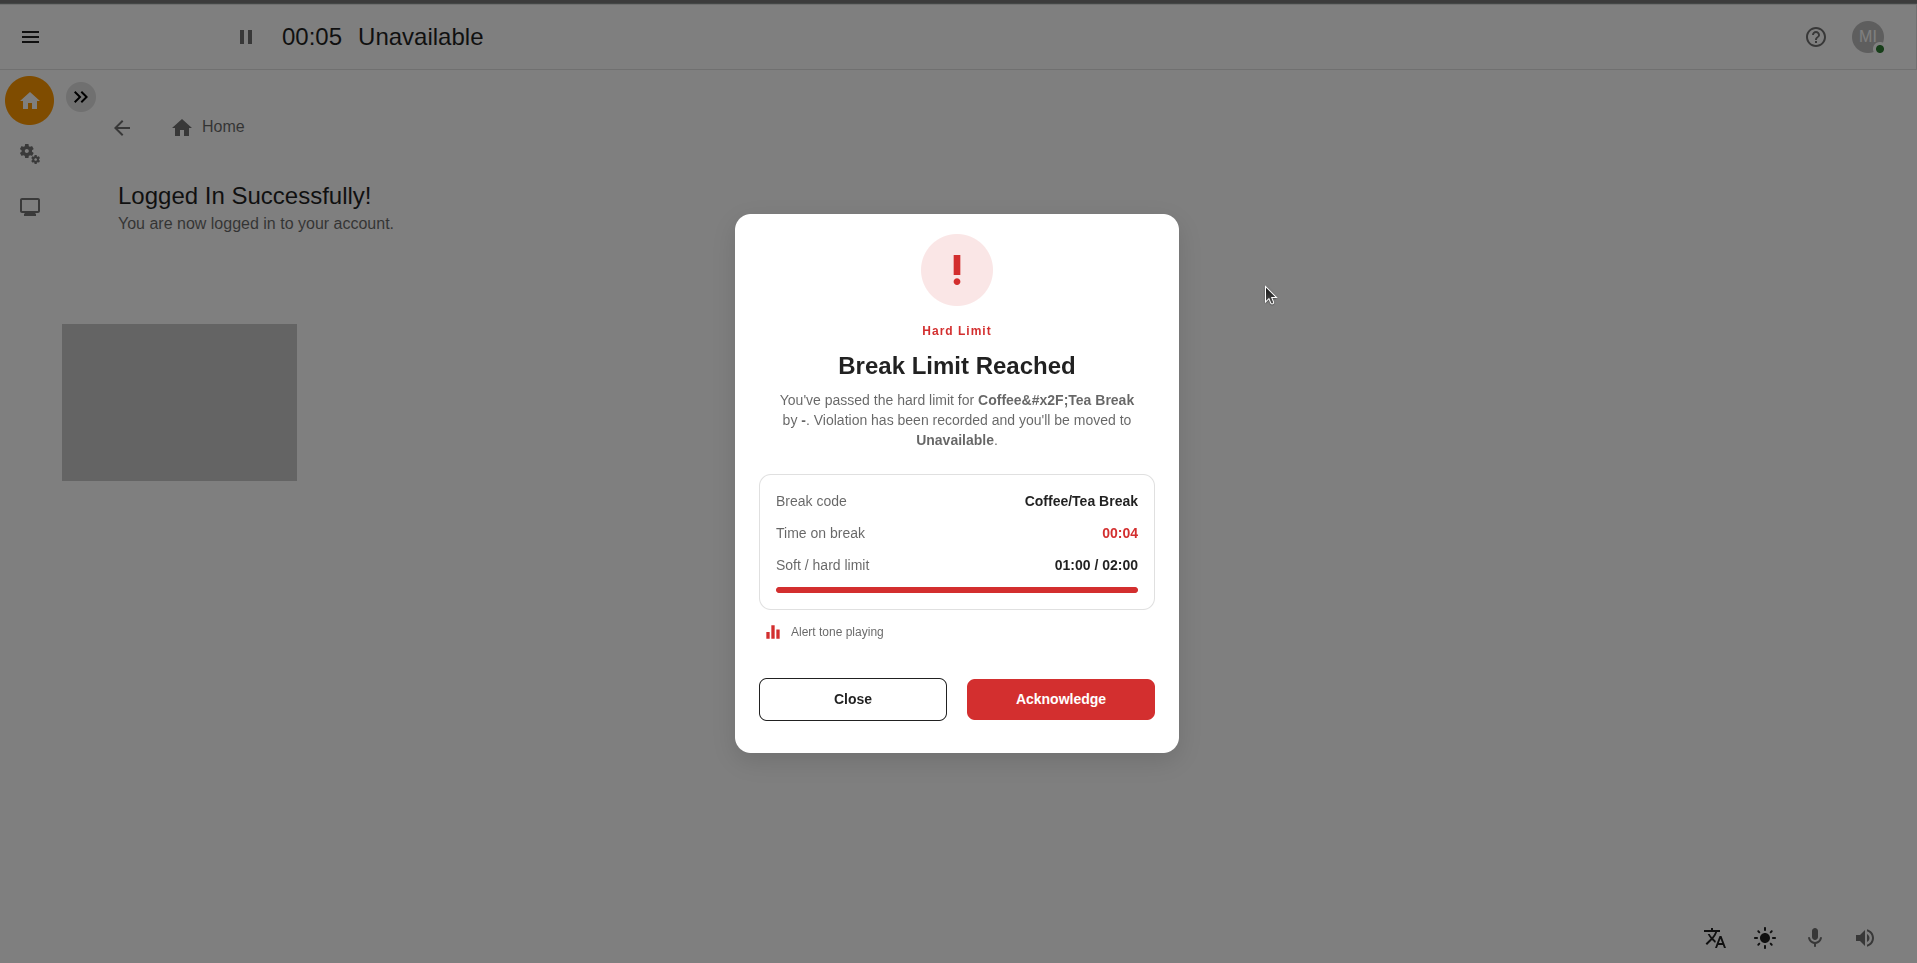
The notification displays:
-
Break code name
-
Current time on break
-
Configured soft and hard limits
-
Alert tone indicator
-
Close button
-
Acknowledge button
|
If the Move Agent to Unavailable option is enabled for the break code, the agent is automatically moved to the clerk status to Unavailable when the Hard Limit is reached. |