Project Management Module
Dashboard Overview
After logging in, you’ll be directed to the Dashboard . From the Dashboard, click on the Project-Management icon located on the navigation menu. . You will be redirected to the Project-Management Page.
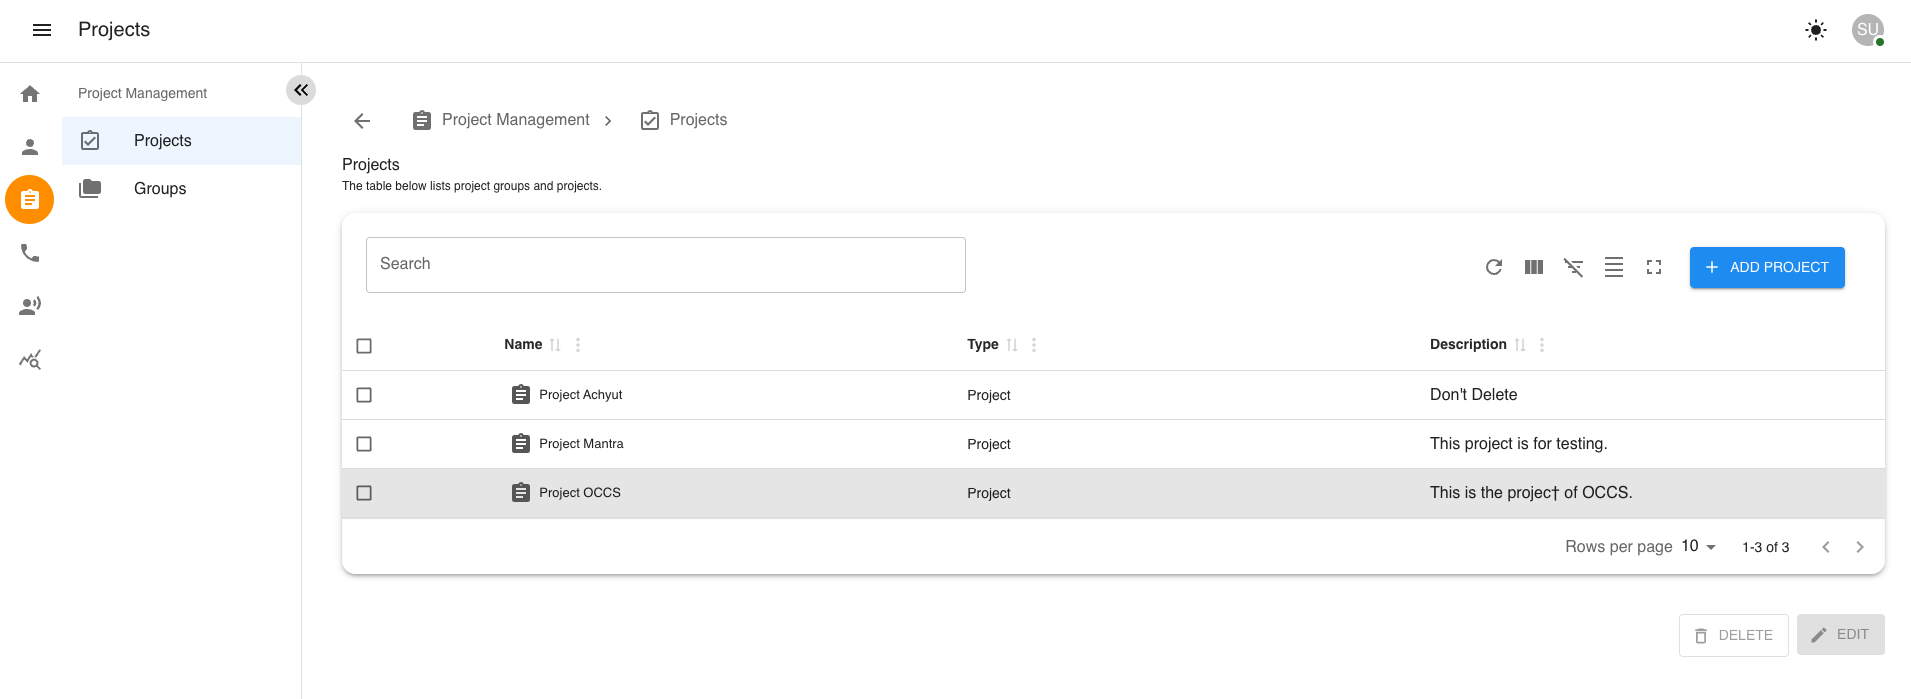
1 Projects
The Project Module enables collaboration among multiple teams within a single project. Each project is assigned a unique identifier, known as the "Queue," which streamlines the management of client calls by routing them to available clerks within the system. Projects can also be assigned to a parent group, allowing related projects to be organized and managed together.
Project Fields in Project Management
Inside Project Management each Project contains the following key fields:
Channel: The communication method used for calls. This includes options like Voice, Email and Contact.
Views: Represents the number of views or interactions related to the project. You can also create custom views to filter and display specific data.
Database: The main data repository that stores all records associated with the project. It includes features such as Export and Field Management.
Result Code: Used to classify and track the outcome of each interaction. This supports detailed reporting and process analysis.
1 Create Project
Step-by-step instructions for creating project.
-
Navigate to Project Management
-
From the left sidebar, click on the Project Management icon.
-
Select the Projects option from the menu.
-
1.1 Add a New Project
-
Click the Add Project button to begin creating a new project.
Complete the Project Details Form - Fill out the required fields with valid data, such as project name. - If the project has a parent group, select the appropriate parent group for managing related projects. - Fill the Queue number as this number is responsible for handling the call from the client and routing them to the available clerks in the system. - Click the Next button to proceed to the Teams Selection form.
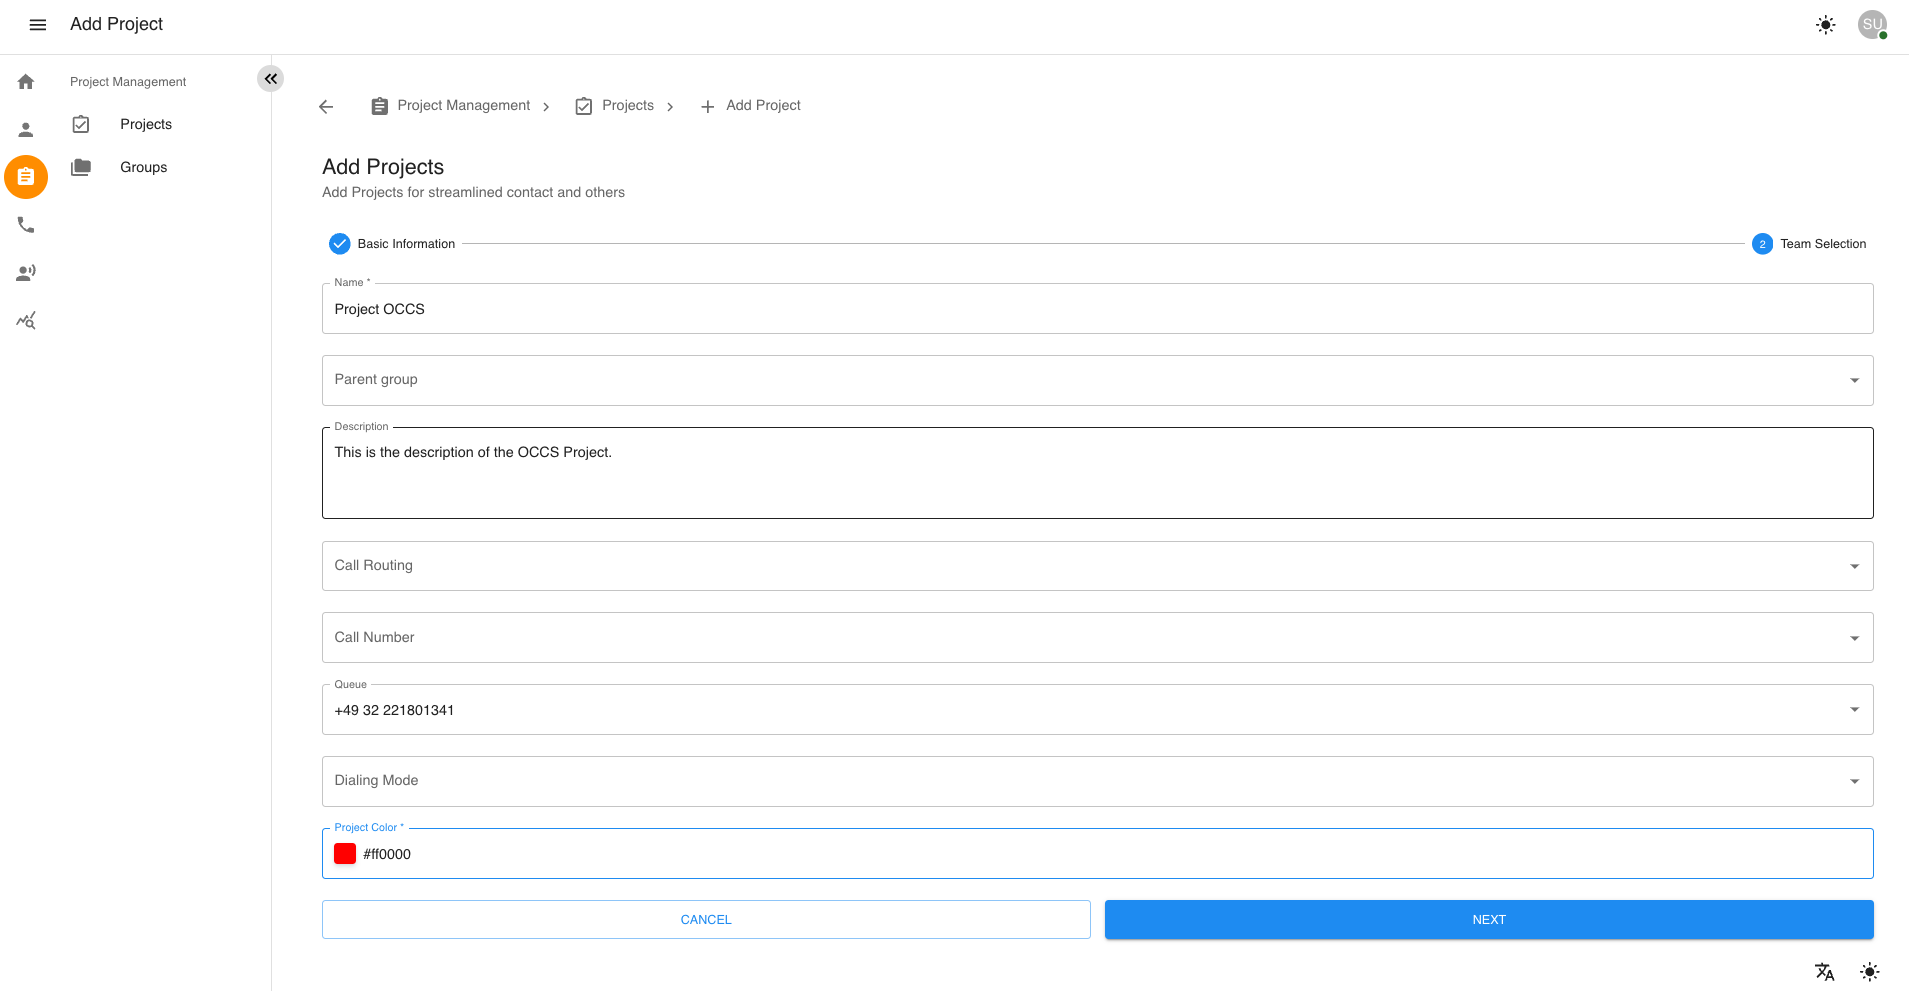
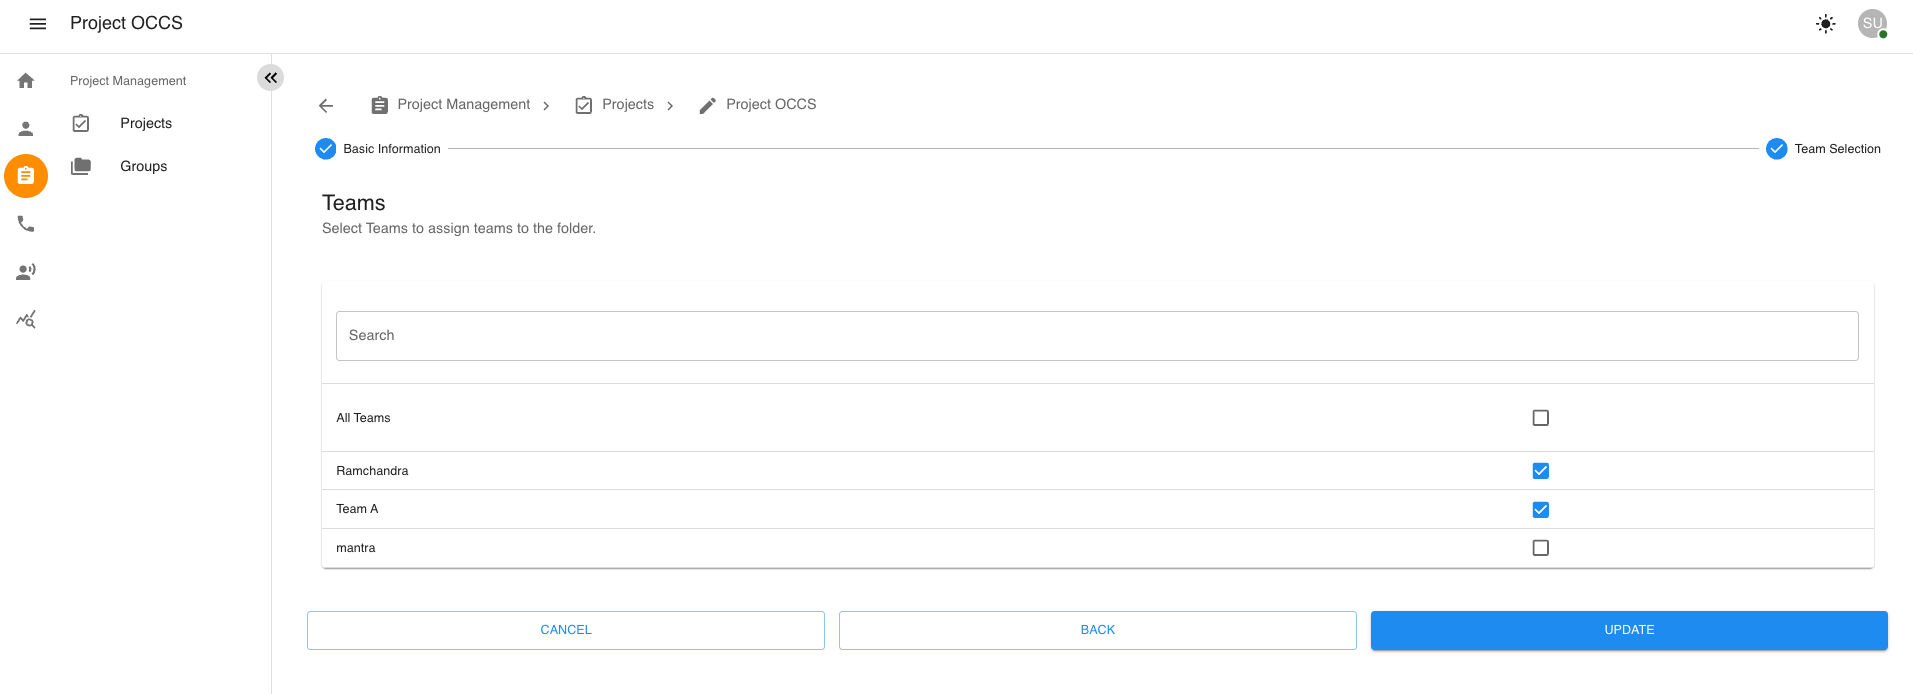
Assign Teams Selections - In the Team Members Selection form, check the boxes next to the teams you want to assign to this project. - The selected teams include users with the role of Group Clerks, who have the rights and permissions to handle call management. When a client calls the designated queue number, available clerks within the assigned teams for the related project will manage the call.
Create the Project - After selecting the desired teams, click the Create button to finalize the new teams setup.

Then after creating a project, you will be redirected to the Project Management Page where you can see the newly created project listed.
1.2 Edit an Existing Project
-
Locate the project you want to edit and select the checkbox next to it.
-
The Edit button will become enabled. Click it to proceed.
-
In the Project Details Form, update fields like name, parent group, queue number, and so on.
-
Click Next to continue to the Teams Selection form.
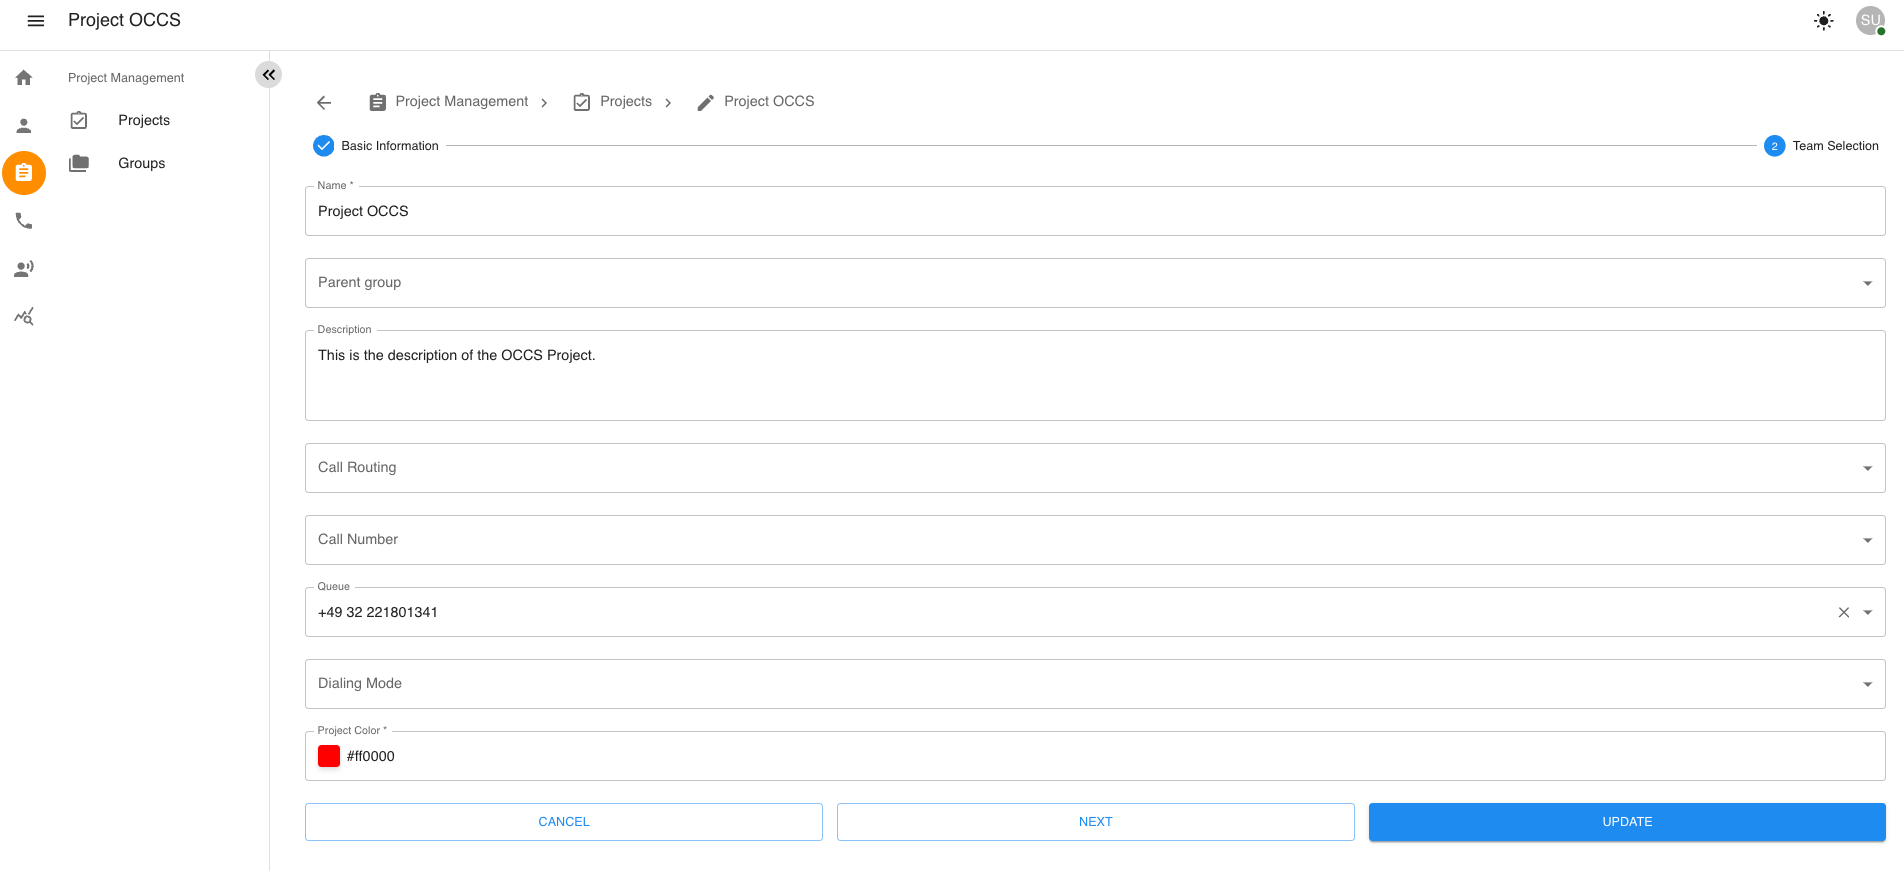
Update Teams Selection - In the Team Members Selection form, update and check the boxes next to the teams you want to assign to this project. - The selected teams include users with the role of Group Clerks, who have the rights and permissions to handle call management. When a client calls the designated queue number, available clerks within the assigned teams for the related project will manage the call.
-
After selecting the desired teams, click the Update button to finalize the project’s configurations.
After creating a project, you can access project list.
Selecting a Project
Inside the Project-Management , you can access project list.
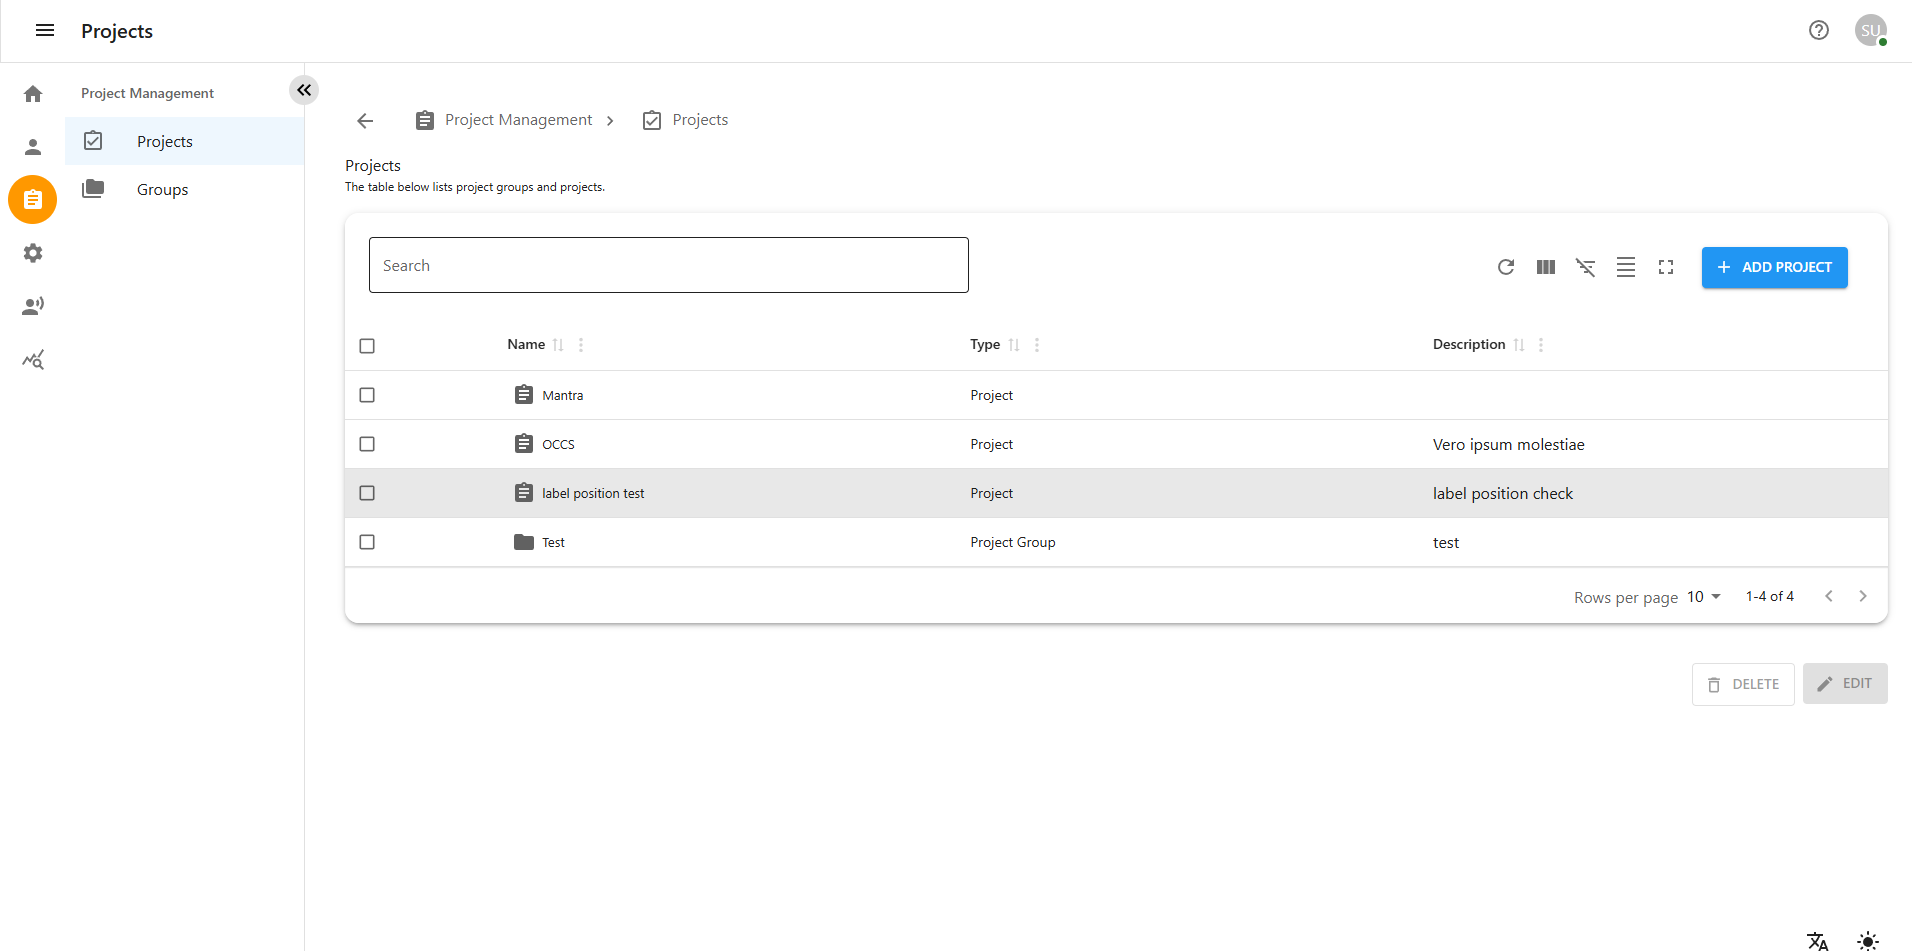
To view specific call records, select a project from the Project List within the Dashboard. Each project listed will have key details.
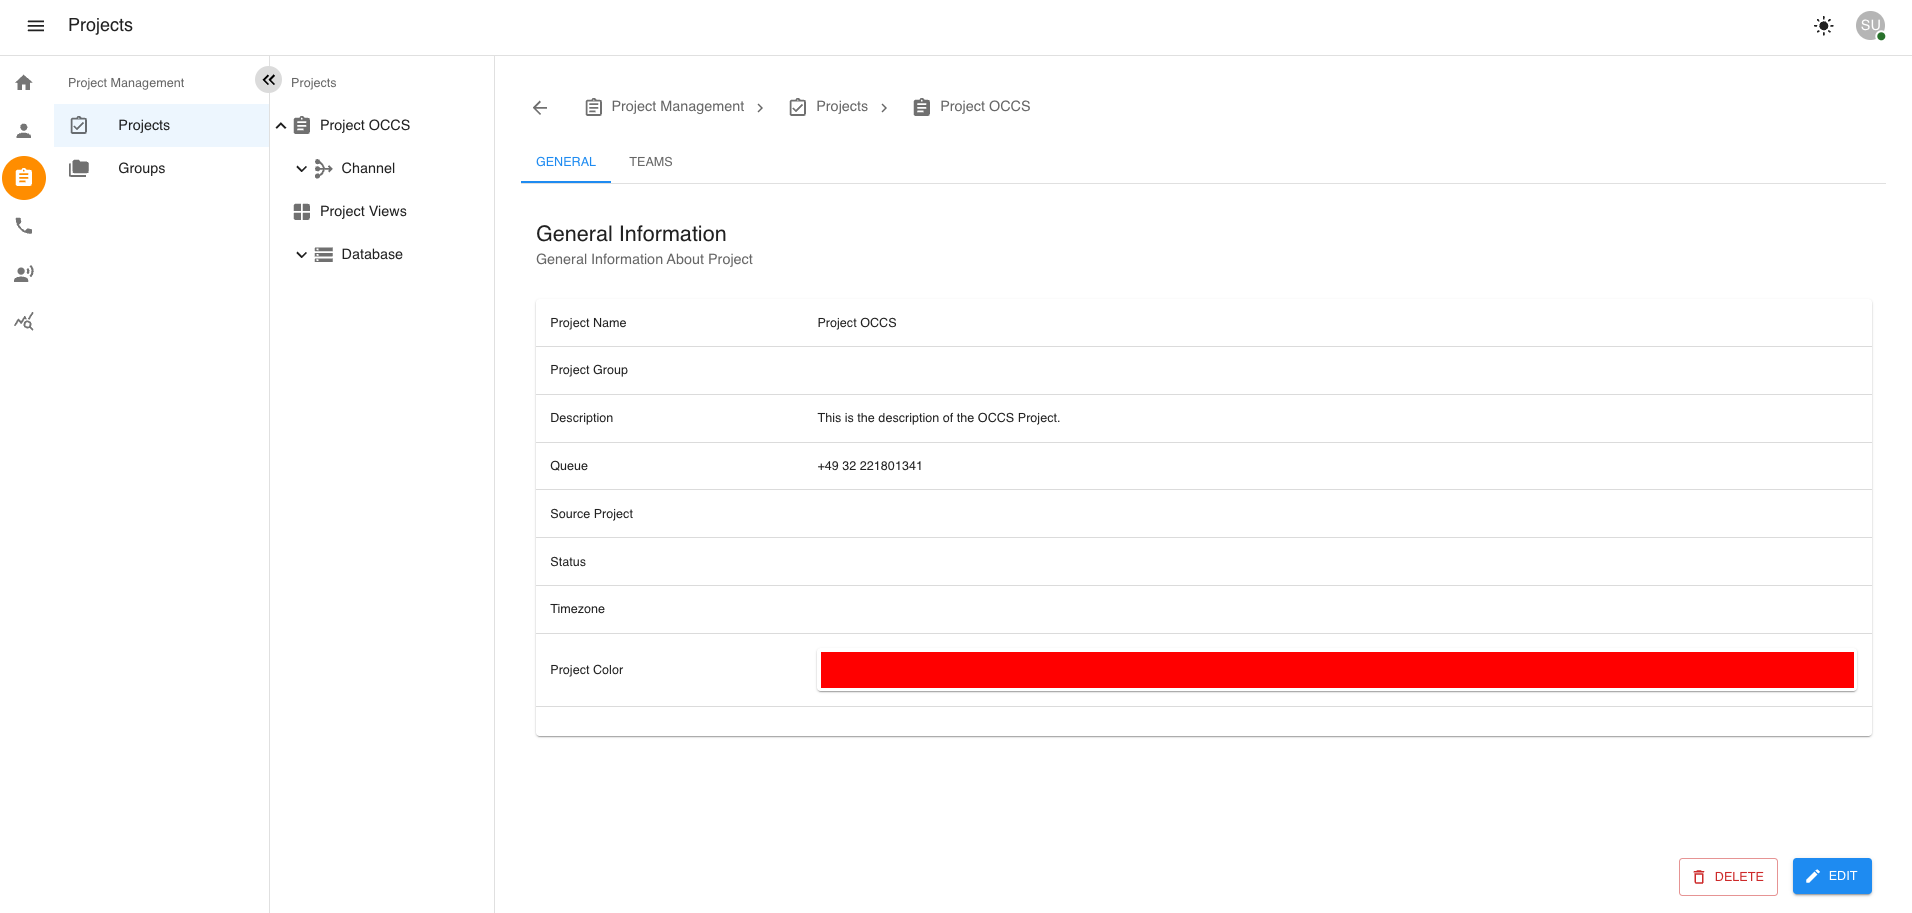
Project Details
After selecting a project, you’ll land on the Project Details Page. This page provides an overview of the project, including its name, description, and other relevant details.
Inbound Overview
Inbound settings are managed within a specific project under Project Management. After selecting a project, you can access the Channel section, where you’ll find Voice settings. Inside Voice, the Inbound section allows you to configure Opening Time, Holiday schedules, and Default call behavior.
It is especially useful for setting up ringback tones or custom messages during business hours, holidays, or outside working times. This ensures that when a caller tries to reach your team, they hear the right tone or message based on the time and day they are calling.
1. Navigating to Inbound Settings
-
Go to Project Management.
-
Select your desired Project.
-
Go to the Channel section.
-
Select Voice.
-
Click on the Inbound section.

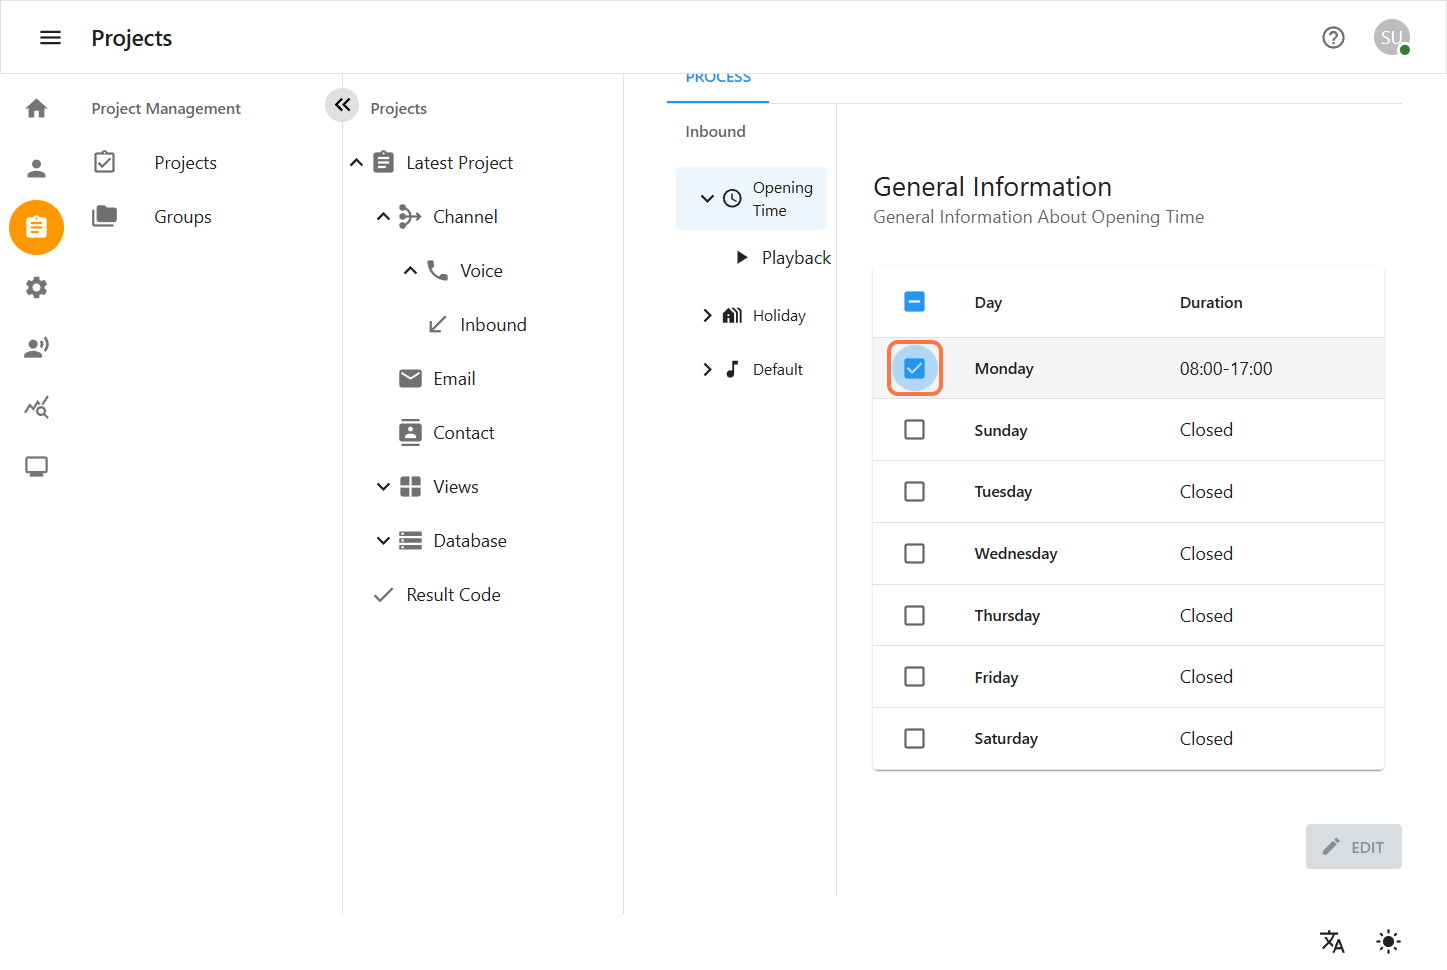
2. Opening Time
The Opening Time section allows you to define your business working hours and days for inbound calls.
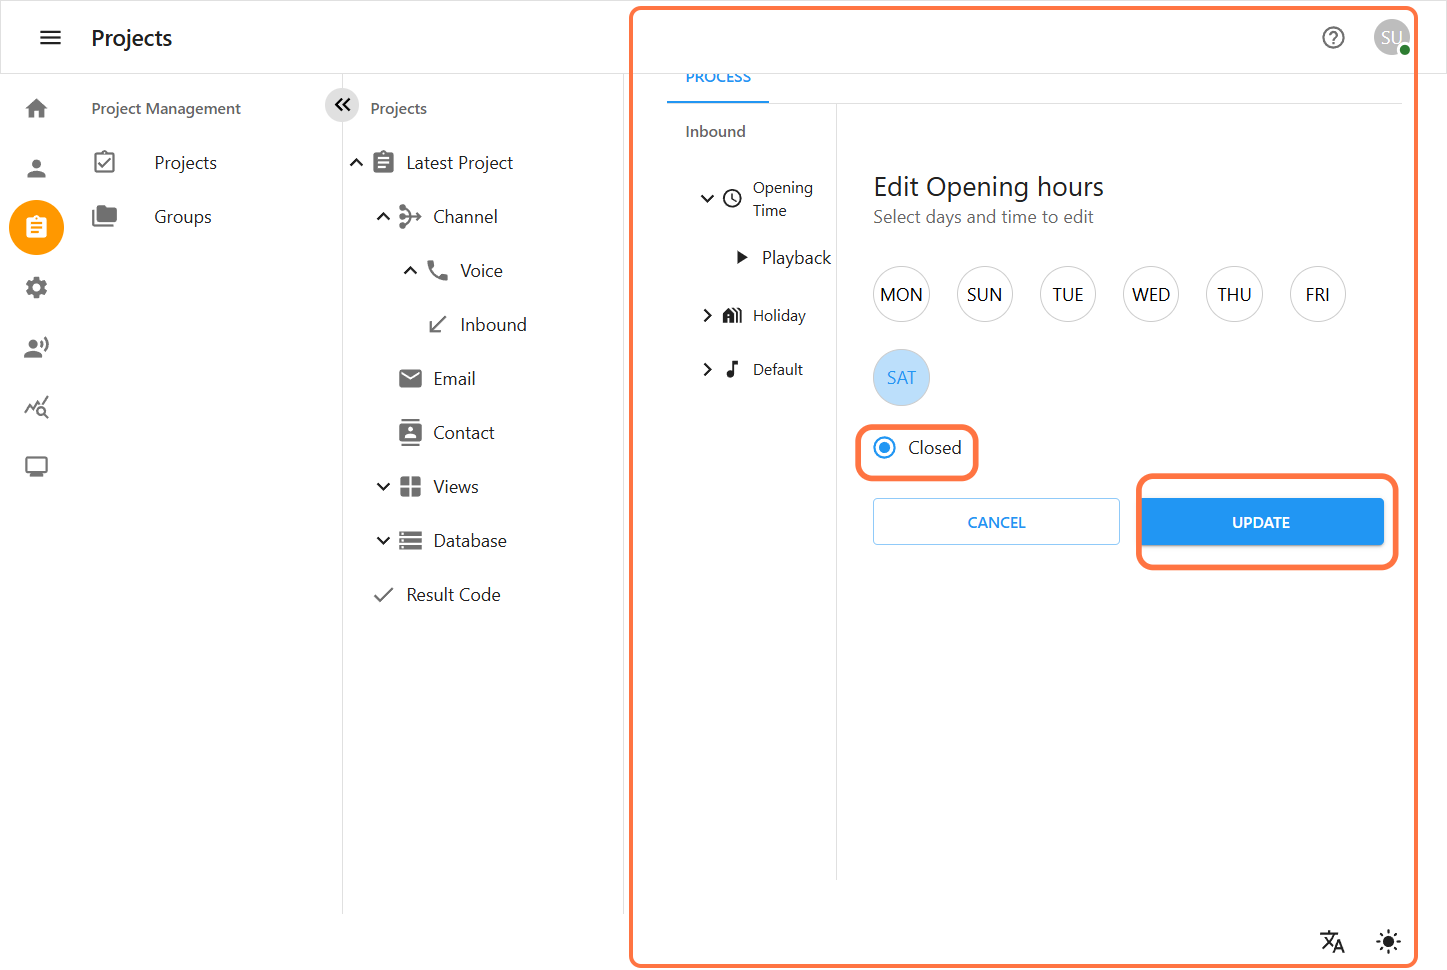
2.1 Add Opening Time
-
Go to Inbound → Opening Time.
-
You will see a predefined list of available opening days (e.g., Sunday to Saturday).
-
Select the day you want to configure.
-
Set the Start Time and End Time for that day (e.g., 09:00 AM – 06:00 PM).
To add multiple shifts or breaks: Click the + Add Another Time Slot button. Define additional Start Time and End Time ranges (e.g., Morning: 09:00 AM – 12:00 PM, Afternoon: 01:00 PM – 05:00 PM).
Click Save to apply the changes.
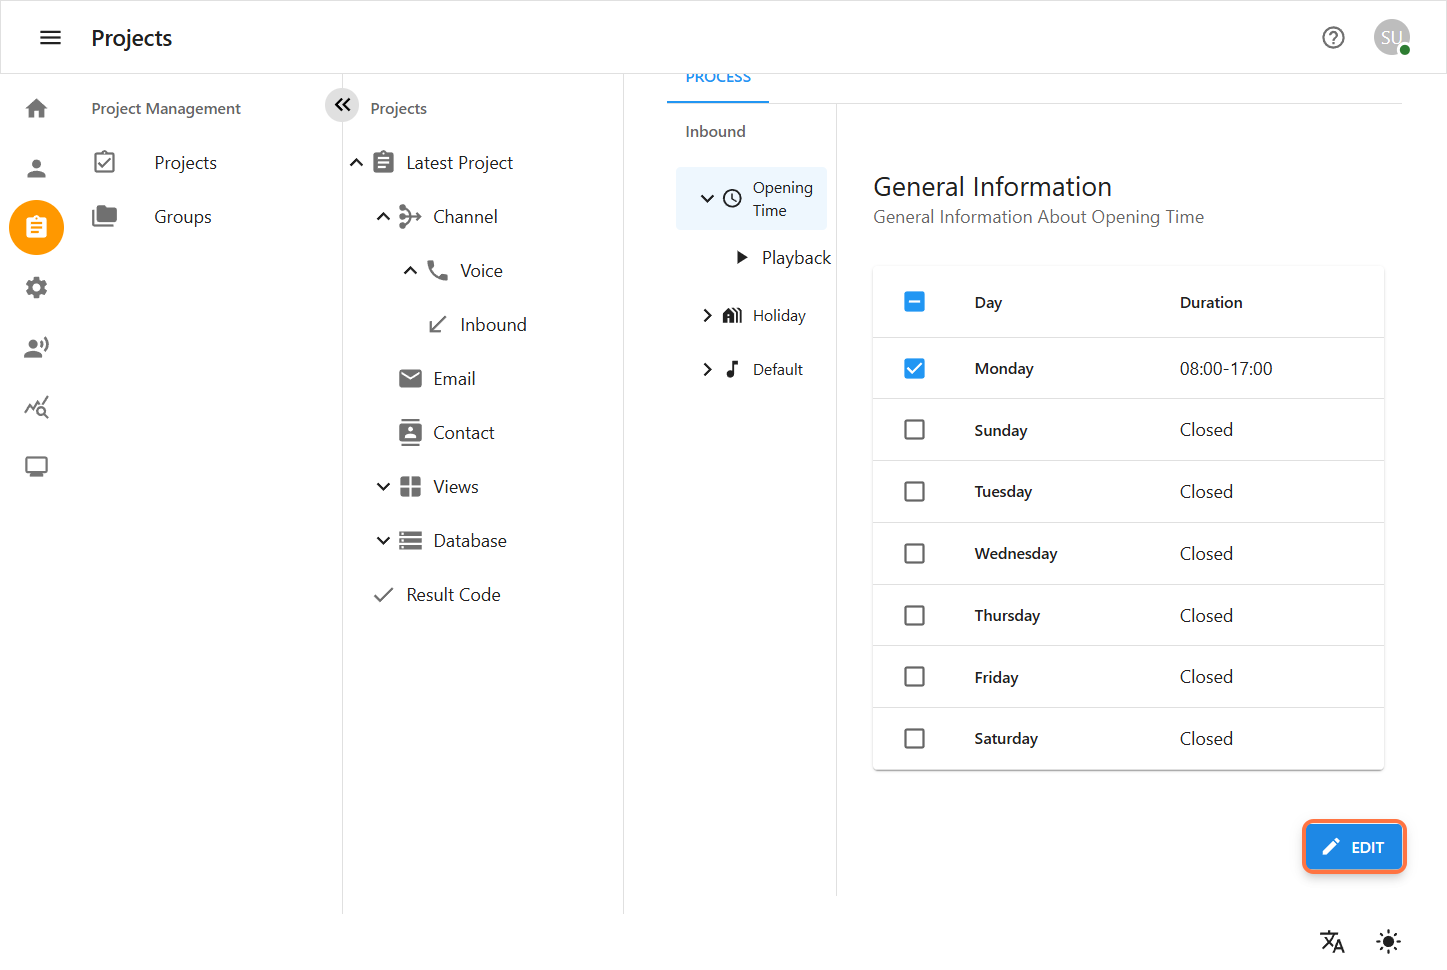
2.2 Edit Opening Time
-
Go to Inbound → Opening Time.
-
Find the day entry you want to edit.
-
Click the Edit (✏️) icon next to it.
-
Update the Start Time and End Time.
-
Click Save.

2.3 Delete Opening Time
-
Locate the day entry you want to update.
-
You cannot directly delete the date/day, but you can update the Start Time and End Time, or change/closed the associated day.
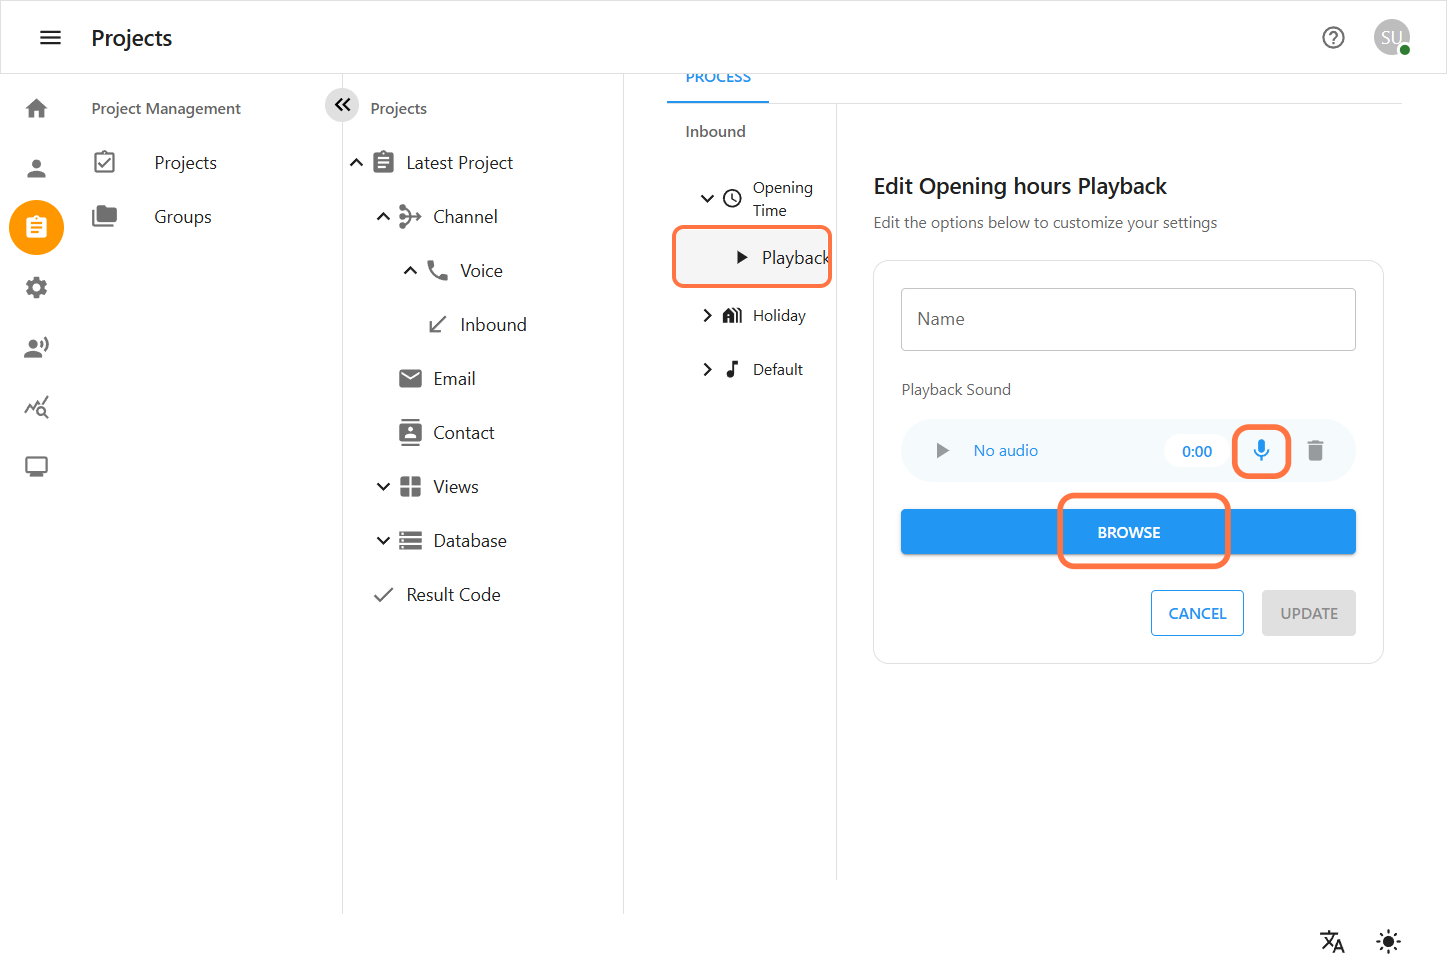
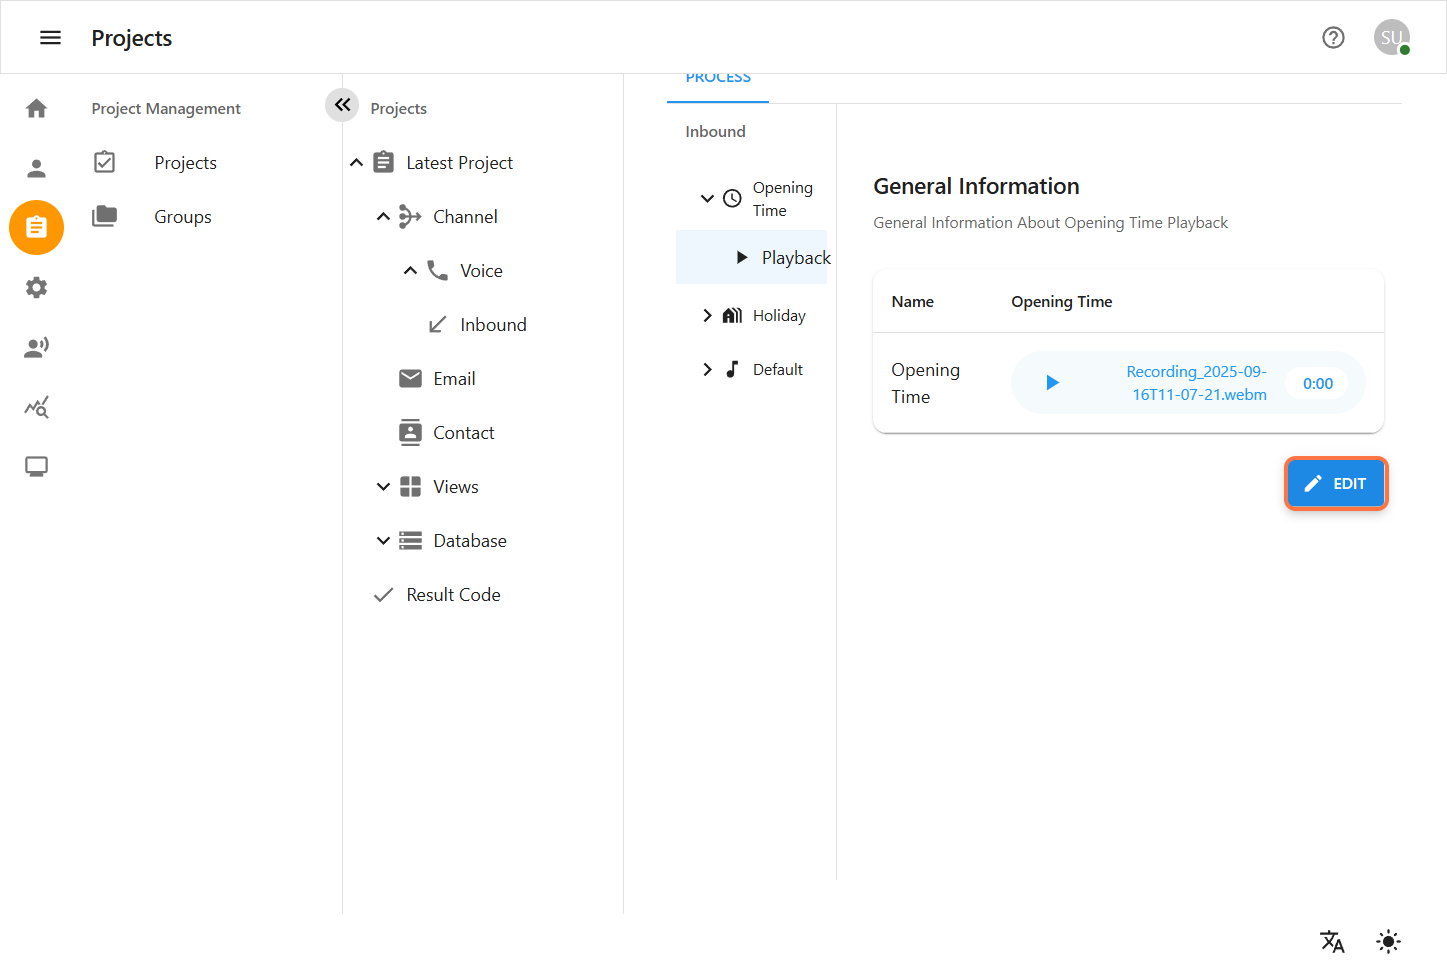
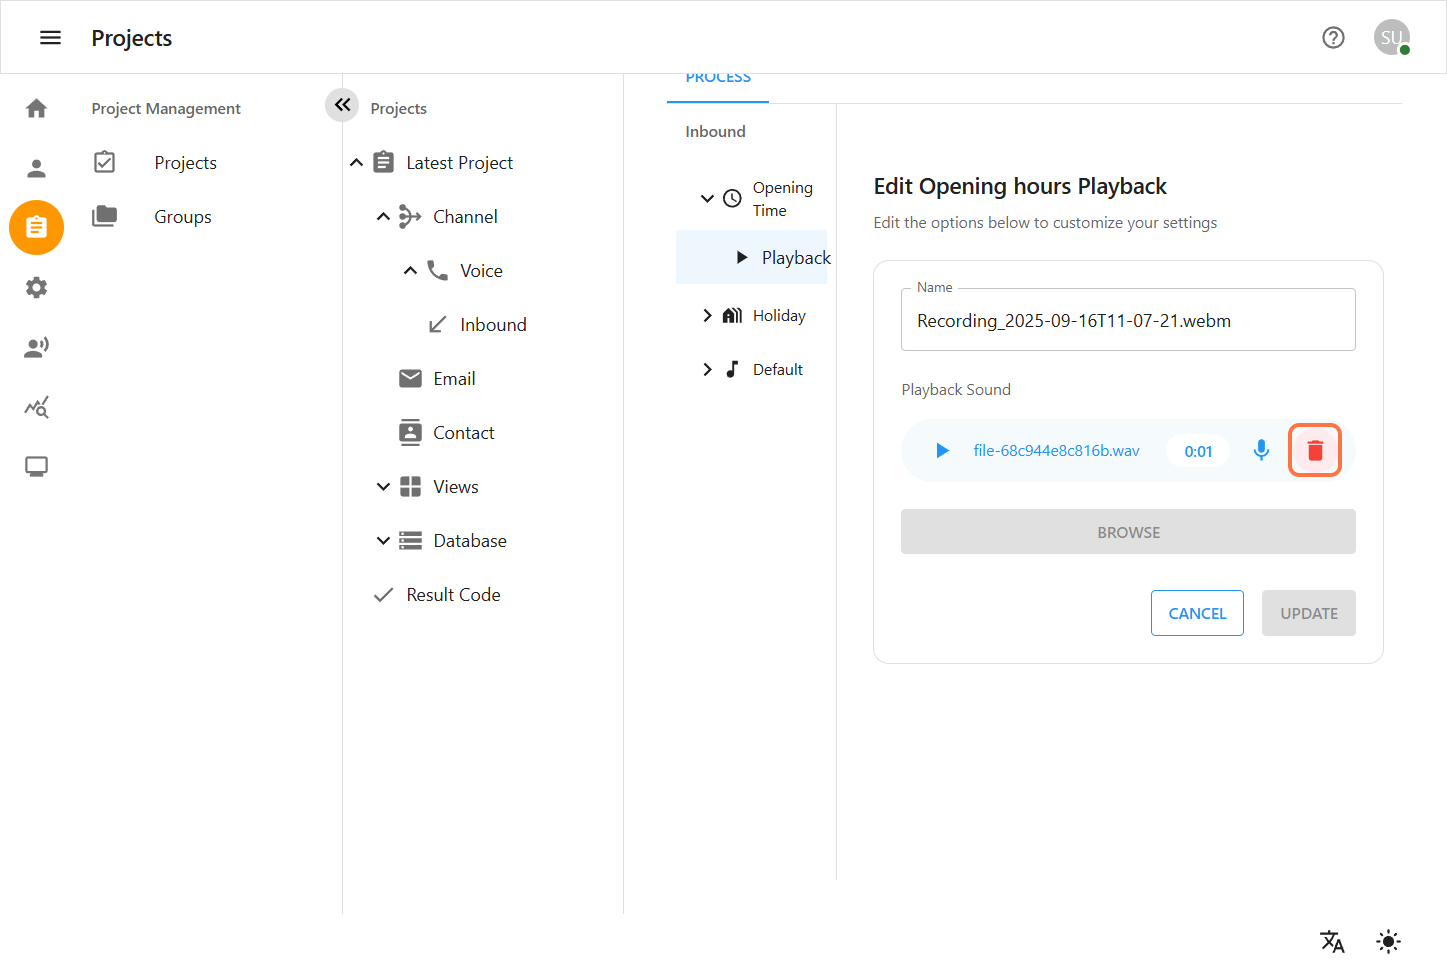
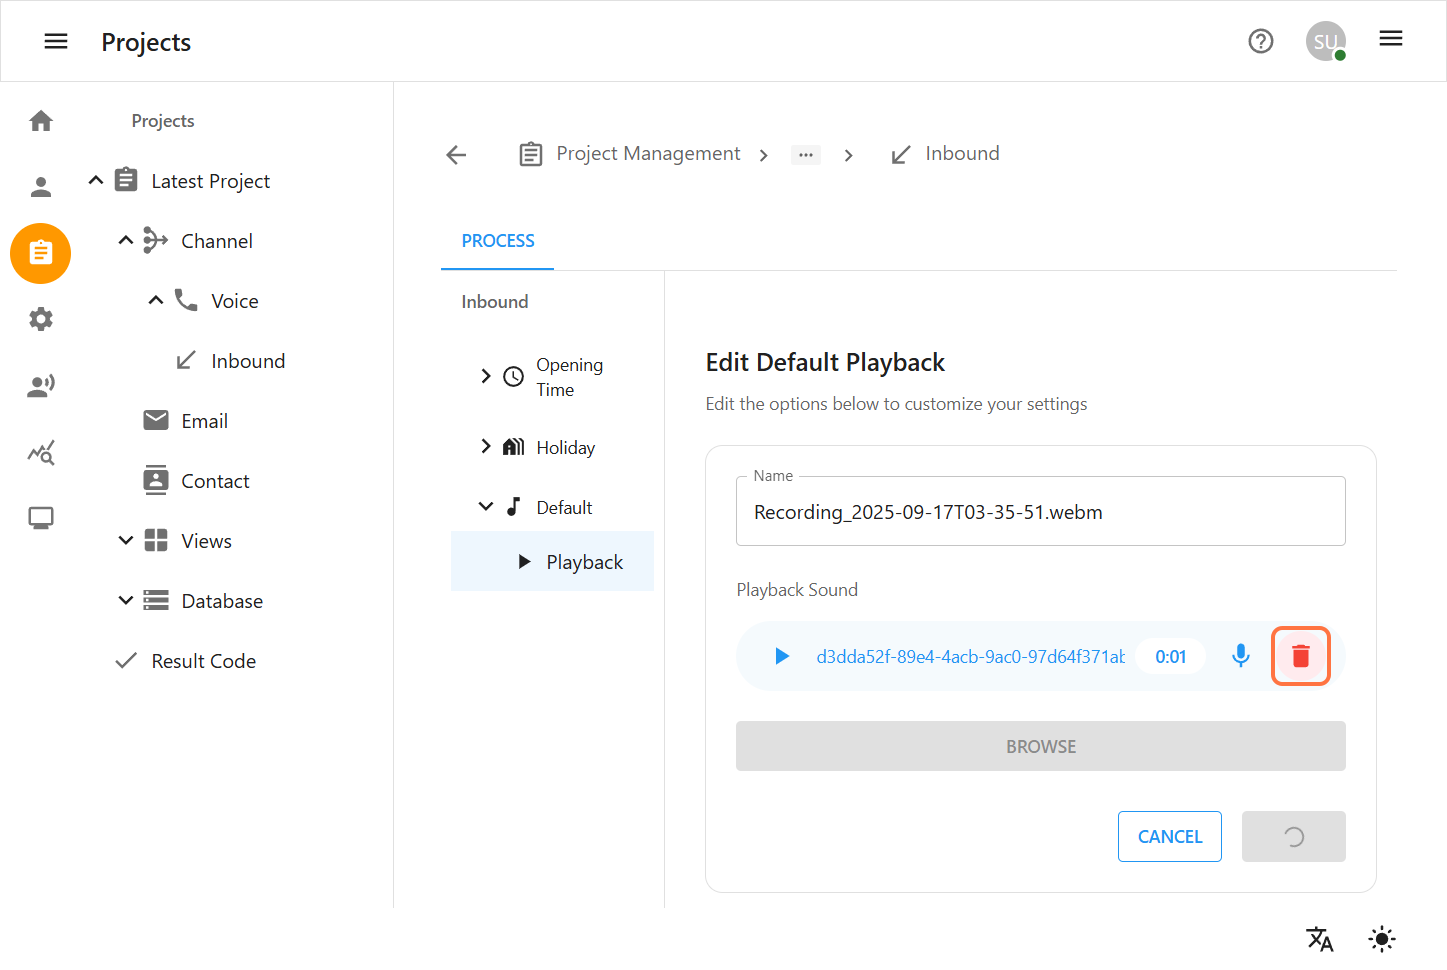
Playback for Opening Time
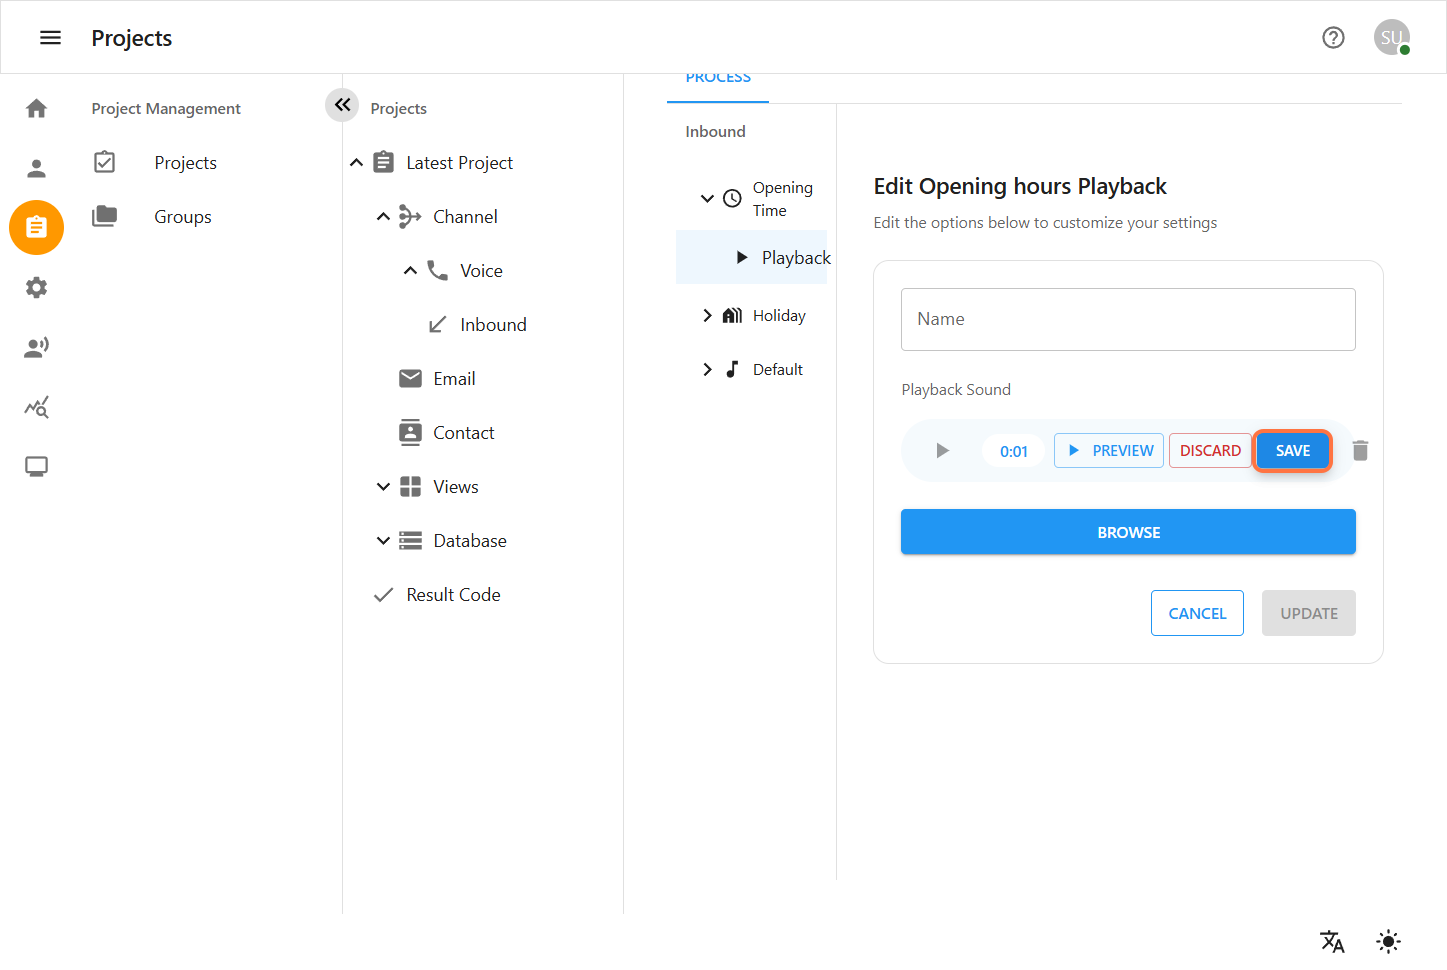
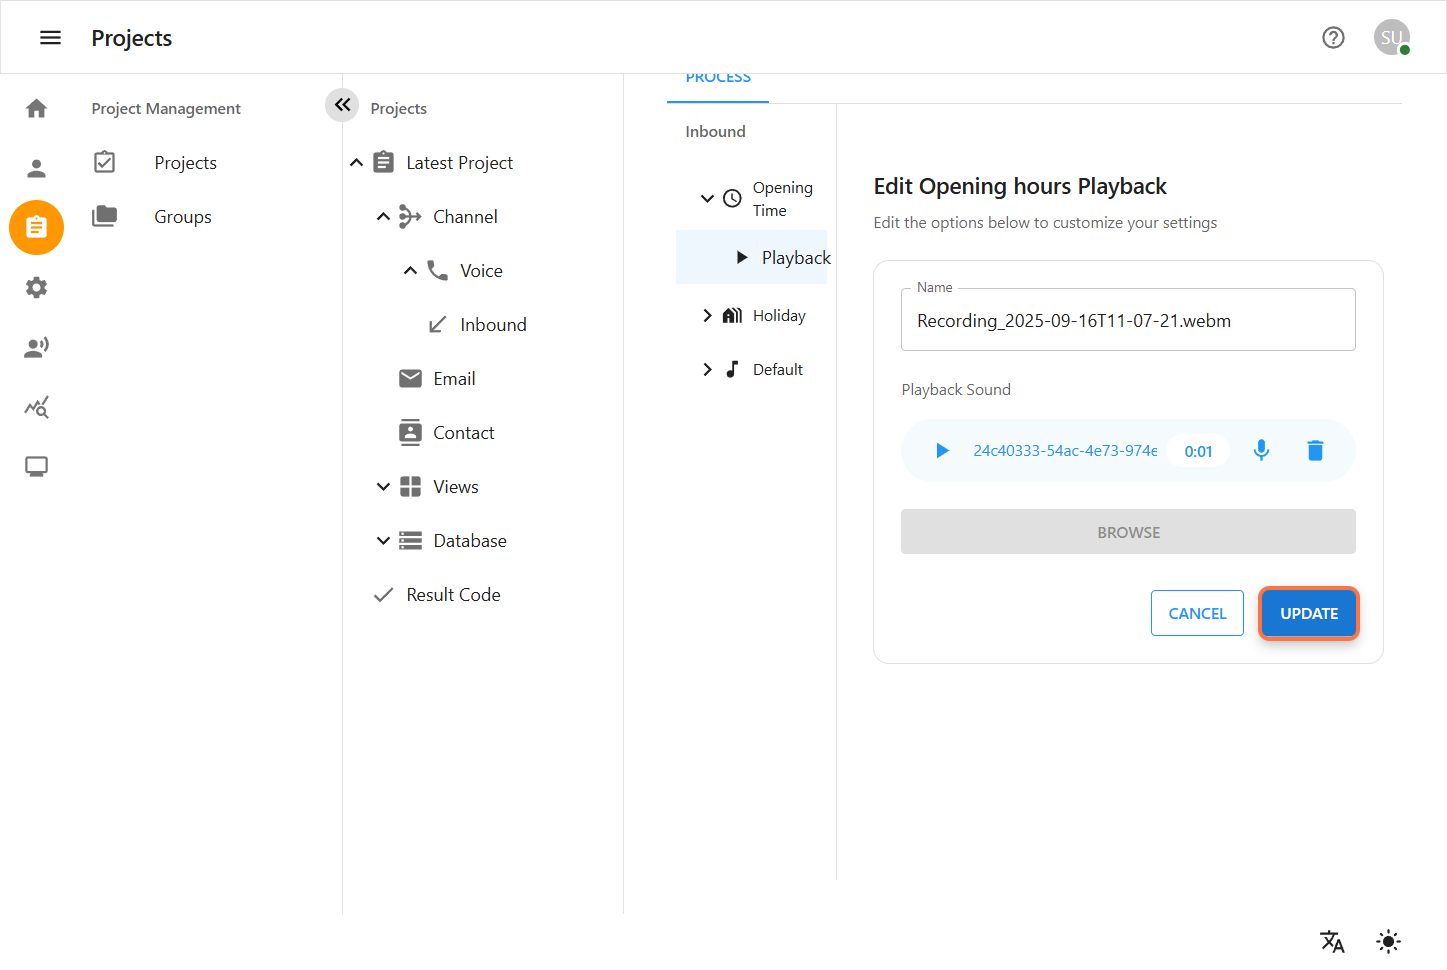
Optional audio configuration:
-
Select an existing Recorded Playback.
-
Click Record New to create a new audio recording.
-
Or click Browse to upload/select an audio file from your device.
Management:
-
Click Edit to modify the selected playback settings.
-
Click Delete to remove the current playback.
-
You can delete an existing playback and replace it with a new file.
Playback Behavior:
-
If a playback is set here, it plays during opening hours.
-
If nothing is set, the system’s Default Playback is used.
-
If no Default Playback is configured, the call is handled by the default Asterisk sound.
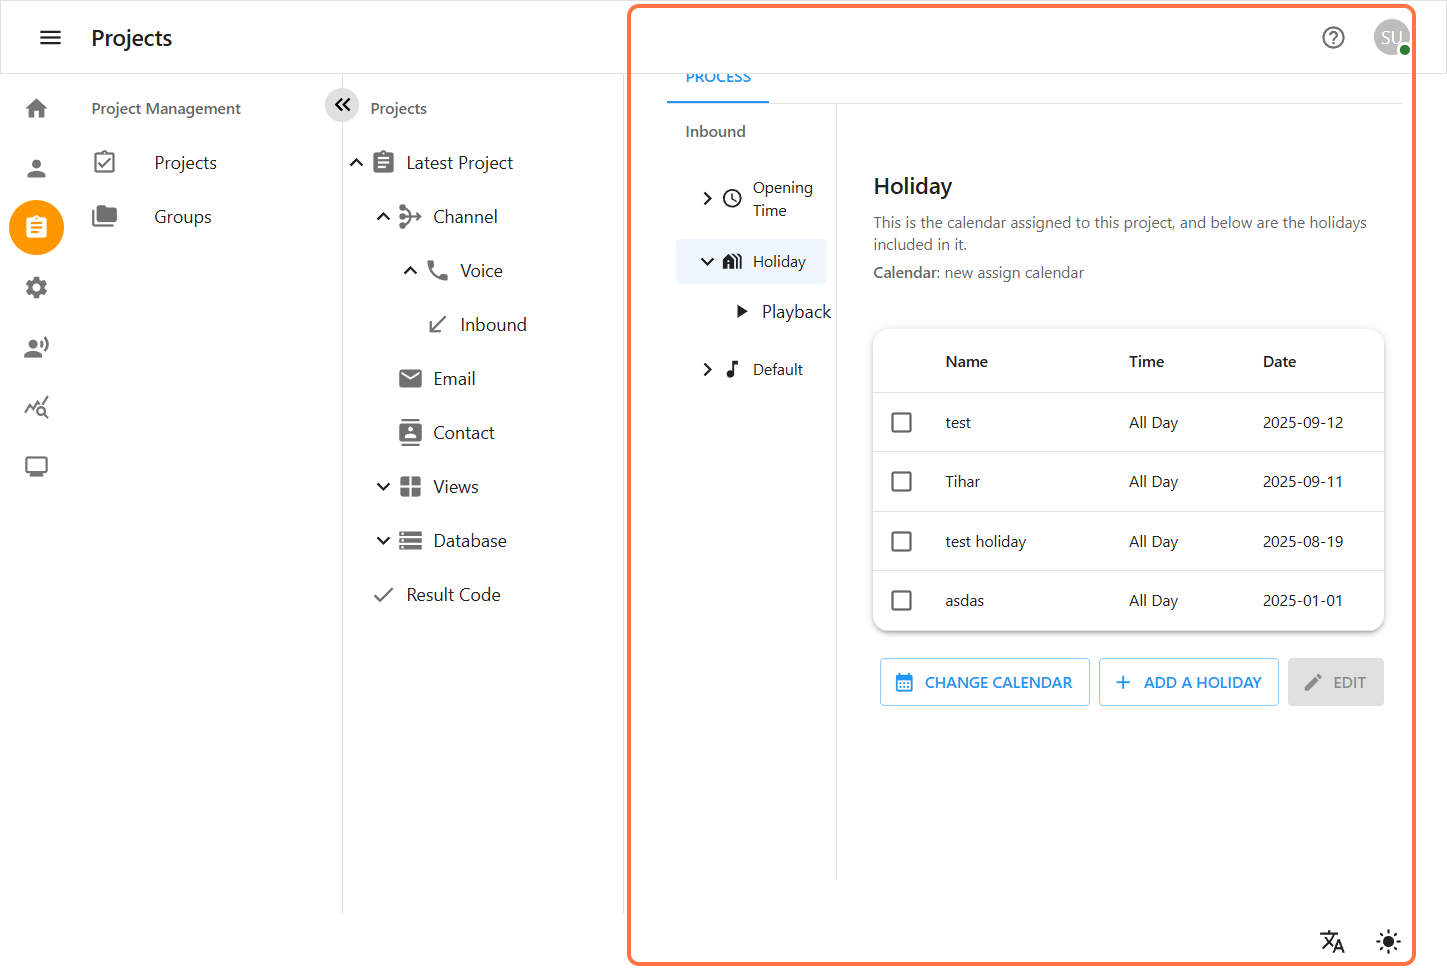
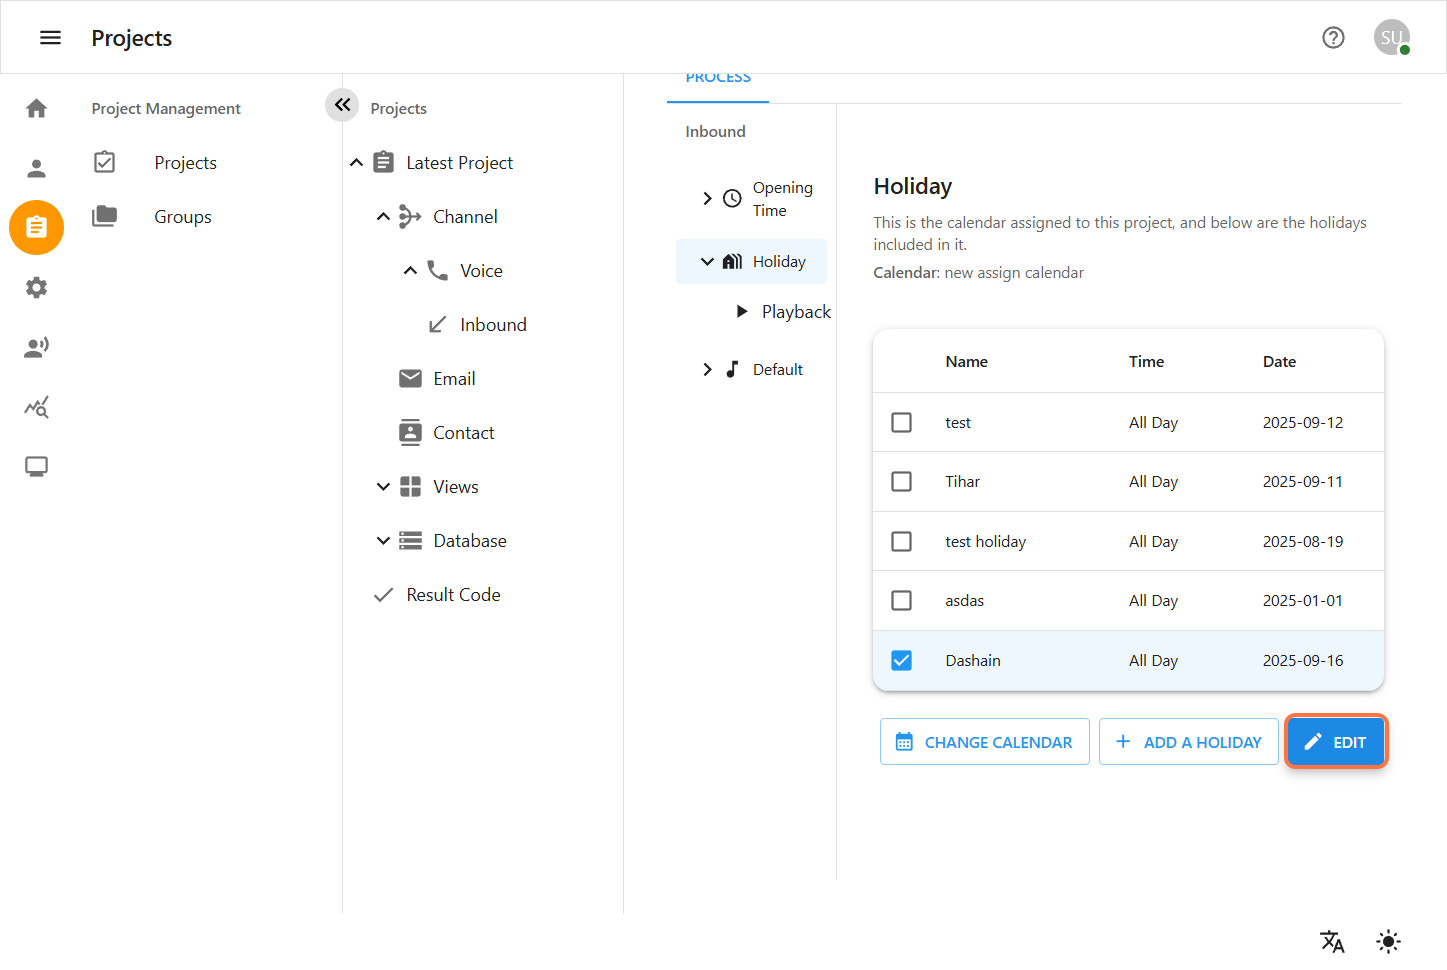
3. Holiday
The Holiday section displays a list of holidays.
3.1 Holiday Adding Process
-
Go to Global Settings → Calendar → Holiday.
-
Once you add the holiday there, the holiday date and holiday list will automatically appear in the Inbound → Holiday section inside the project.
-
This means holidays must be created globally first. After that, you can view and manage them (view, edit) from the Inbound Holiday section of your project.
3.2 View Holiday in Inbound → Holiday Section
After holidays are added from Global Settings, they will display inside Inbound → Holiday with the following details:
-
Name – The holiday name (e.g., Christmas Day)
-
Date – The holiday date
-
Type – The holiday type (e.g., Public Holiday, Company Leave)
-
Time – If applicable, the specific holiday time
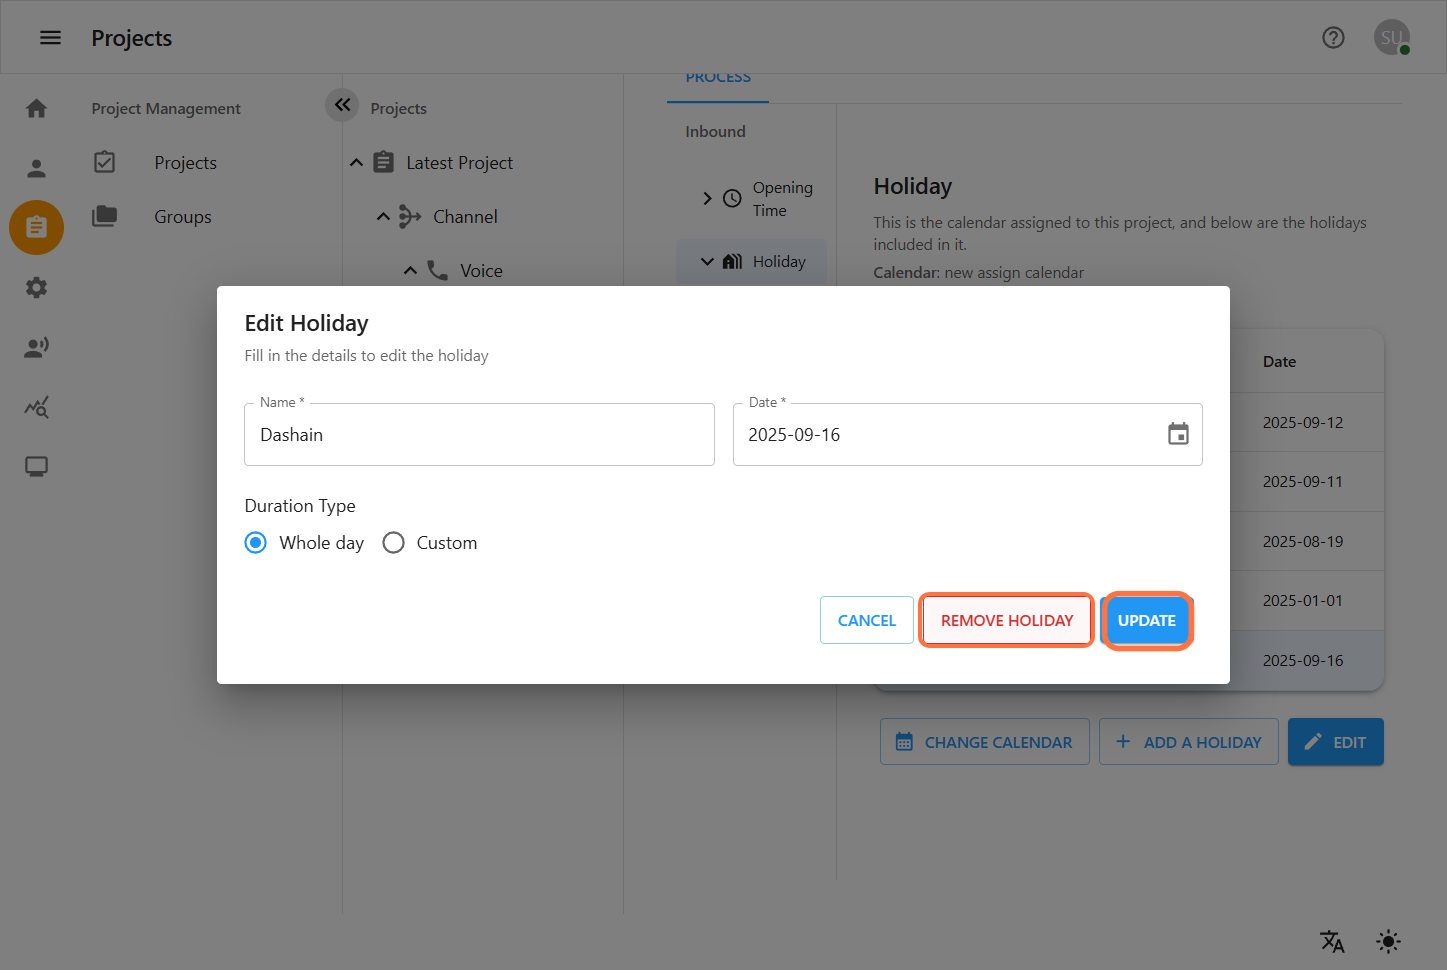
3.3 Edit Holiday
-
First, holidays must be created in Global Settings → Calendar → Holiday. This ensures that all projects have a consistent list of official holidays.
-
In Inbound → Holiday for your project, you can:
-
Select a calendar that has been set in the Global Settings.
-
View all holidays that have been added globally.
-
Add new holidays specific to this project if needed from here, without affecting the global calendar.
-
-
For each holiday, you can update the following details:
-
Holiday Name – The name of the holiday (e.g., Christmas Day).
-
Date – The specific date of the holiday.
-
Type – The holiday type (e.g., Public Holiday, Company Leave).
-
Time – If applicable, set a specific time range for the holiday.
-
-
Click Save.


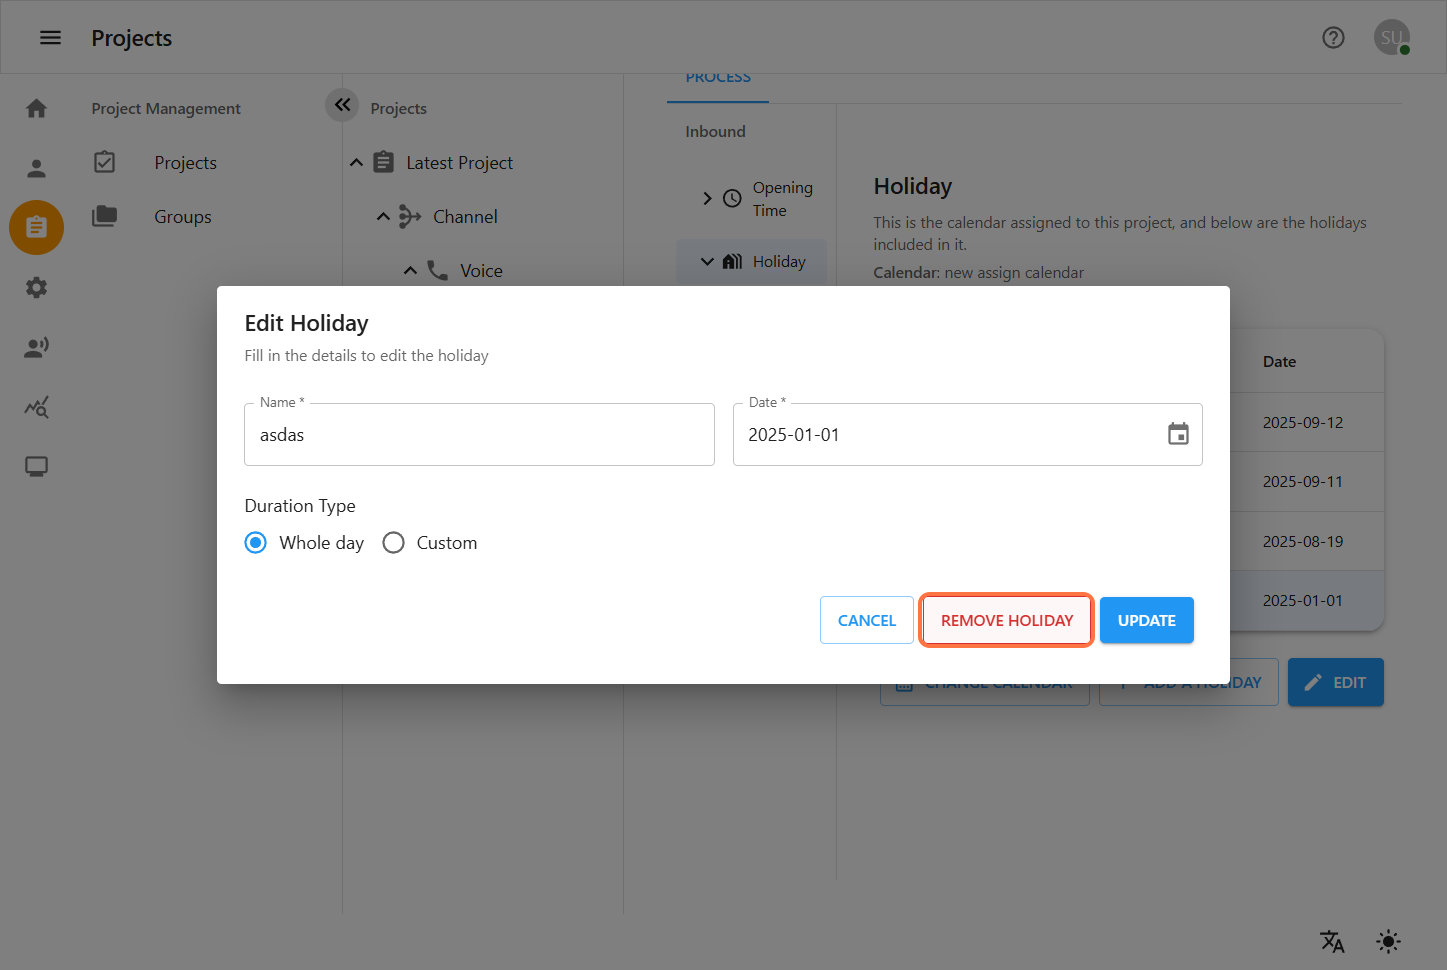
3.4 Delete Holiday
-
Go to Global Settings → Calendar.
-
Locate the holiday you want to delete.
-
Click the Delete (🗑️) icon.
-
Confirm the deletion.

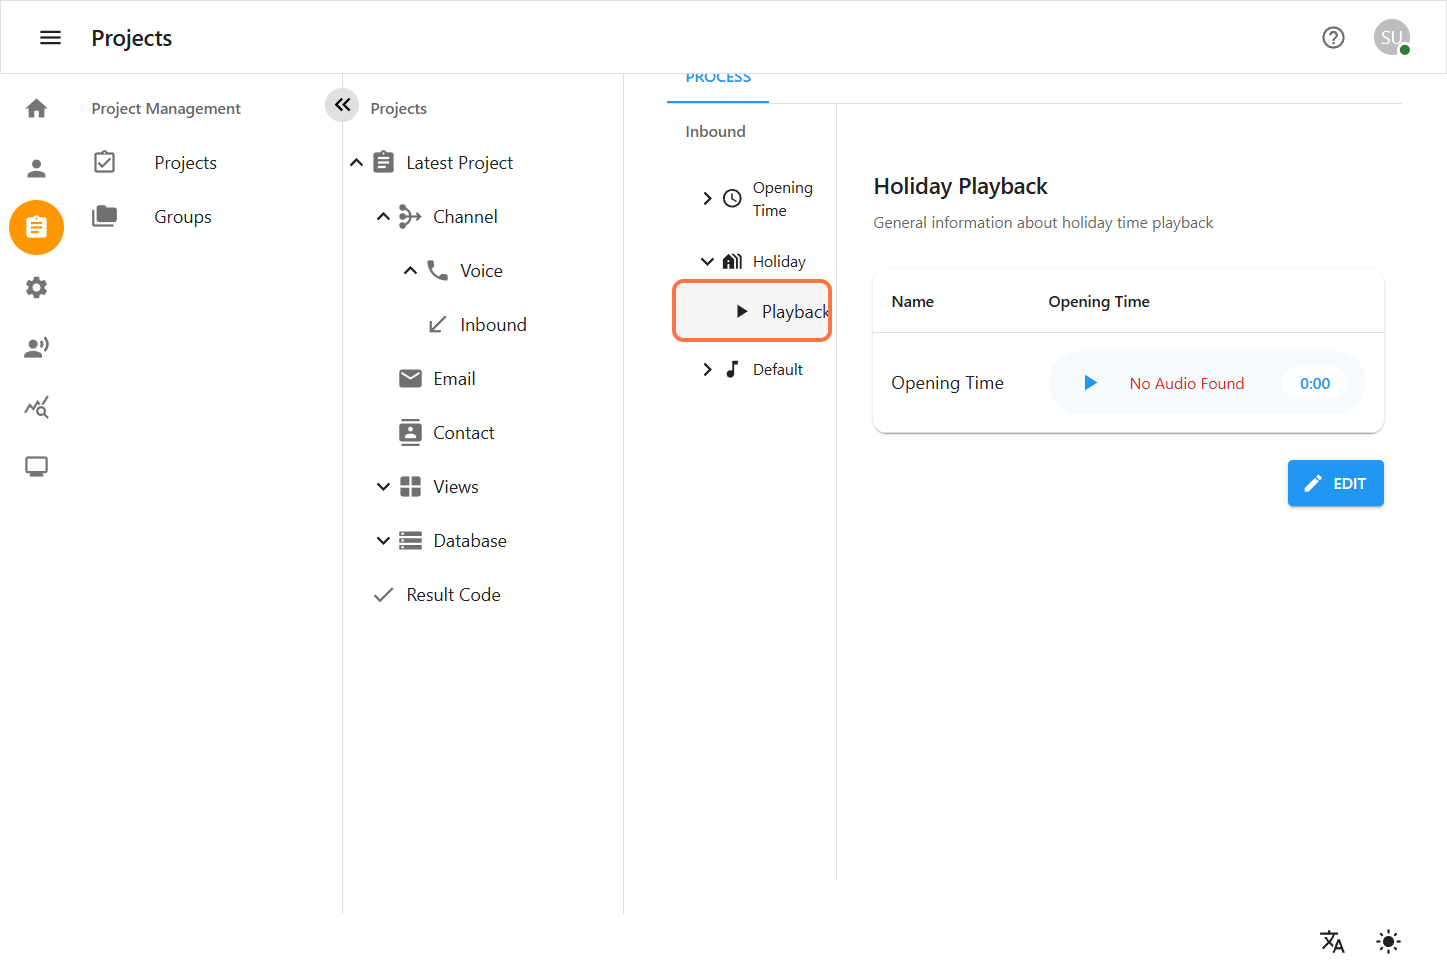
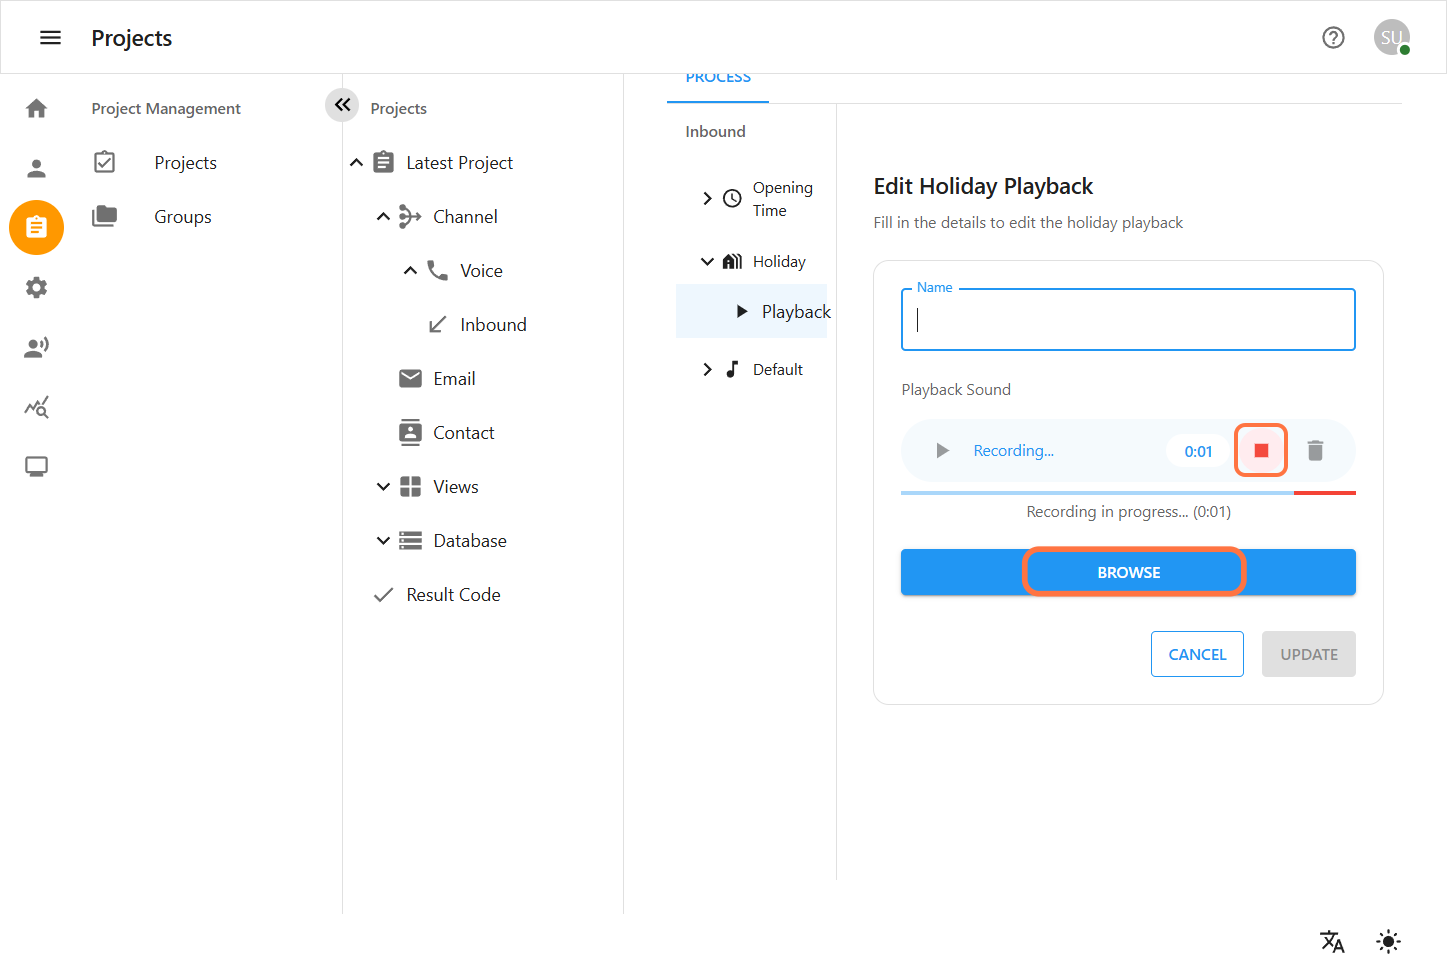
Playback for Holiday
Optional audio configuration:
-
Select an existing Recorded Playback.
-
Or click Browse to upload/select a new audio file.
You can also delete an existing playback and replace it with a new file.
Playback Behavior:
-
If a playback is set here, it plays on the specified holiday.
-
If nothing is set, the system’s Default Playback is used.
-
If no Default Playback is configured, the call is handled by the default Asterisk sound.

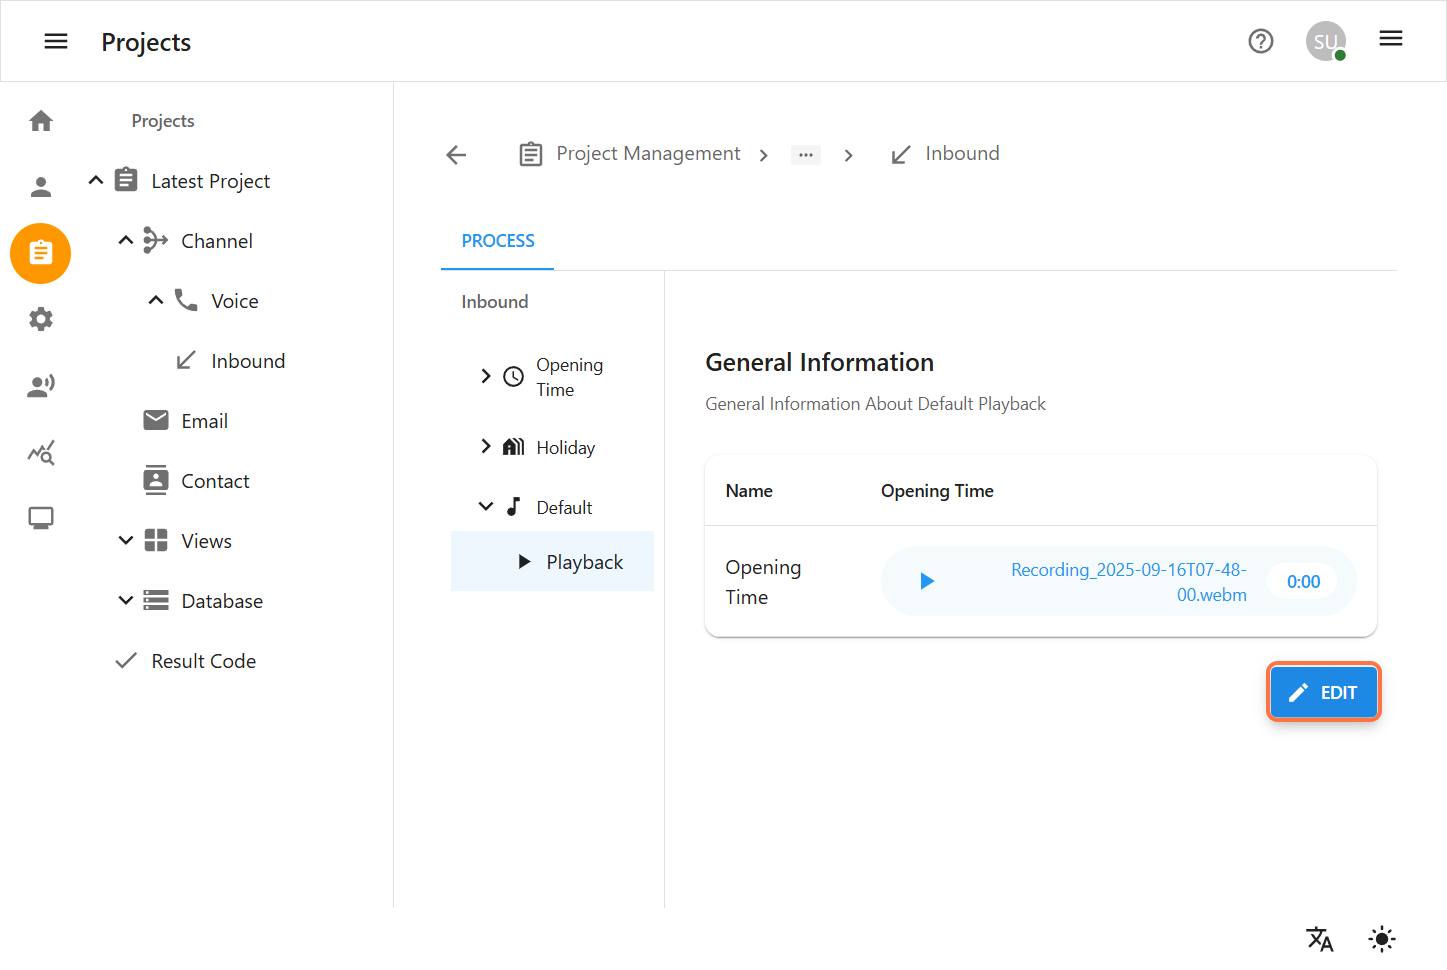
4. Default
The Default section defines how calls are handled outside Opening Time or during Holidays.
Possible Default Actions (Depending on Platform Setup)
-
Play a custom message (e.g., "We are currently closed, please call back during business hours.")
-
Redirect calls to voicemail
-
Forward to another number or channel
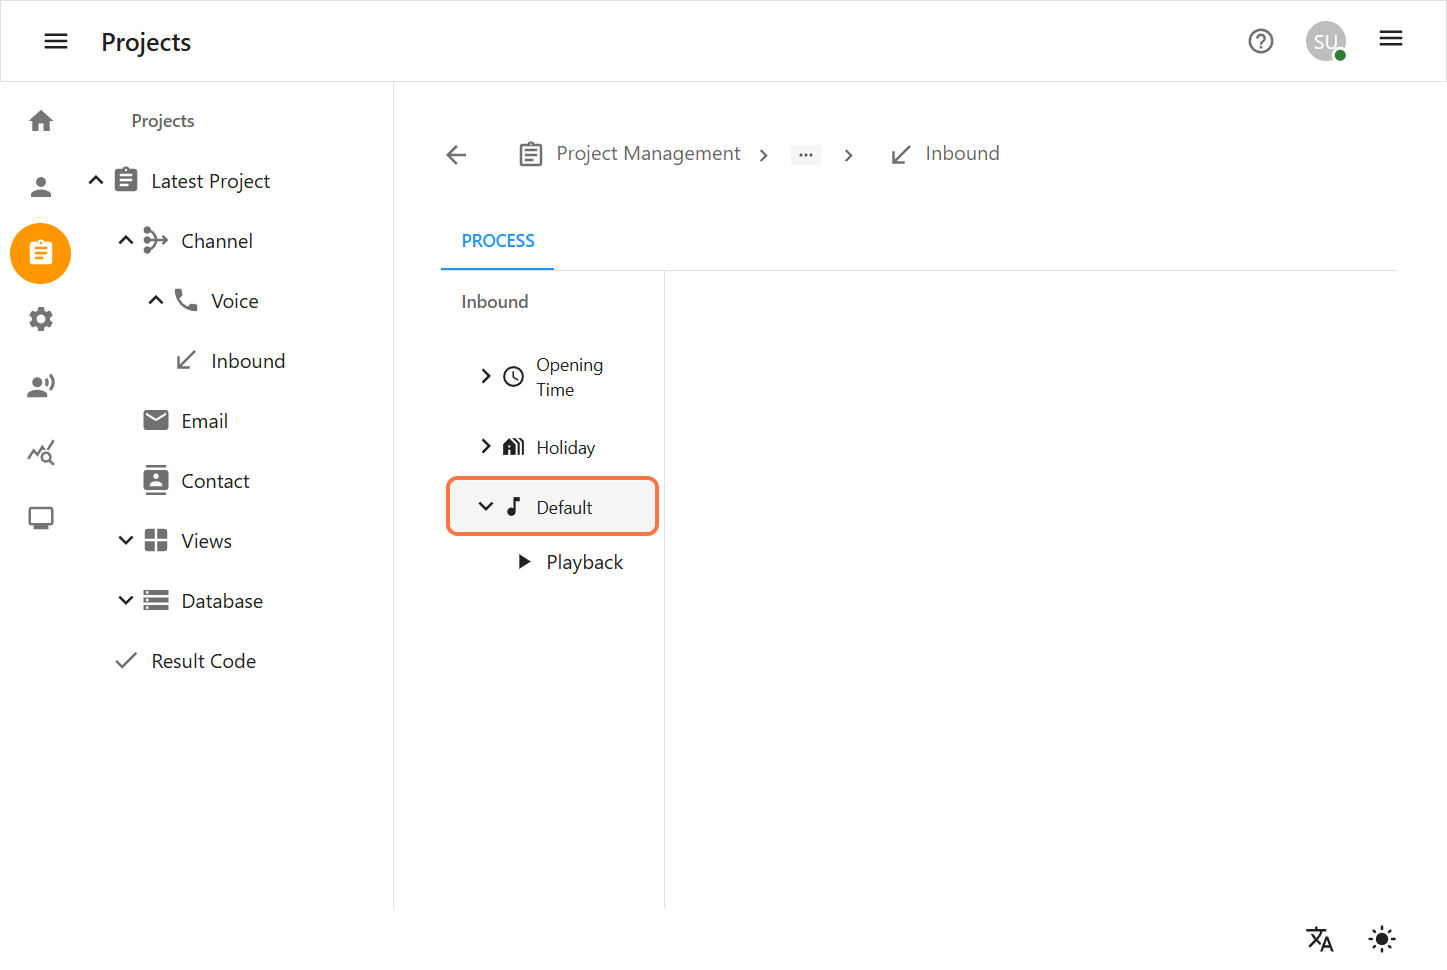
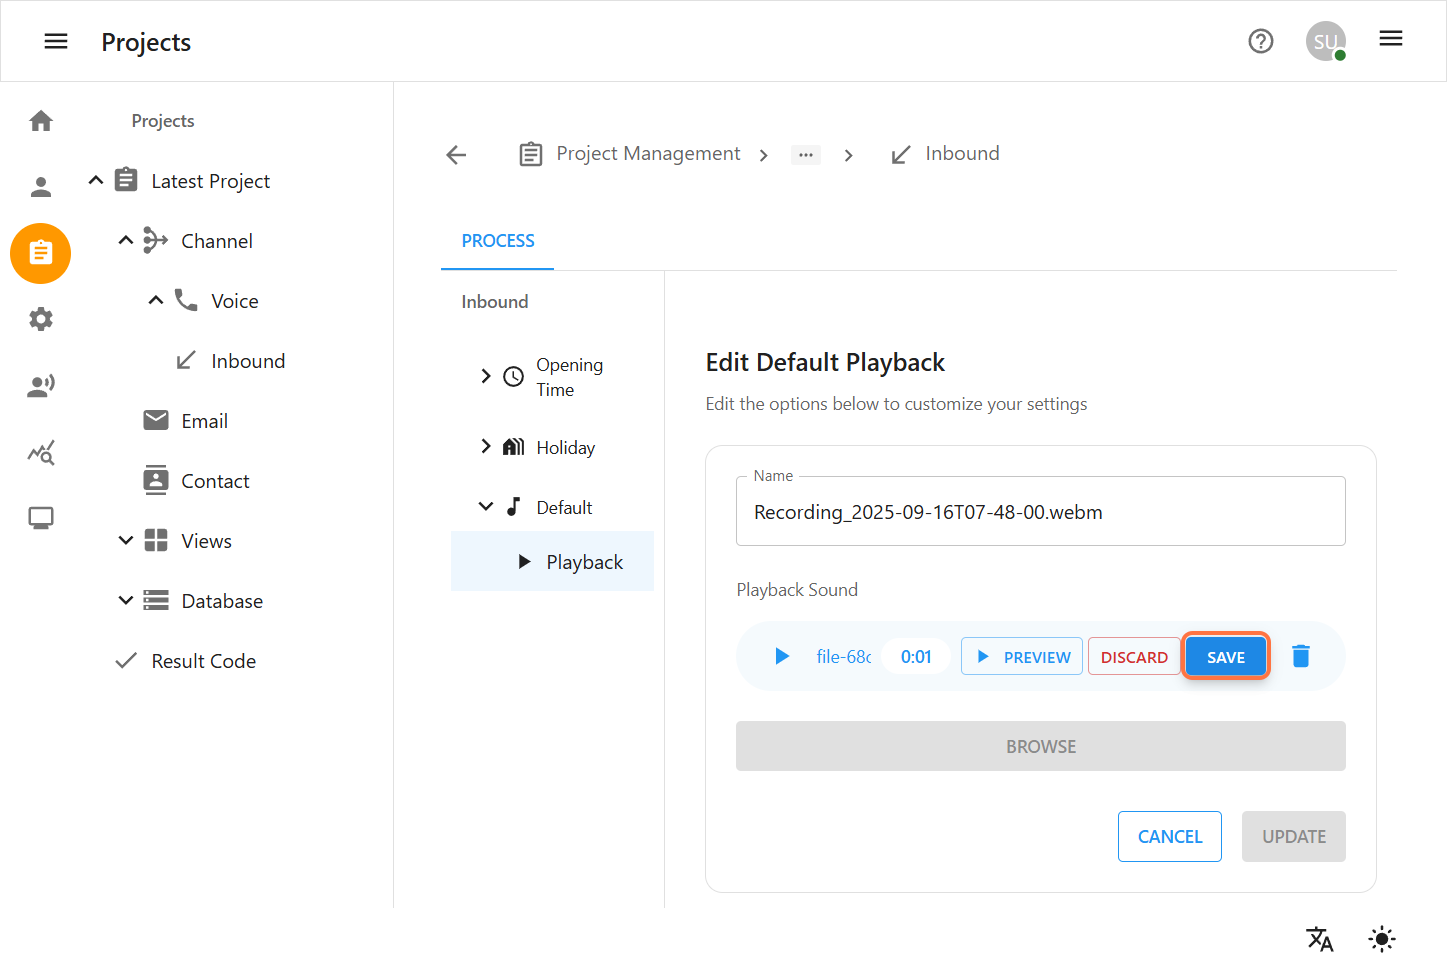
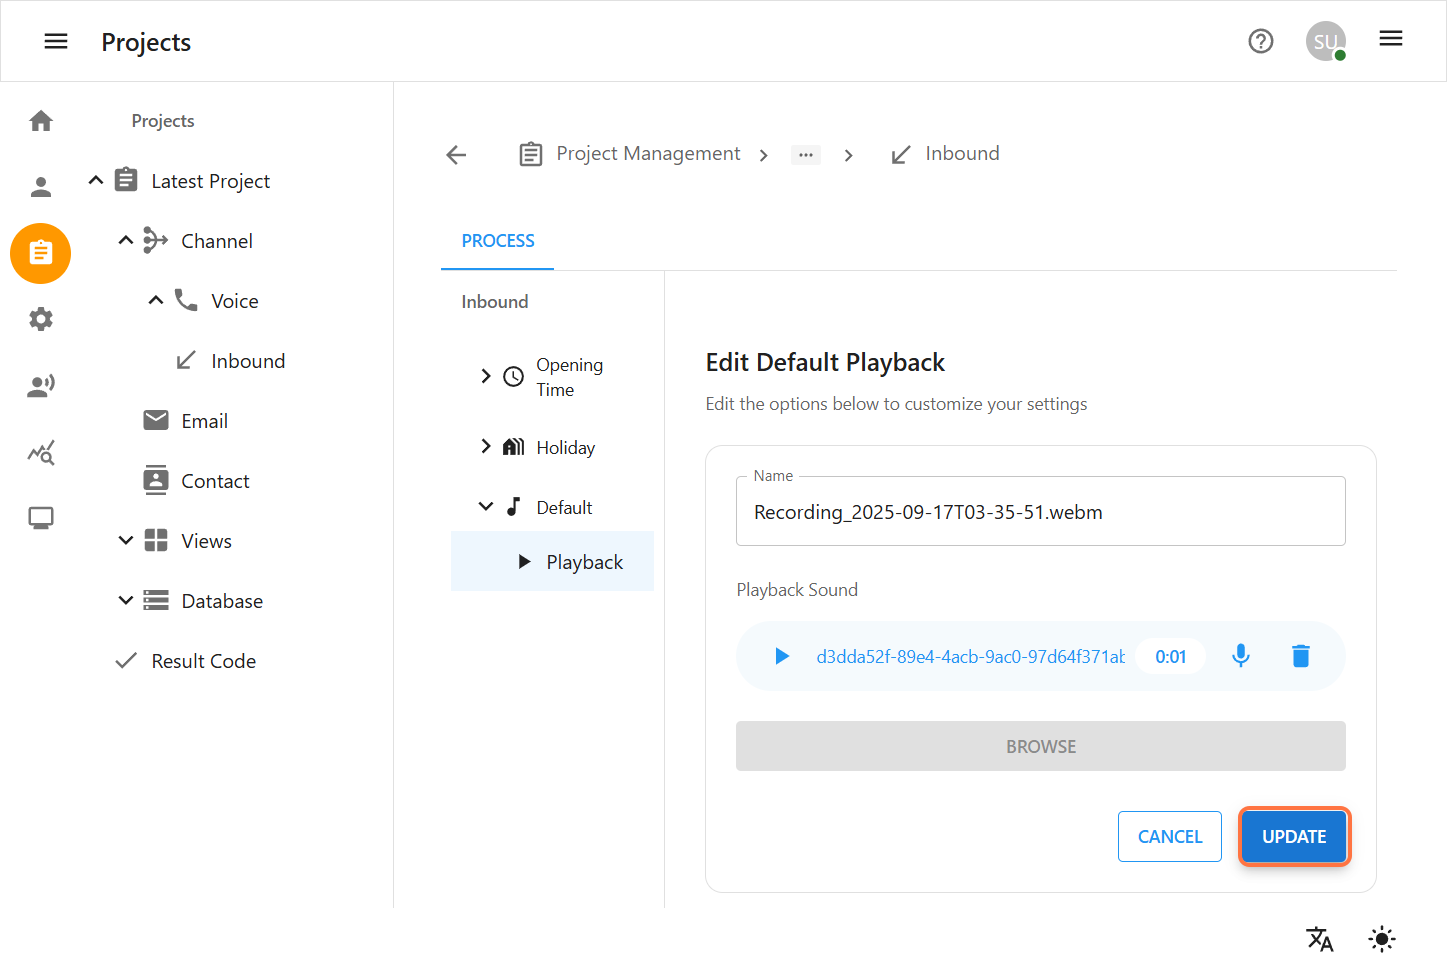
Playback for Default
Optional audio configuration:
-
Select an existing Recorded Playback.
-
Or click Browse to upload/select a new audio file.
You can also delete existing playback and replace it with a new file.
Playback Behavior:
-
This audio serves as the default greeting when no specific playback is configured for a time period (e.g., opening hours, holidays).
-
If no playback is set here, the system will use the built-in Asterisk default sound.
-
This default playback acts as a fallback for all call scenarios without custom audio.


Email Template Over View
Email Templates are reusable message formats used for consistent project communication. They include a message body, attachments, and optional result codes. Users can create, edit, or delete templates, and insert dynamic data using predefined fields and views.
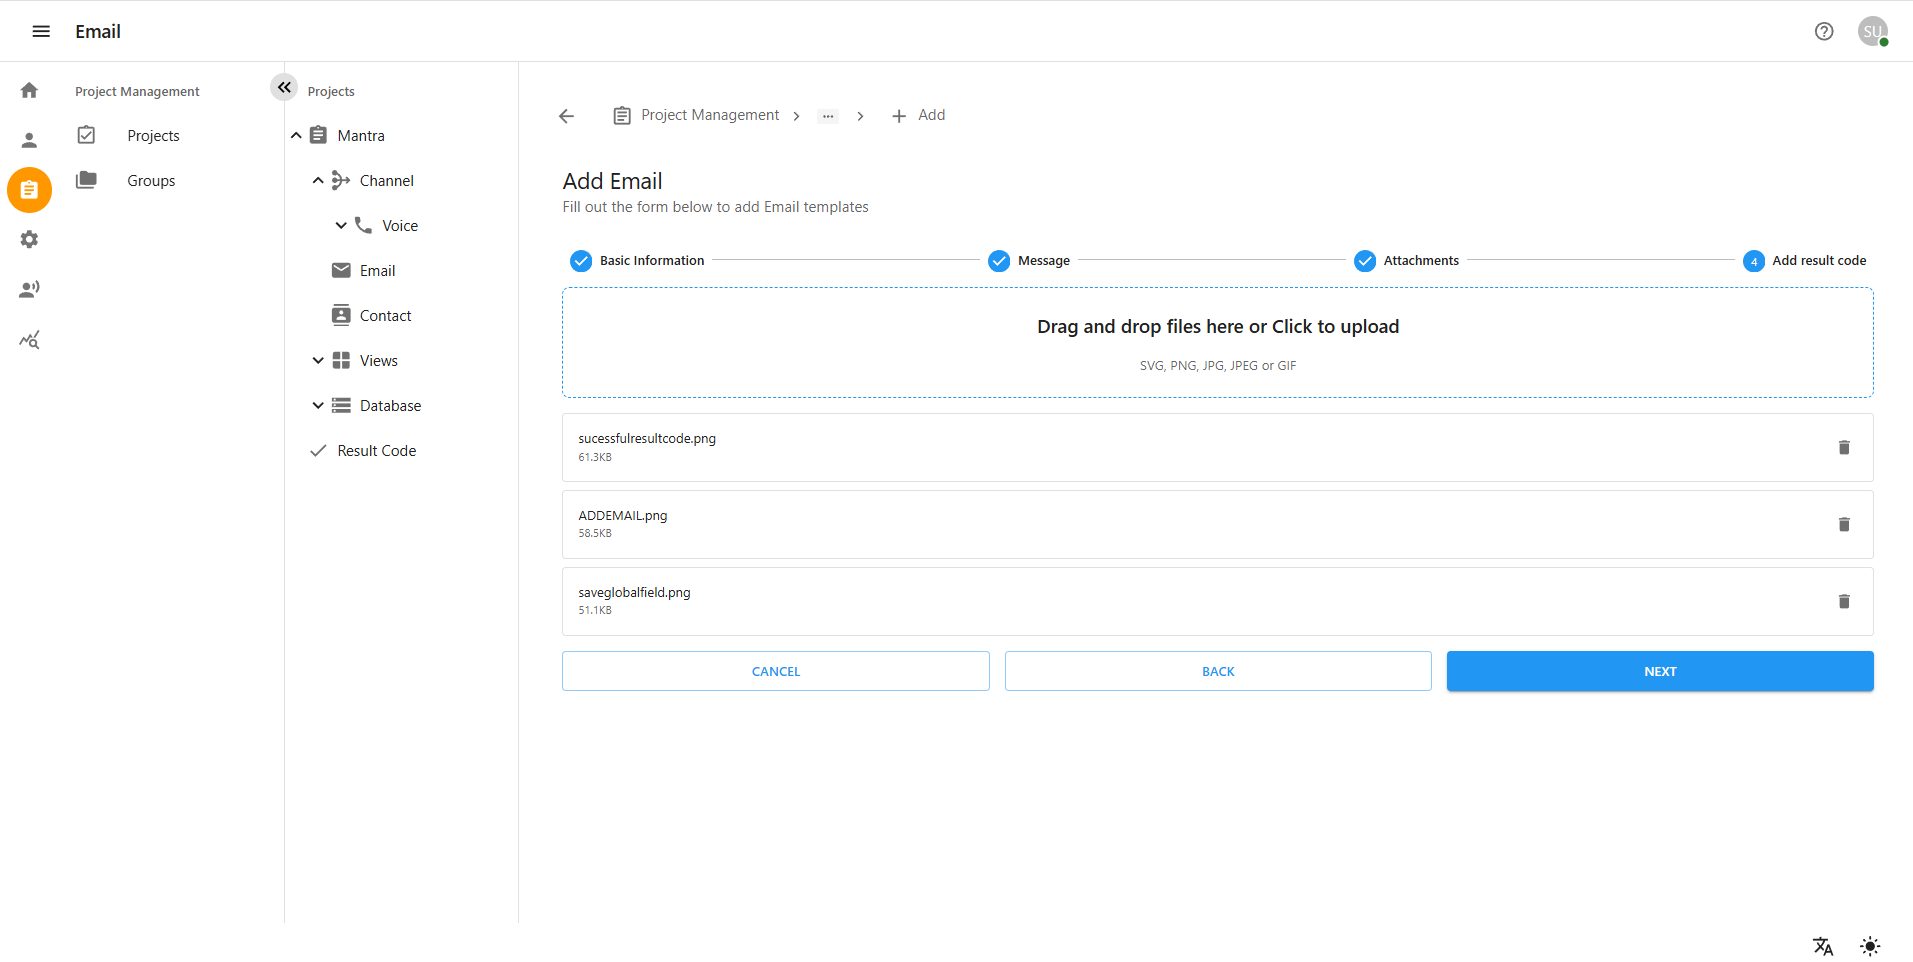
1. Creating Email Templates
-
Go to Project Management > Projects > [Your Project] > Channel > Email
-
Click + ADD to create a new template
-
Follow the multi-step form:
Step 1: Basic Information
-
Template Name: Name of the email format used repeatedly.
-
Subject :The email’s title or main topic.
-
Recipient(s) : The main person or group the email is sent to. Recipients are typically the contacts associated with the respective projects. Users can also manually add recipients by directly typing their email addresses.
-
CC / BCC : Additional people included visibly (CC) or privately (BCC).
-
Sender profile :The identity or role of the person sending the email.
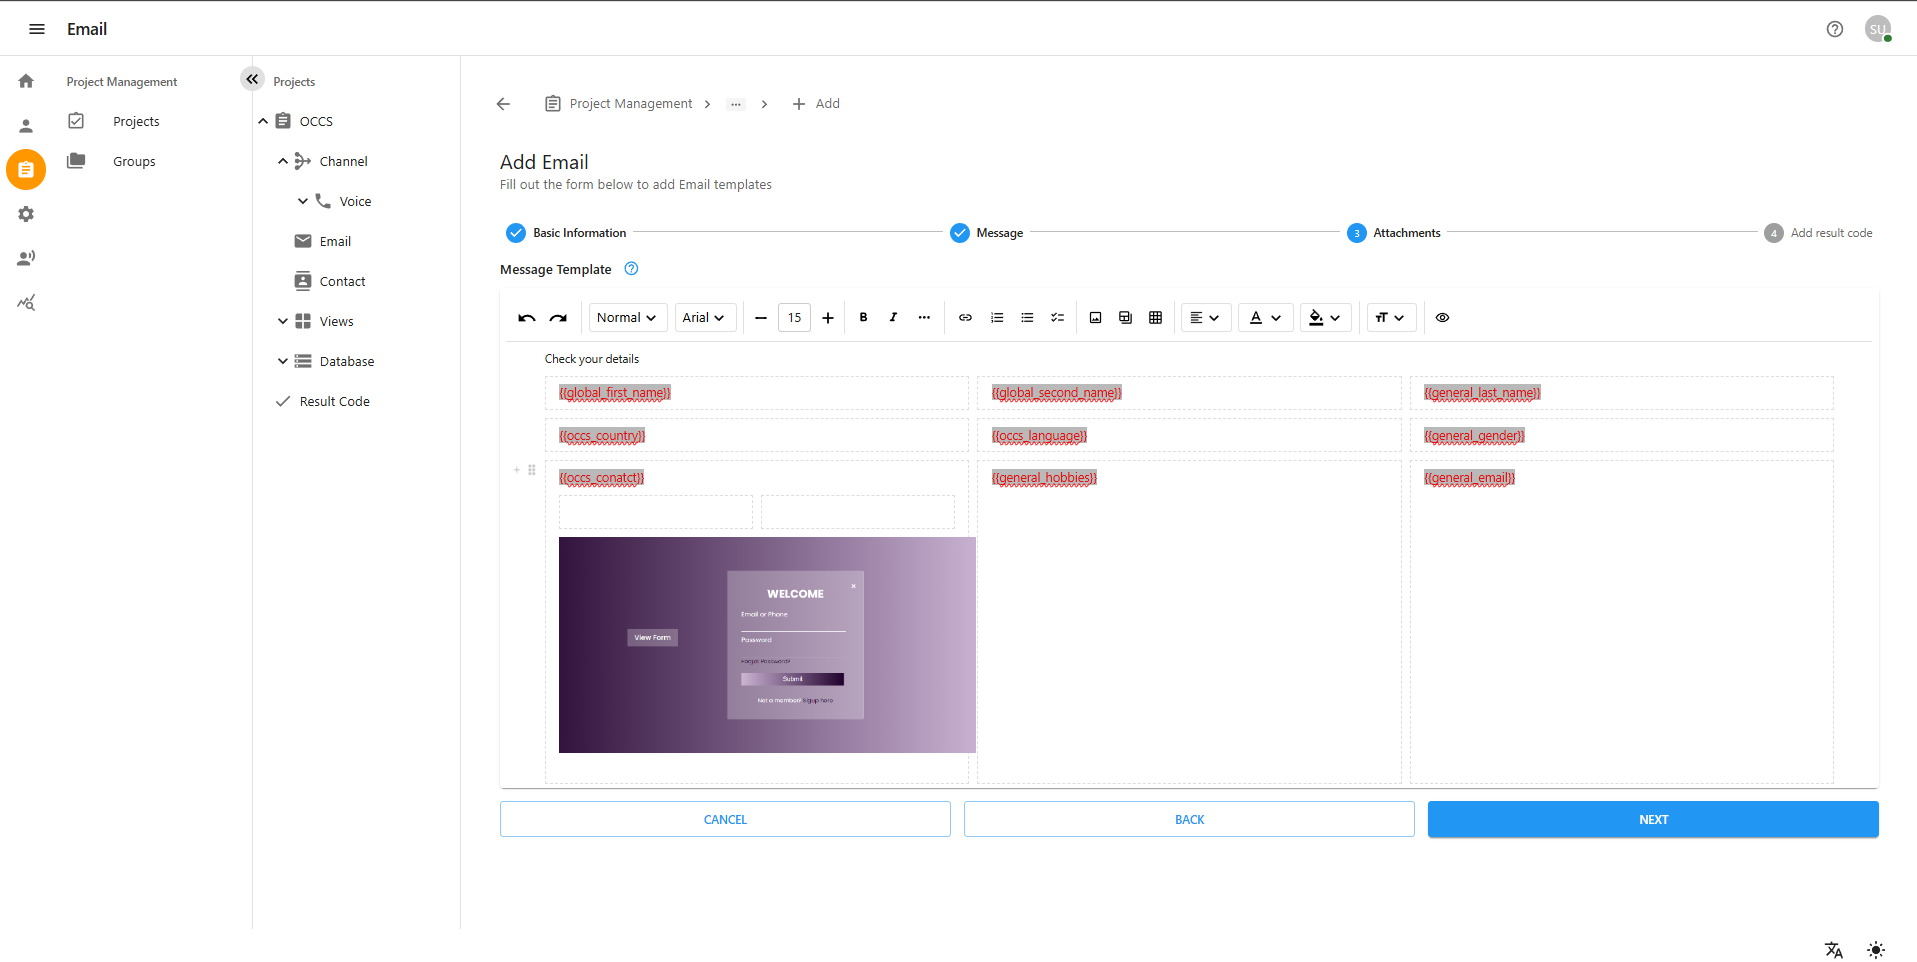
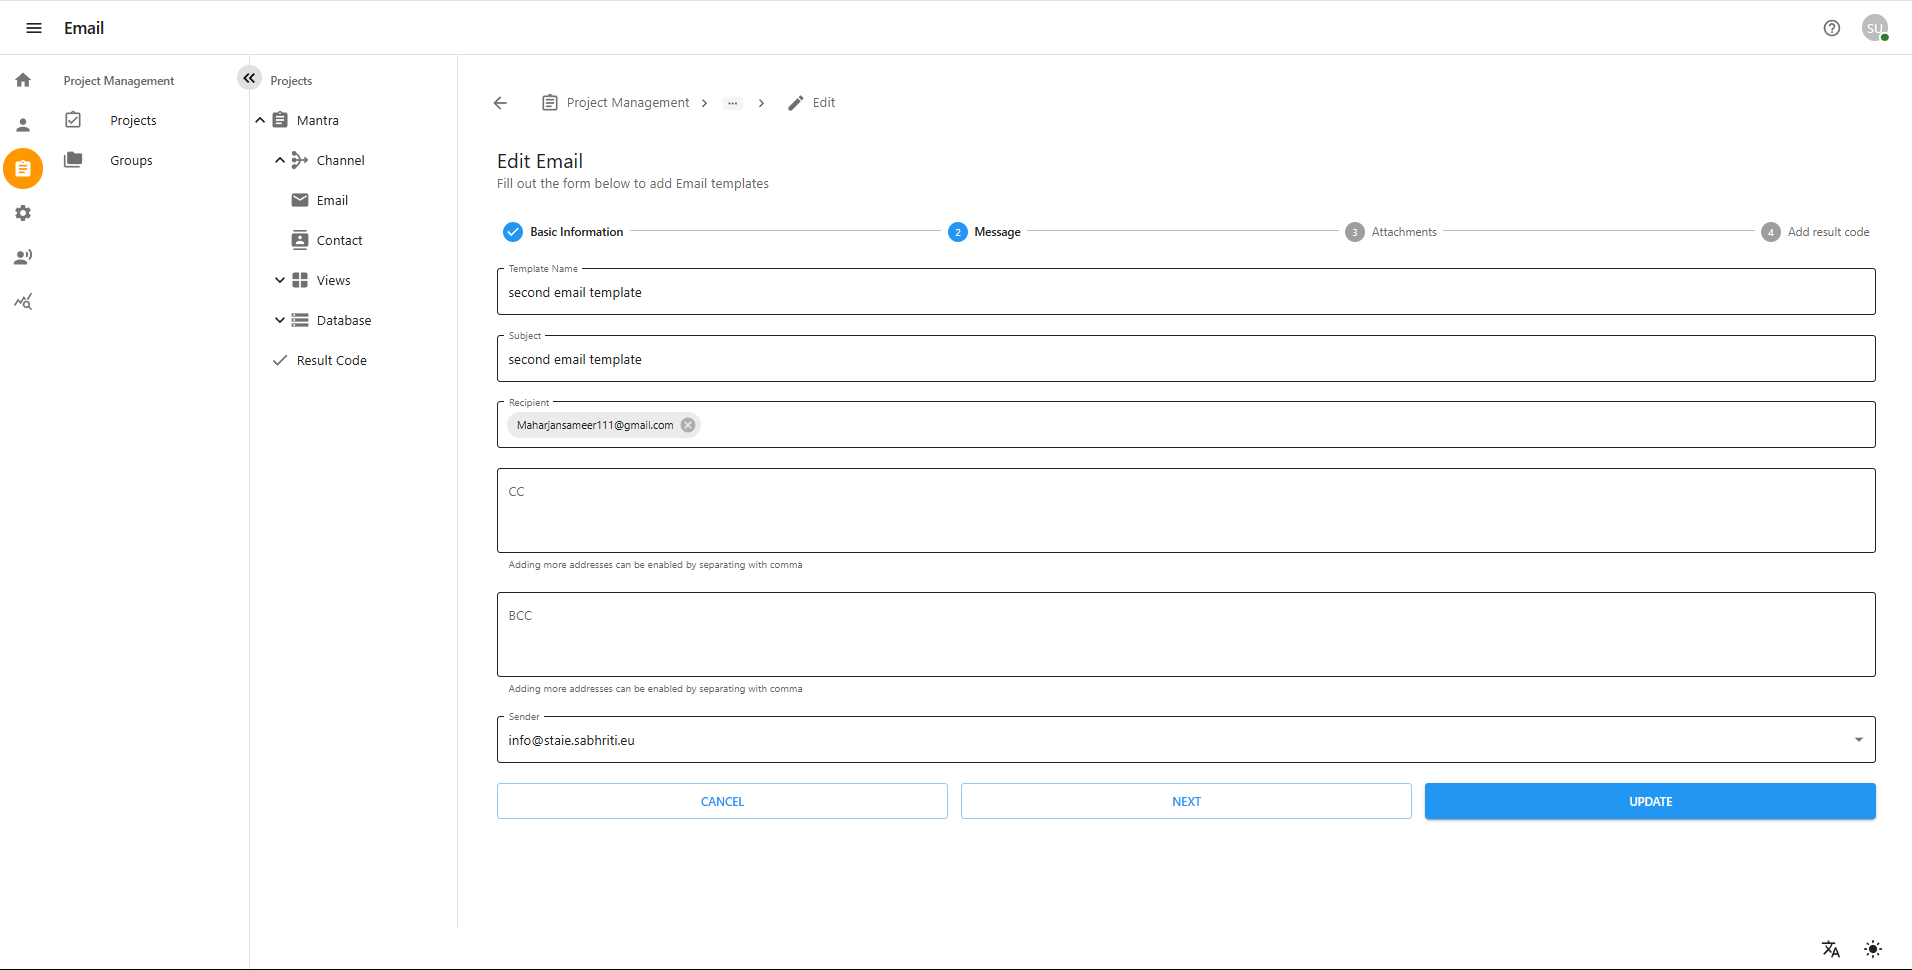
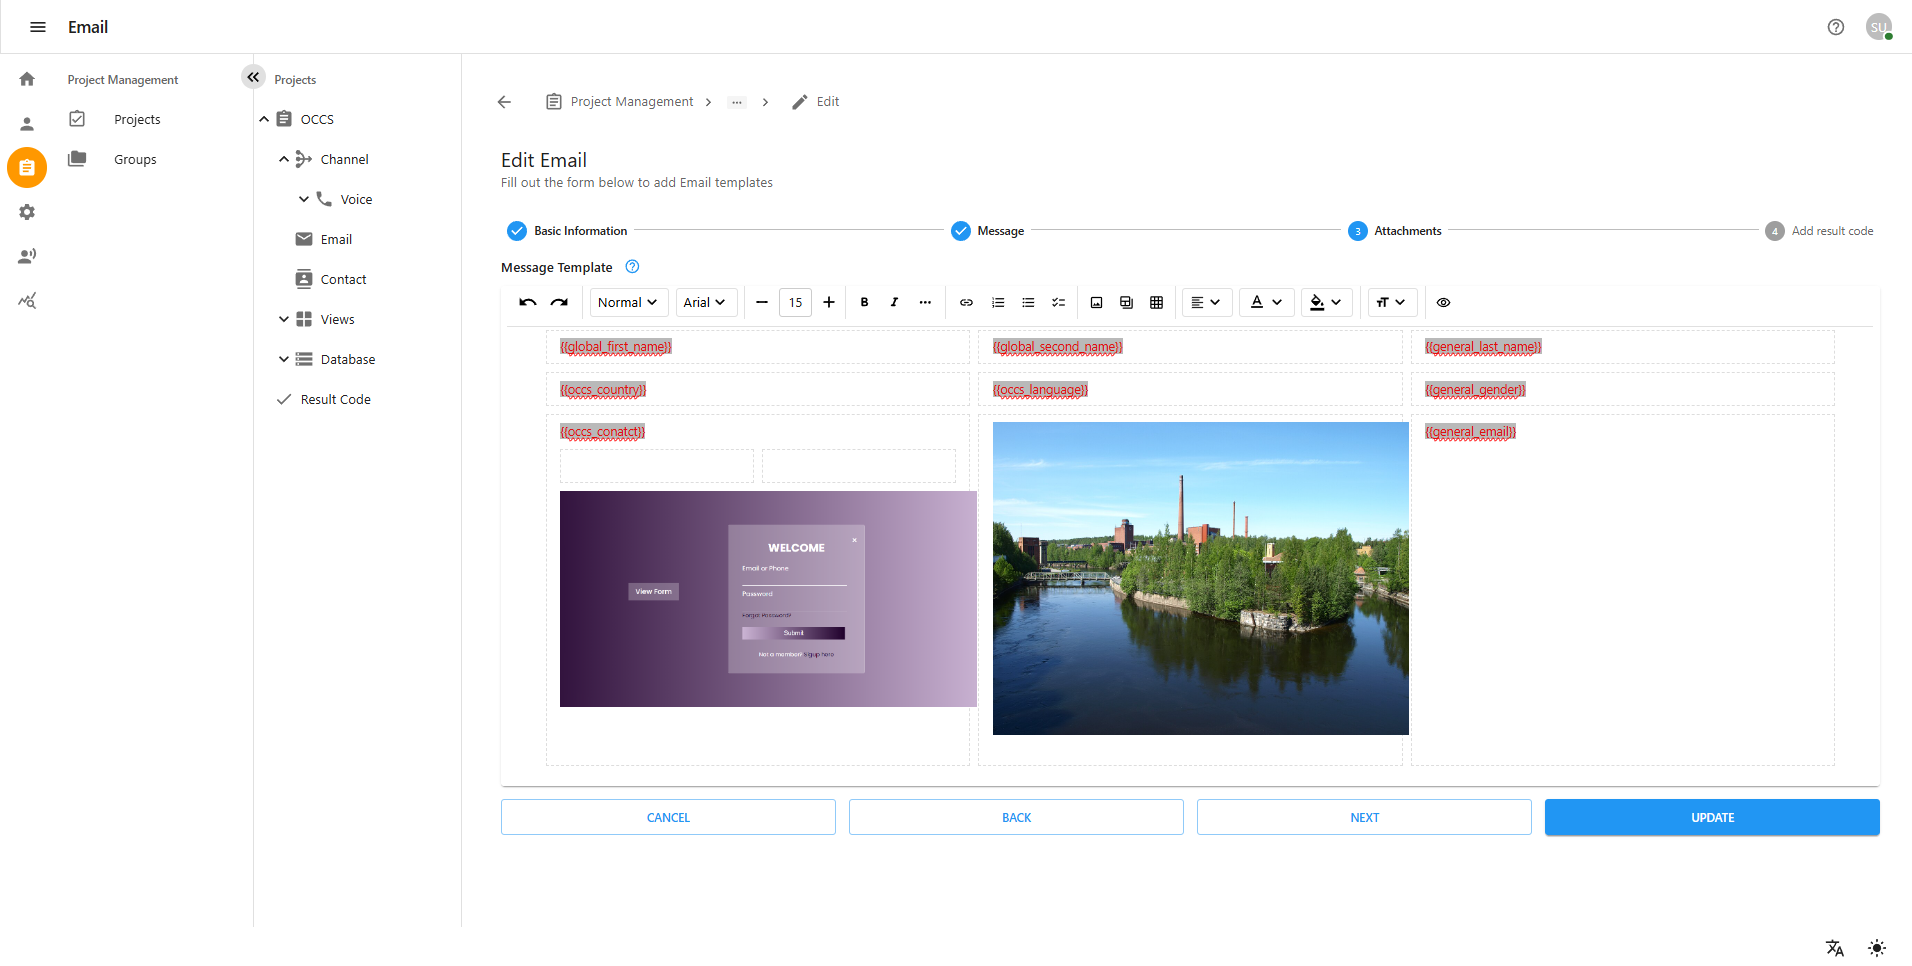
Step 2: Message
-
Compose email body
-
To set up email template messages, you need to first configure the required Fields and Views within the project.
Go to Project Management > Projects > [Your Project]
-
Create necessary fields from the Database section by clicking + Add Field, selecting the appropriate type (e.g., Text, Dropdown), and configuring single or multiple values.
Then, go to the Channel > Views section.
-
Select or create a relevant view and add the required fields, including Result Codes, using drag-and-drop or selection.
You can also group or sort these fields as needed.
-
These configured fields and views are essential to structure and personalize the content in your email template messages. Use predefined Fields and Views to insert dynamic data into email templates and ensure accurate, project-specific communication.
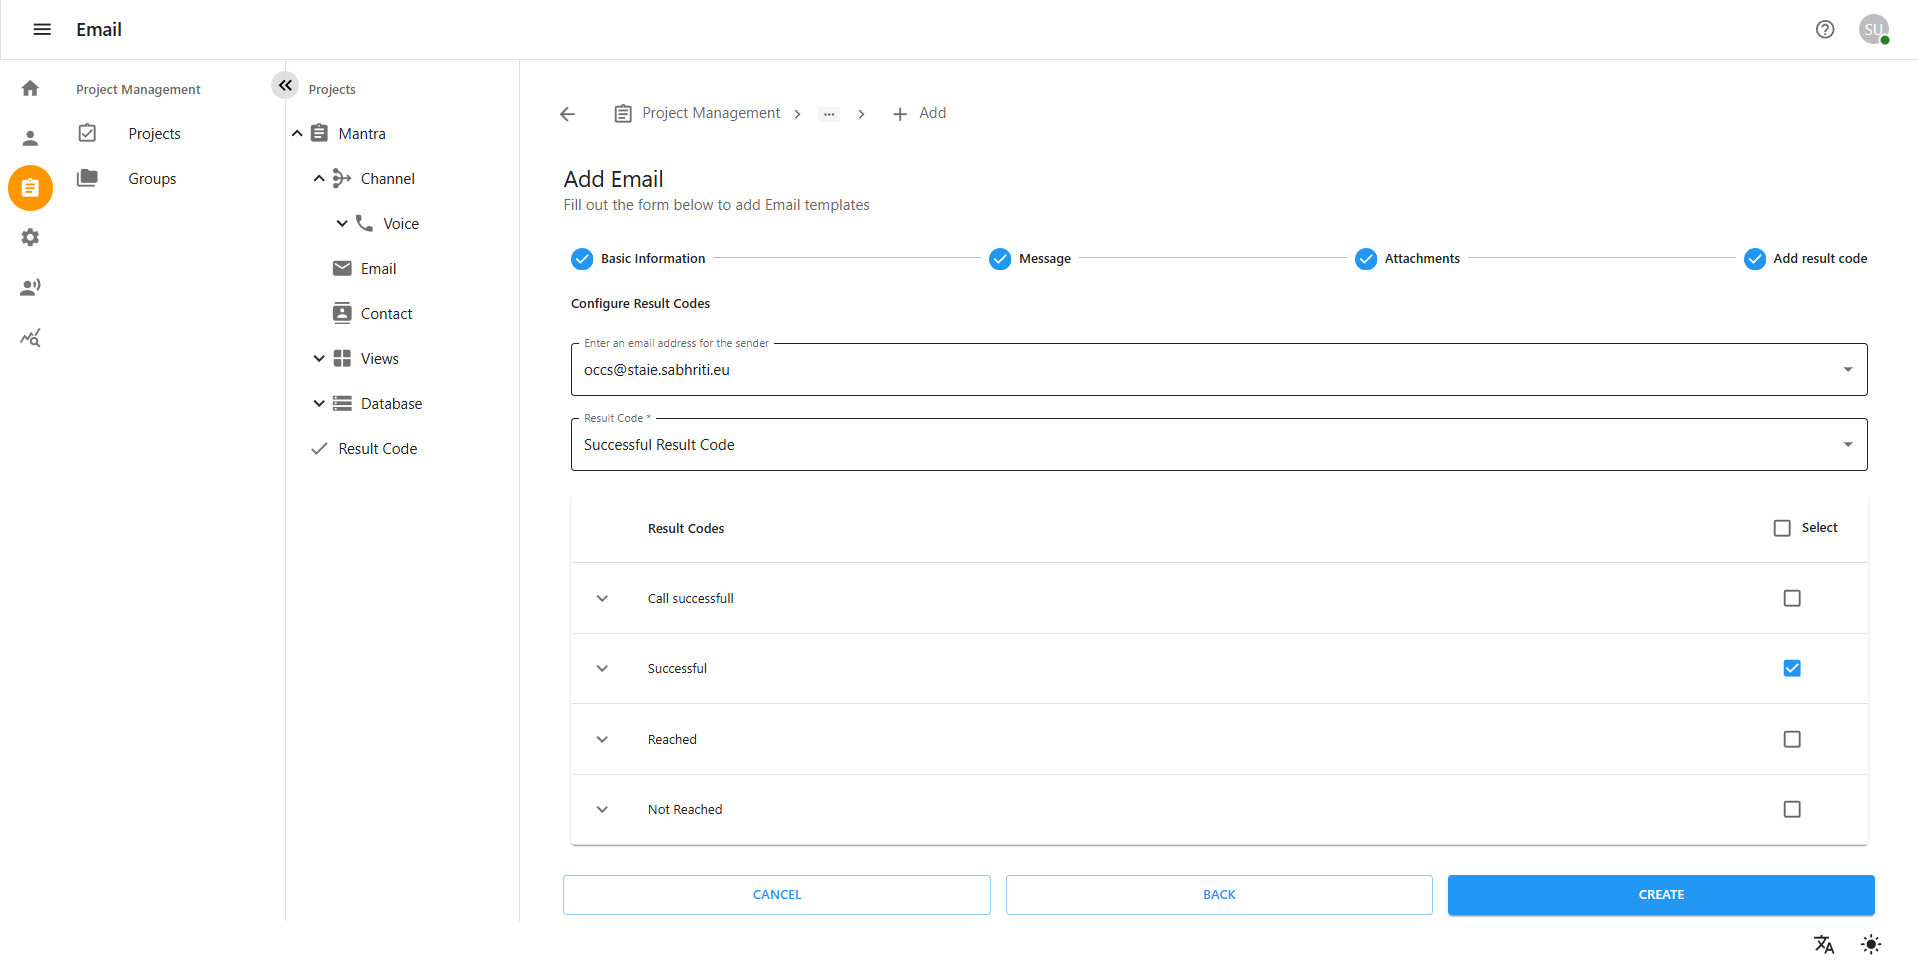
Steps
-
Go to
Projects > Mantra > Result Codeand create result codes. -
Navigate to
Projects > Mantra > Channel > Email. -
In the Add Result Code step:
-
Choose an email template.
-
Select result codes from the dropdown (generated earlier).
-
Tick checkboxes to activate.
-
Common Result Codes
| Code | Meaning |
|---|---|
Call successfull |
Call completed successfully. |
Successful |
Interaction marked successful. |
Reached |
User was contacted. |
Not Reached |
User was not contacted. |
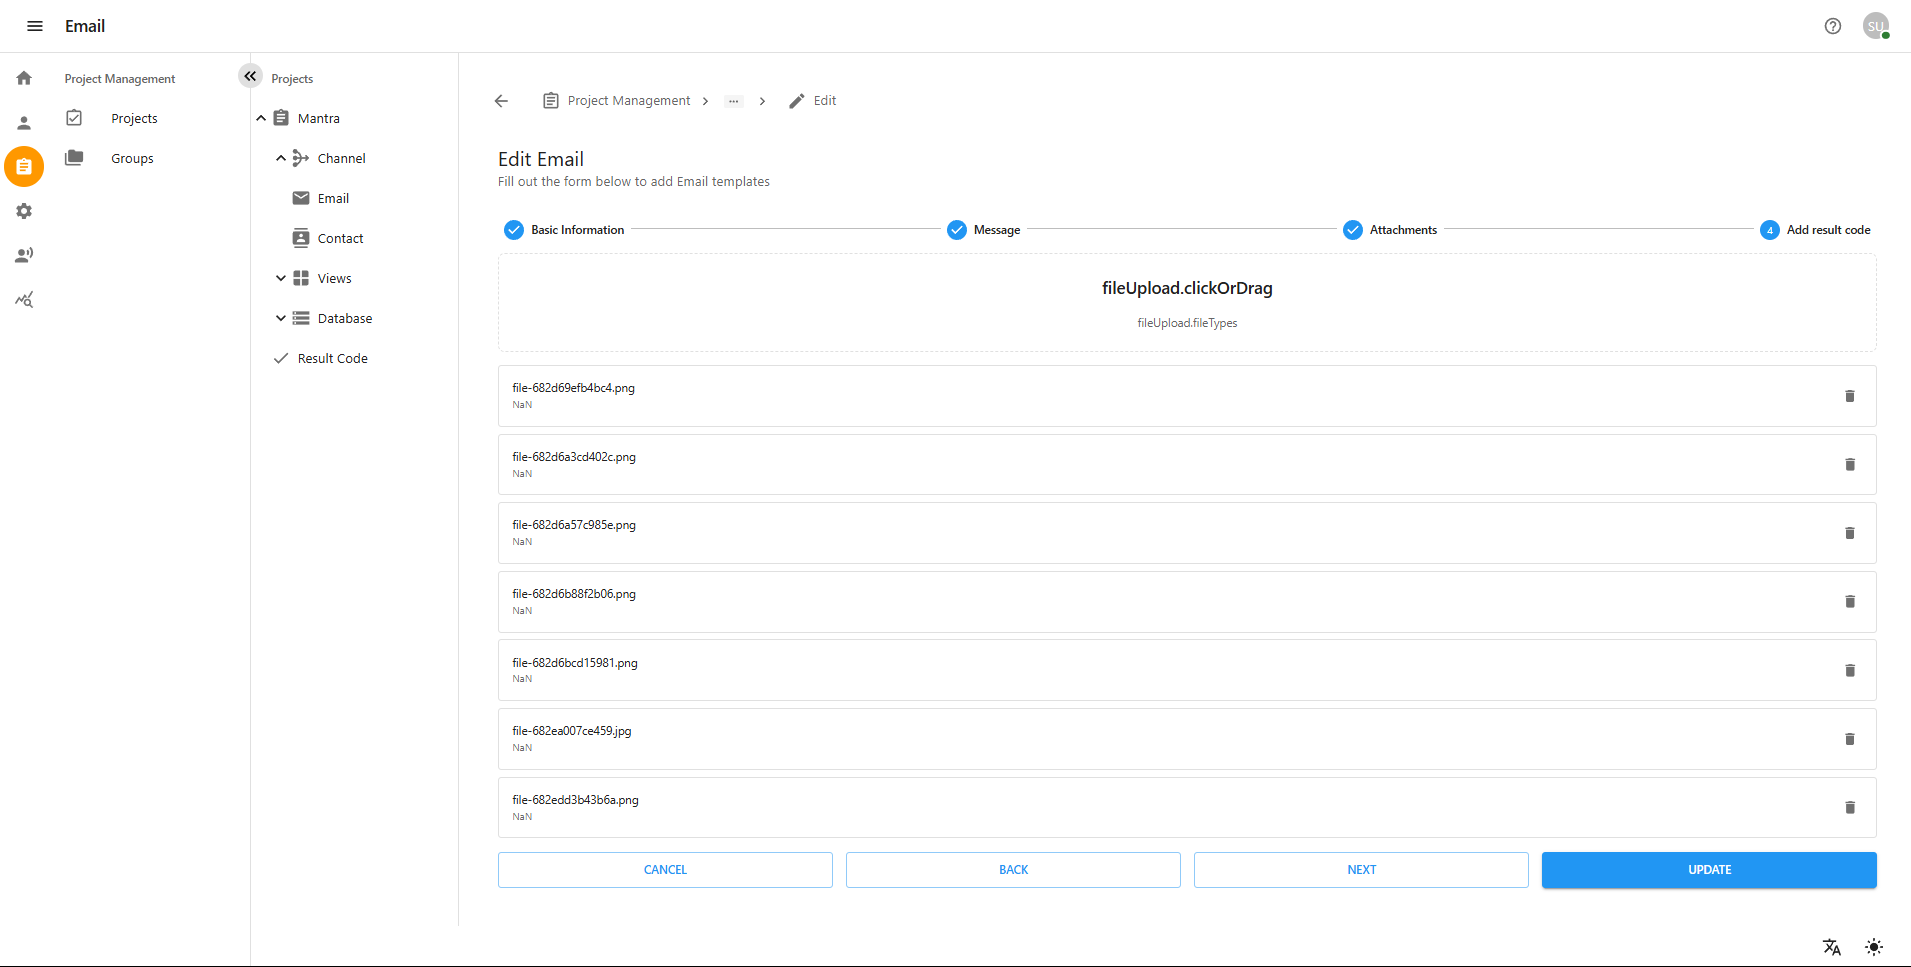
2. Editing Email Templates
-
Navigate to Project Management > Projects > [Your Project] > Channel > Email
-
Select the template and click Edit (pencil icon)
-
Modify Basic Info, Message, Attachments, or Result Code
-
Save changes
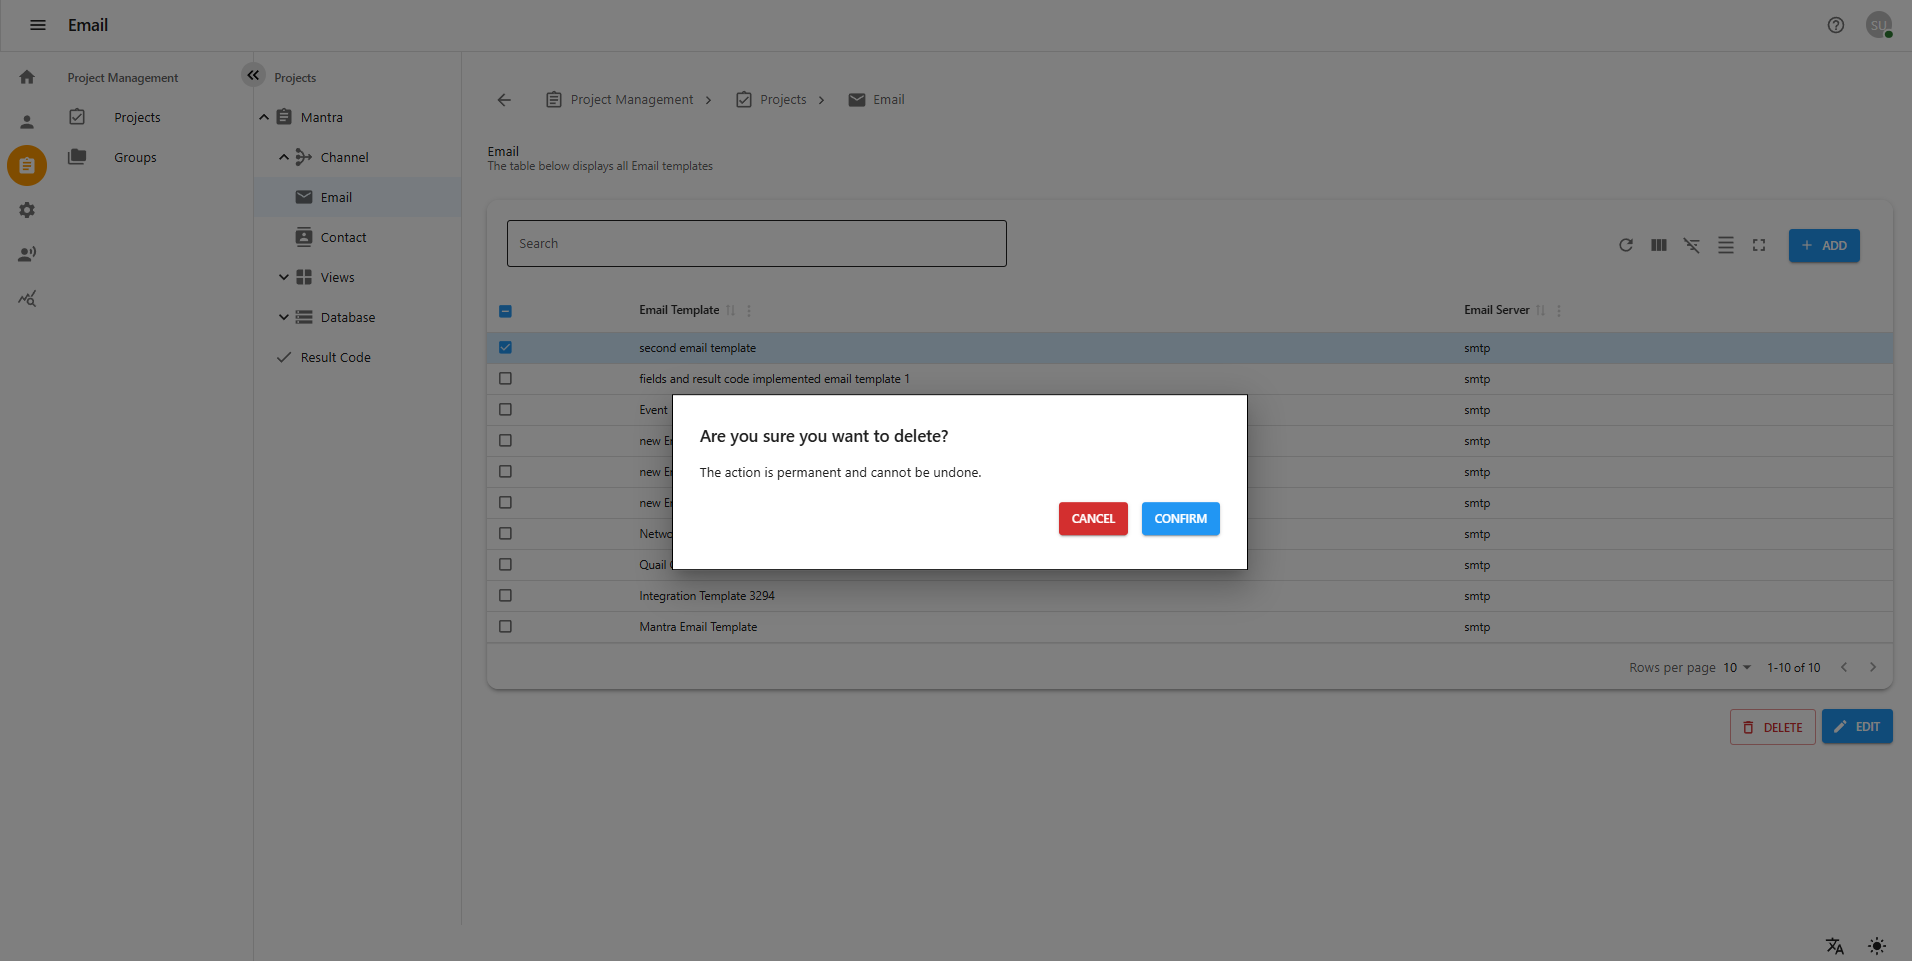
3. Deleting Email Templates
-
Navigate to Project Management > Projects > [Your Project] > Channel > Email
-
Select the template(s) to delete
-
Click Delete (trash icon) and confirm
Receiving Calls
The email template is triggered when the clerk selects the appropriate result code based on the project views during the call. The email is then sent by dynamically parsing the field values.
3 Contact in Channel
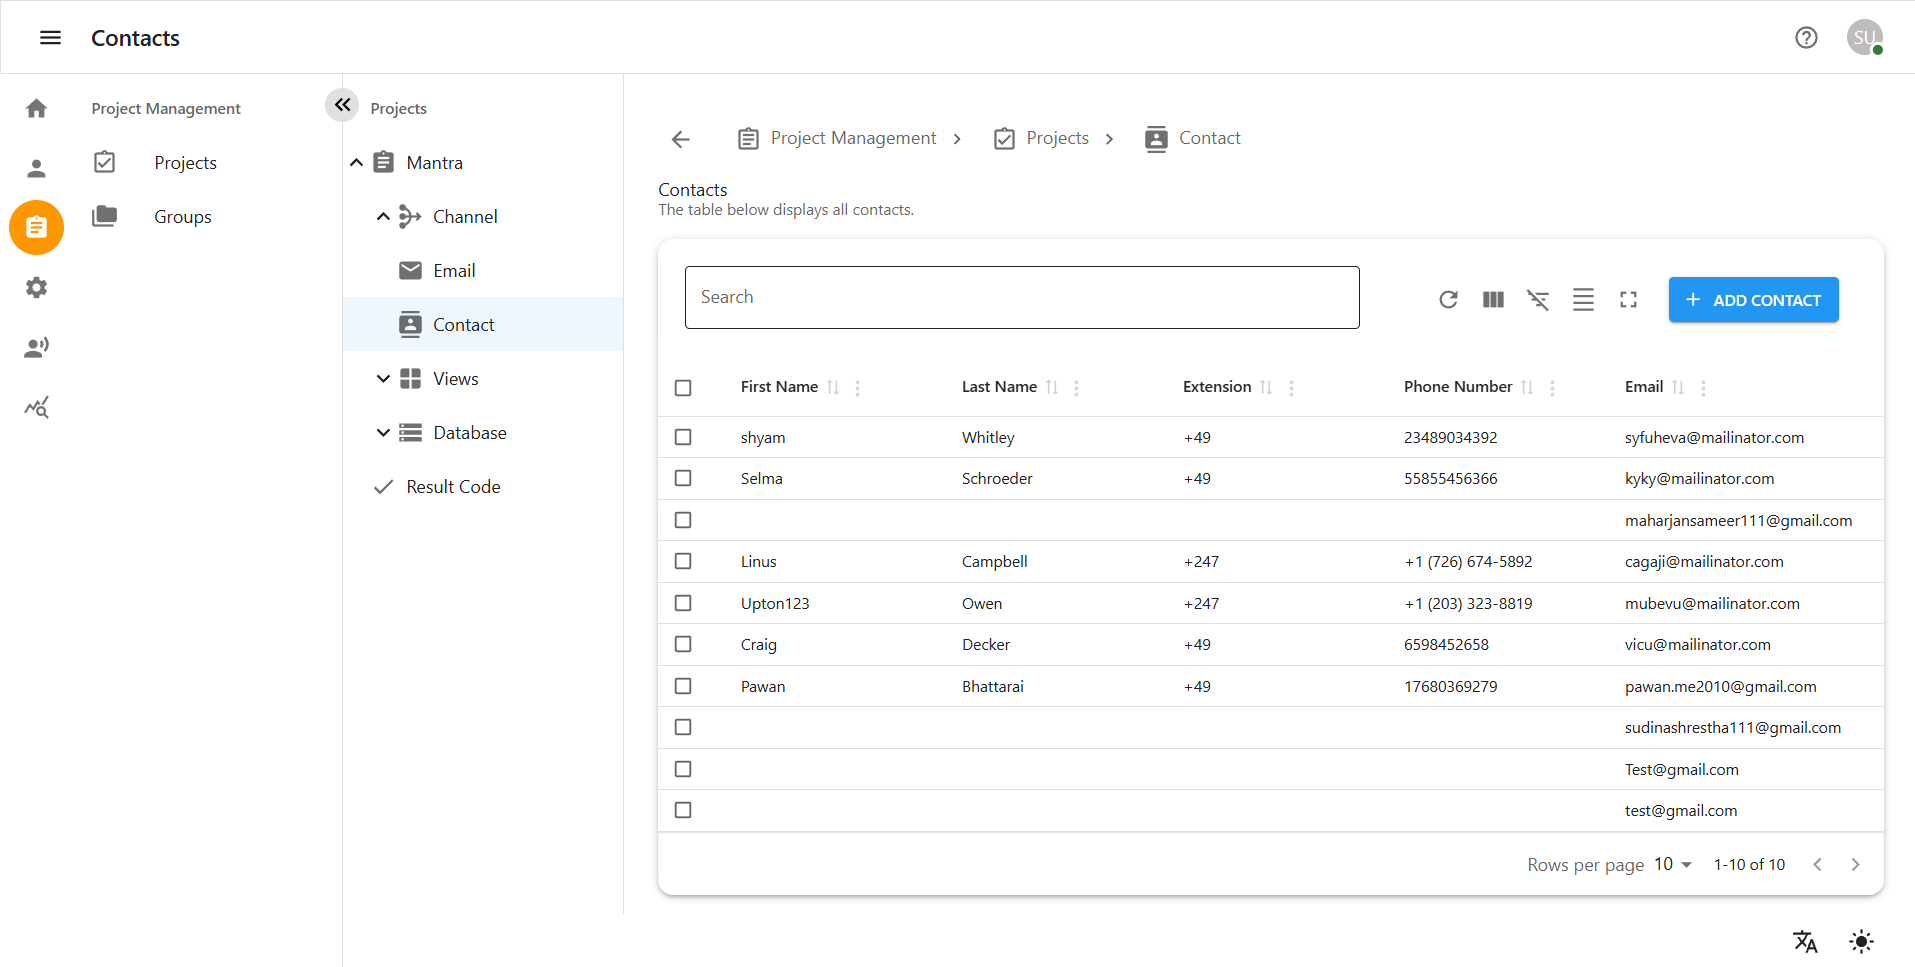
Contact, located under the Channel section, allows users to manage project-specific recipients. Users can easily create, edit, or delete contacts to ensure accurate communication within each project.
1. Accessing the Contact Page
Follow these steps to navigate to the Contact page:
-
Log in to the system with your credentials.
-
In the left-hand navigation menu, click on Projects.
-
Select the desired project name from the list.
-
Within the project section, click on Channel.
-
Click on Contact to view the list of existing contacts.
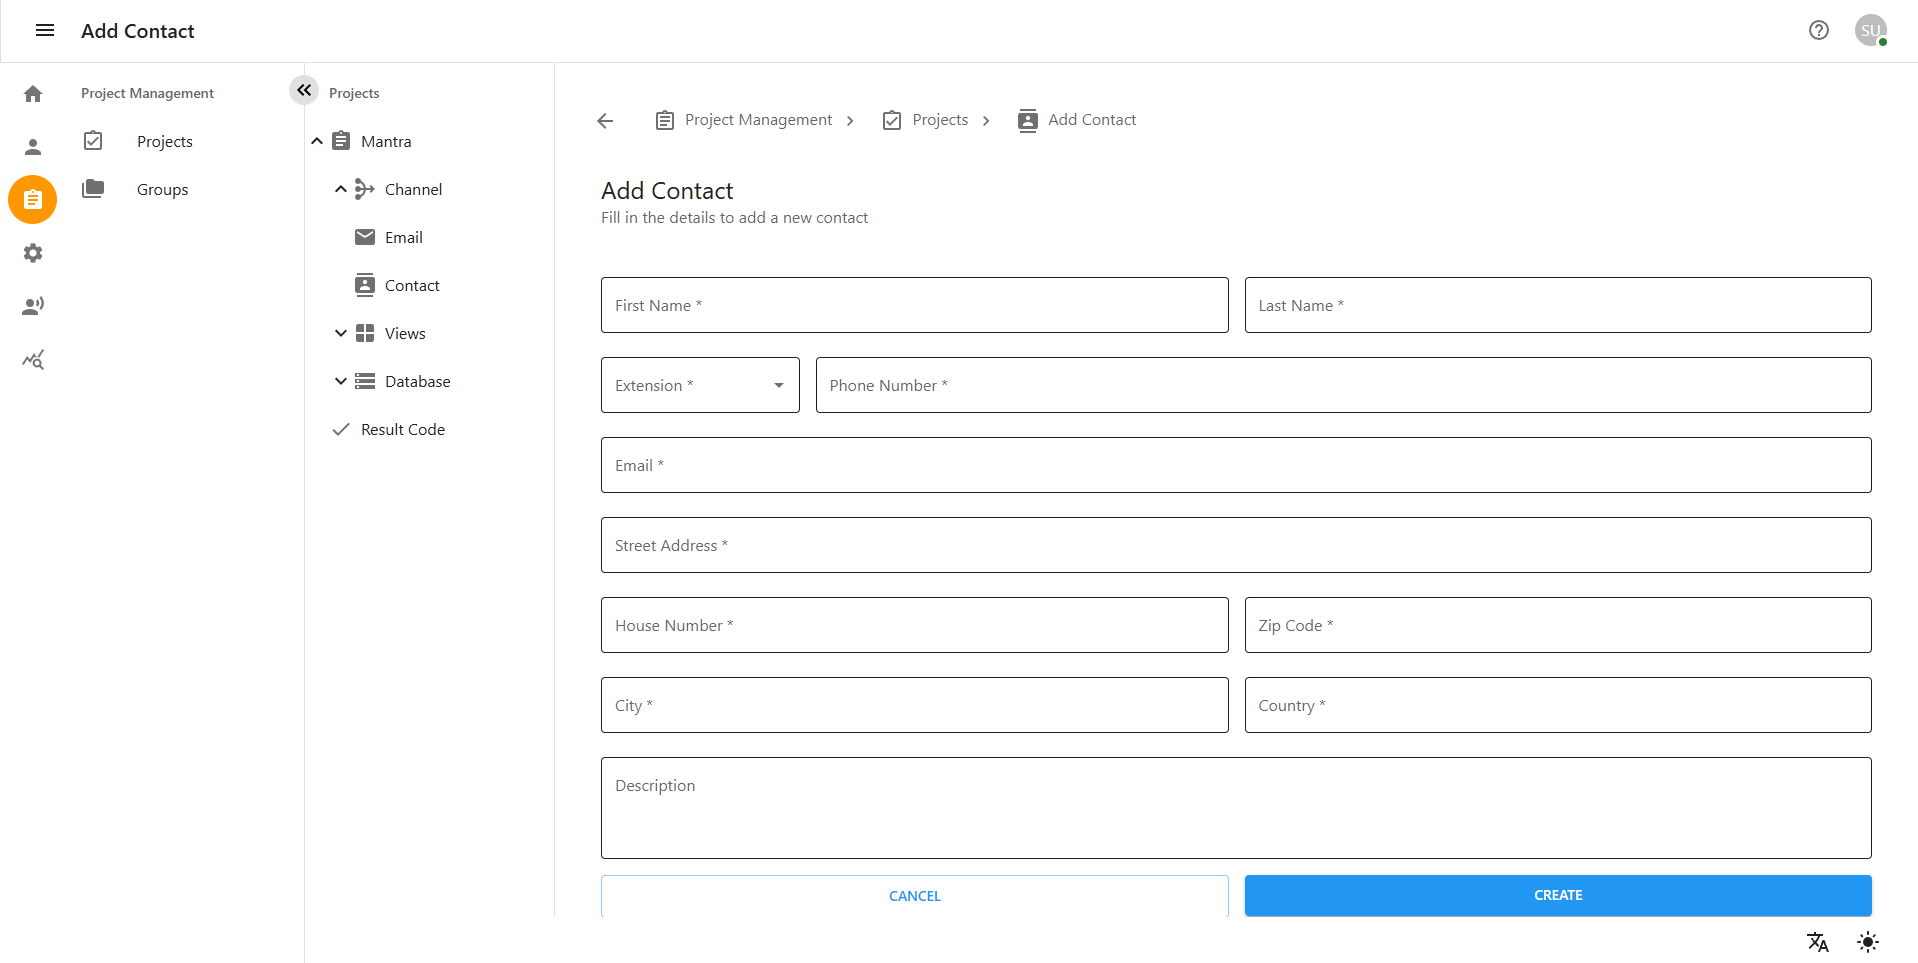
3.1 Creating a New Contact
To add a new contact to the system:
-
On the Contact page, click the + Add Contact or Create New Contact button.
-
A new contact form will appear. Enter alll information in the required fields:
-
After entering the details, click the CREATE or SAVE button.
-
The new contact will now be listed on the Contact page.
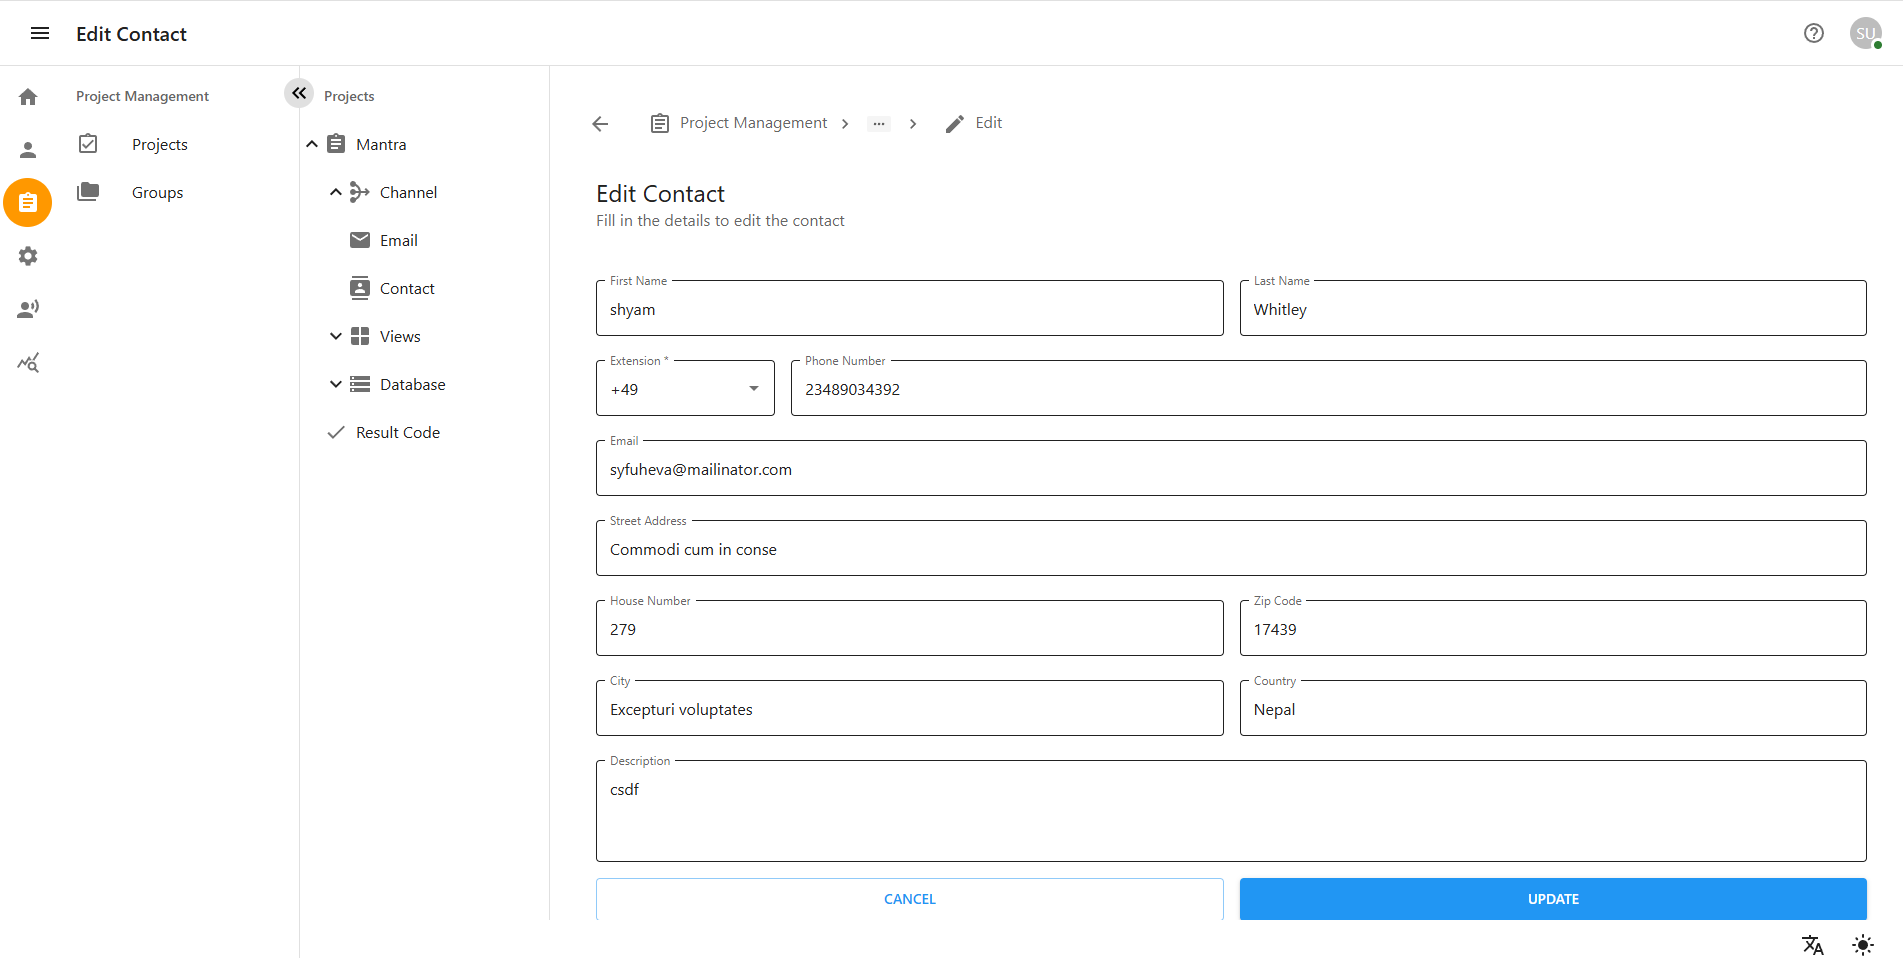
3.2 Editing an Existing Contact
To update contact information:
-
On the Contact page, find and click on the contact name you wish to edit.
-
You will be taken to the Edit Contact page.
-
Review and update the necessary fields.
-
Once the changes are complete, scroll down and click UPDATE to save the changes.
-
If you do not want to save the changes, click CANCEL to return without saving.
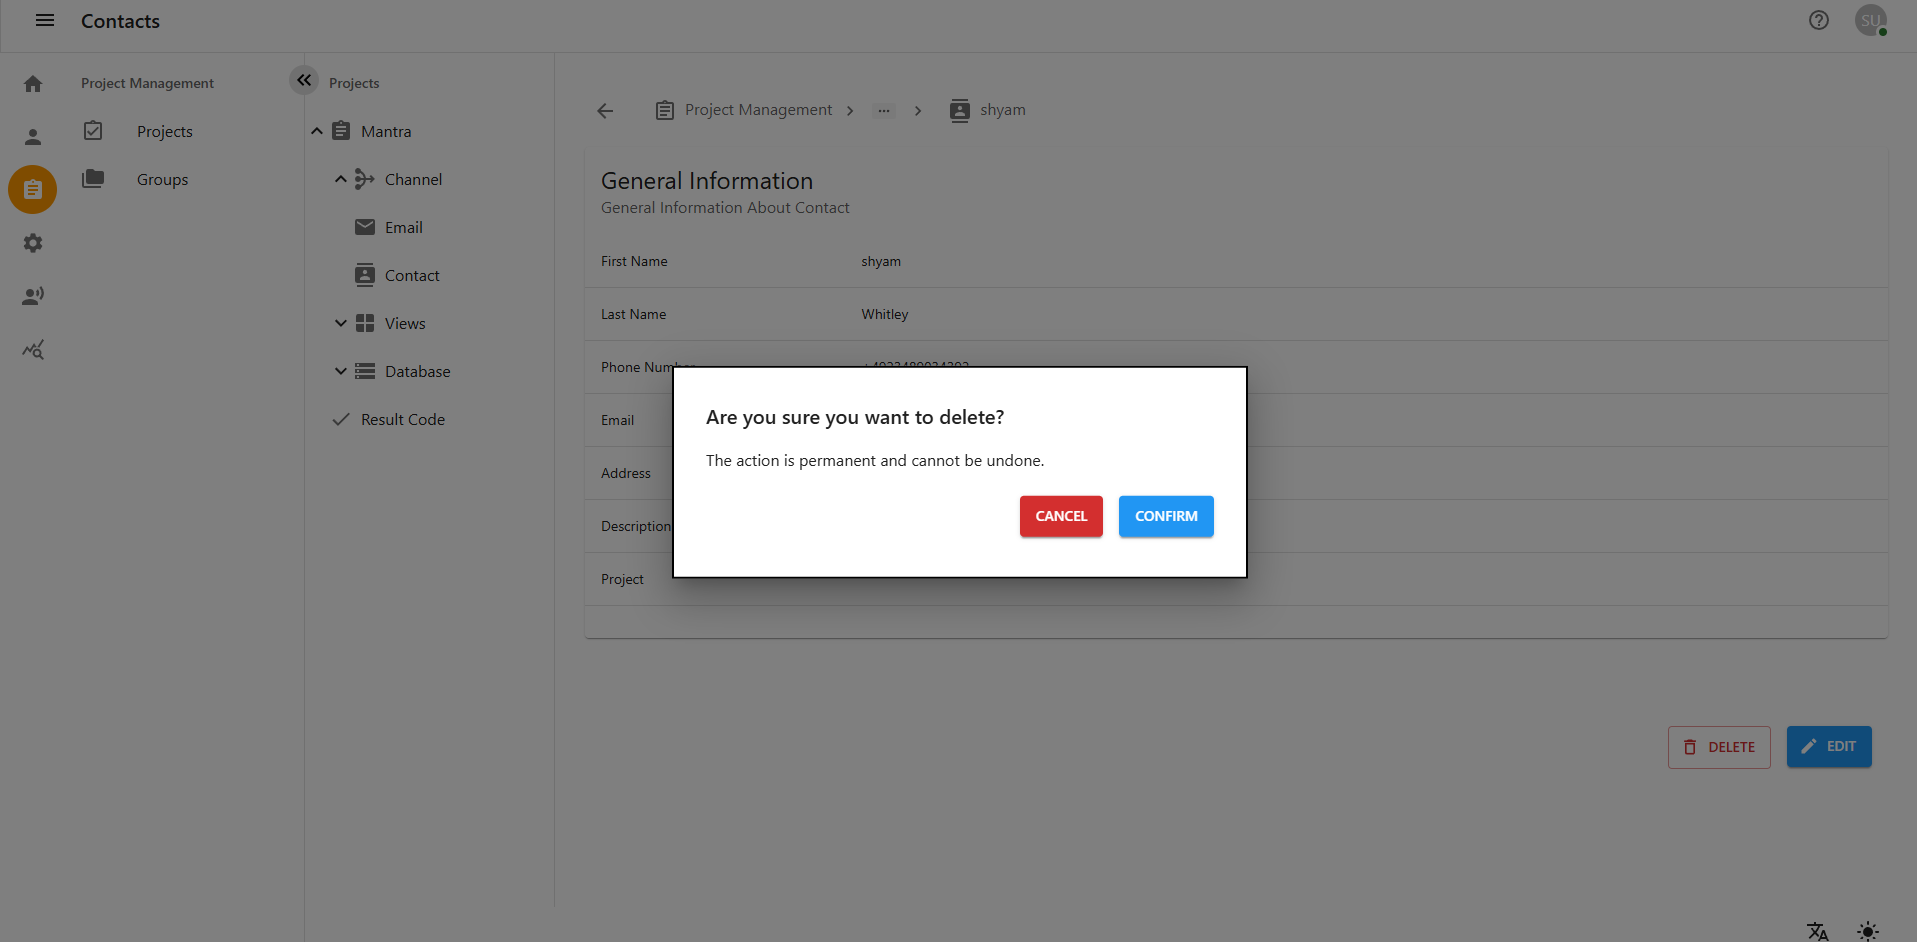
3.3 Deleting a Contact
To remove a contact from the system:
-
On the Contact page, locate the contact you want to delete.
-
Click the Delete icon (usually a trash bin) or select Delete from the action menu.
-
A confirmation message will appear:
"Are you sure you want to delete this contact?"
-
Click YES or CONFIRM to proceed with deletion.
-
To cancel, click NO or CANCEL.
-
The contact will be permanently removed from the list.
4 Manage Project Views and Pages
This section describes how to create, update, edit, and delete Project Views and Pages under each project in the system. Views allow users to design customized pages that appear during client calls, enabling agents to interact with relevant forms in real-time. These forms are auto-loaded based on the project context and can also be used to send emails directly, improving workflow efficiency and communication accuracy.
Navigating to Project Management
-
Click on Project Management from the main menu.
-
You will be redirected to the Project page.
-
Click on the project name you want to manage.
-
On the left-hand side, locate the tree structure and click on Project Views.
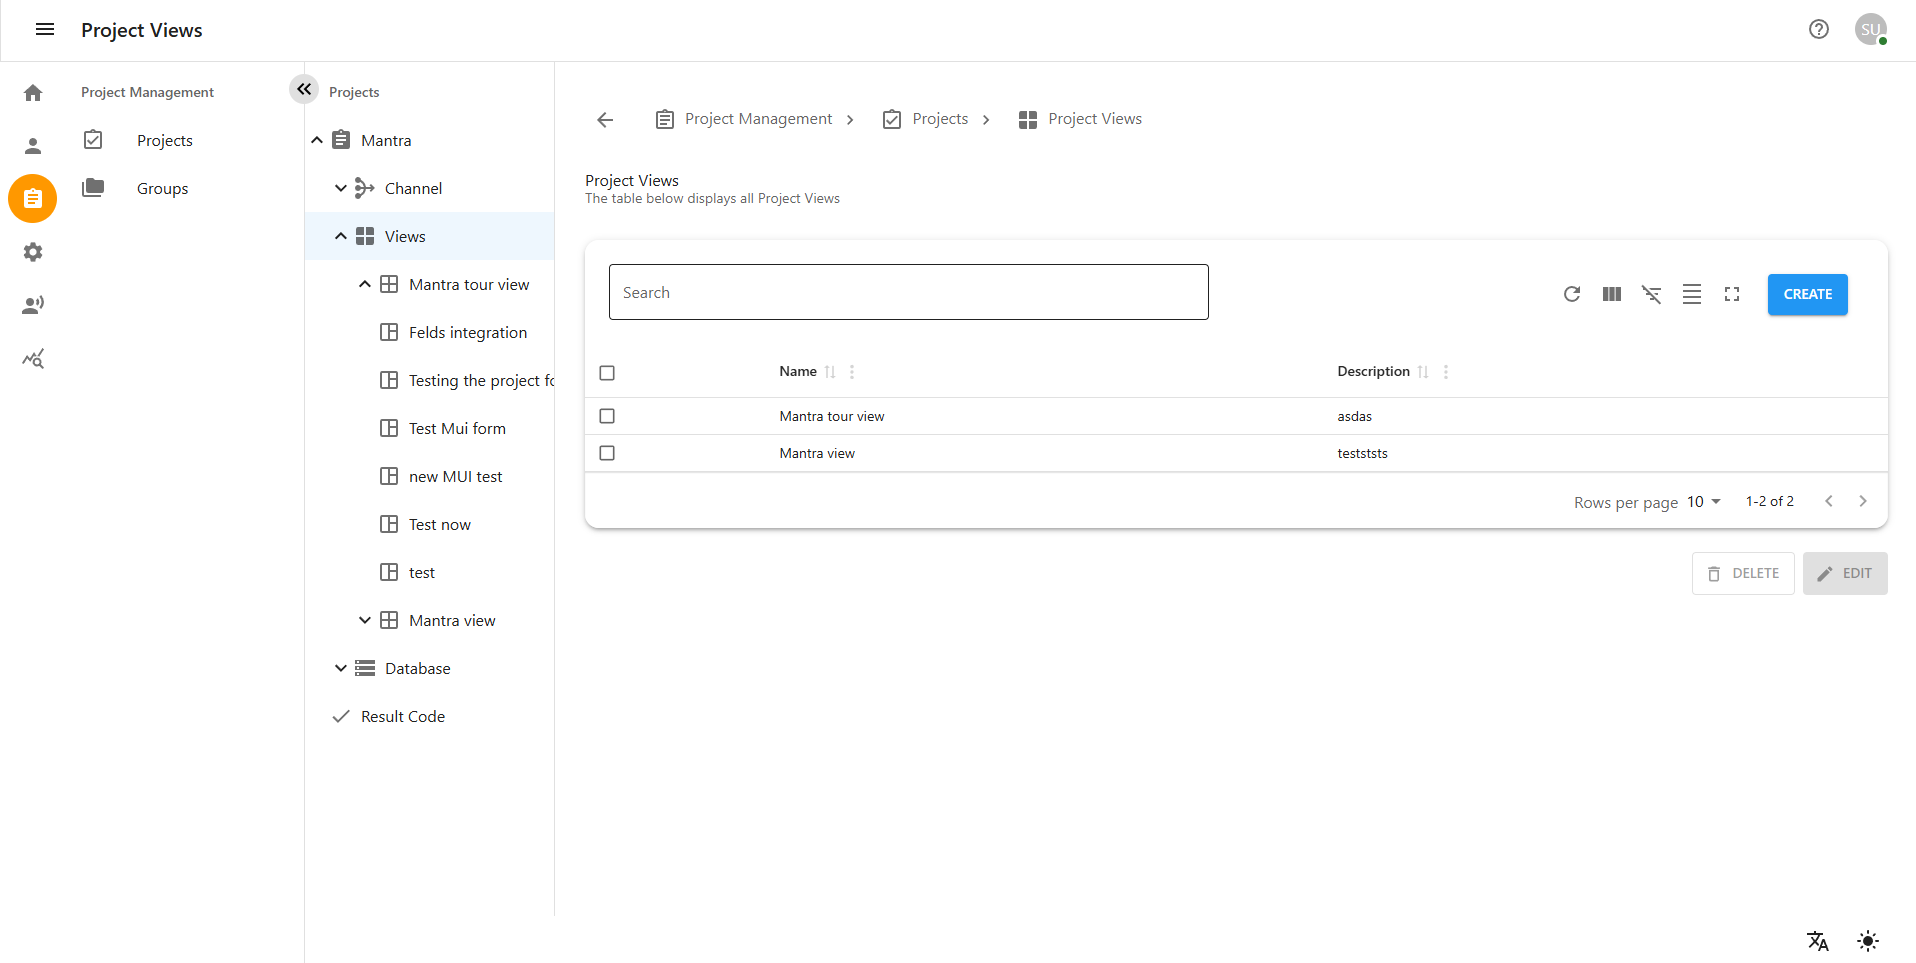
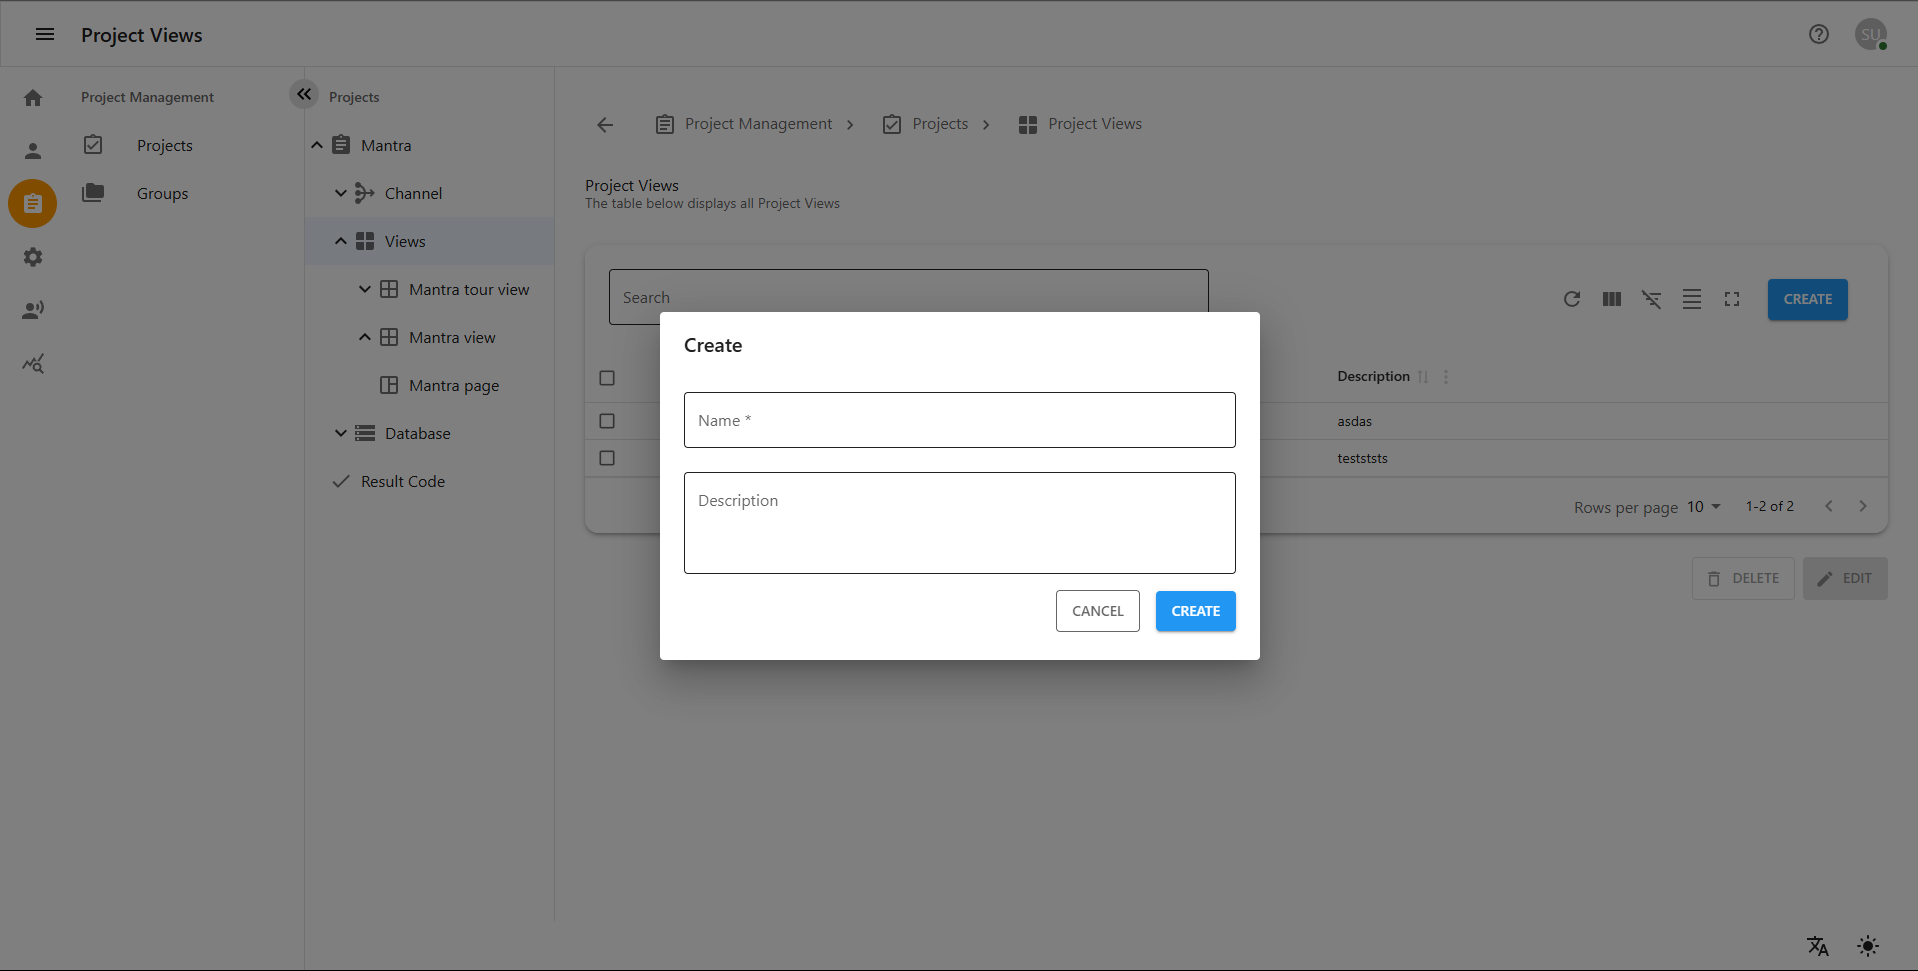
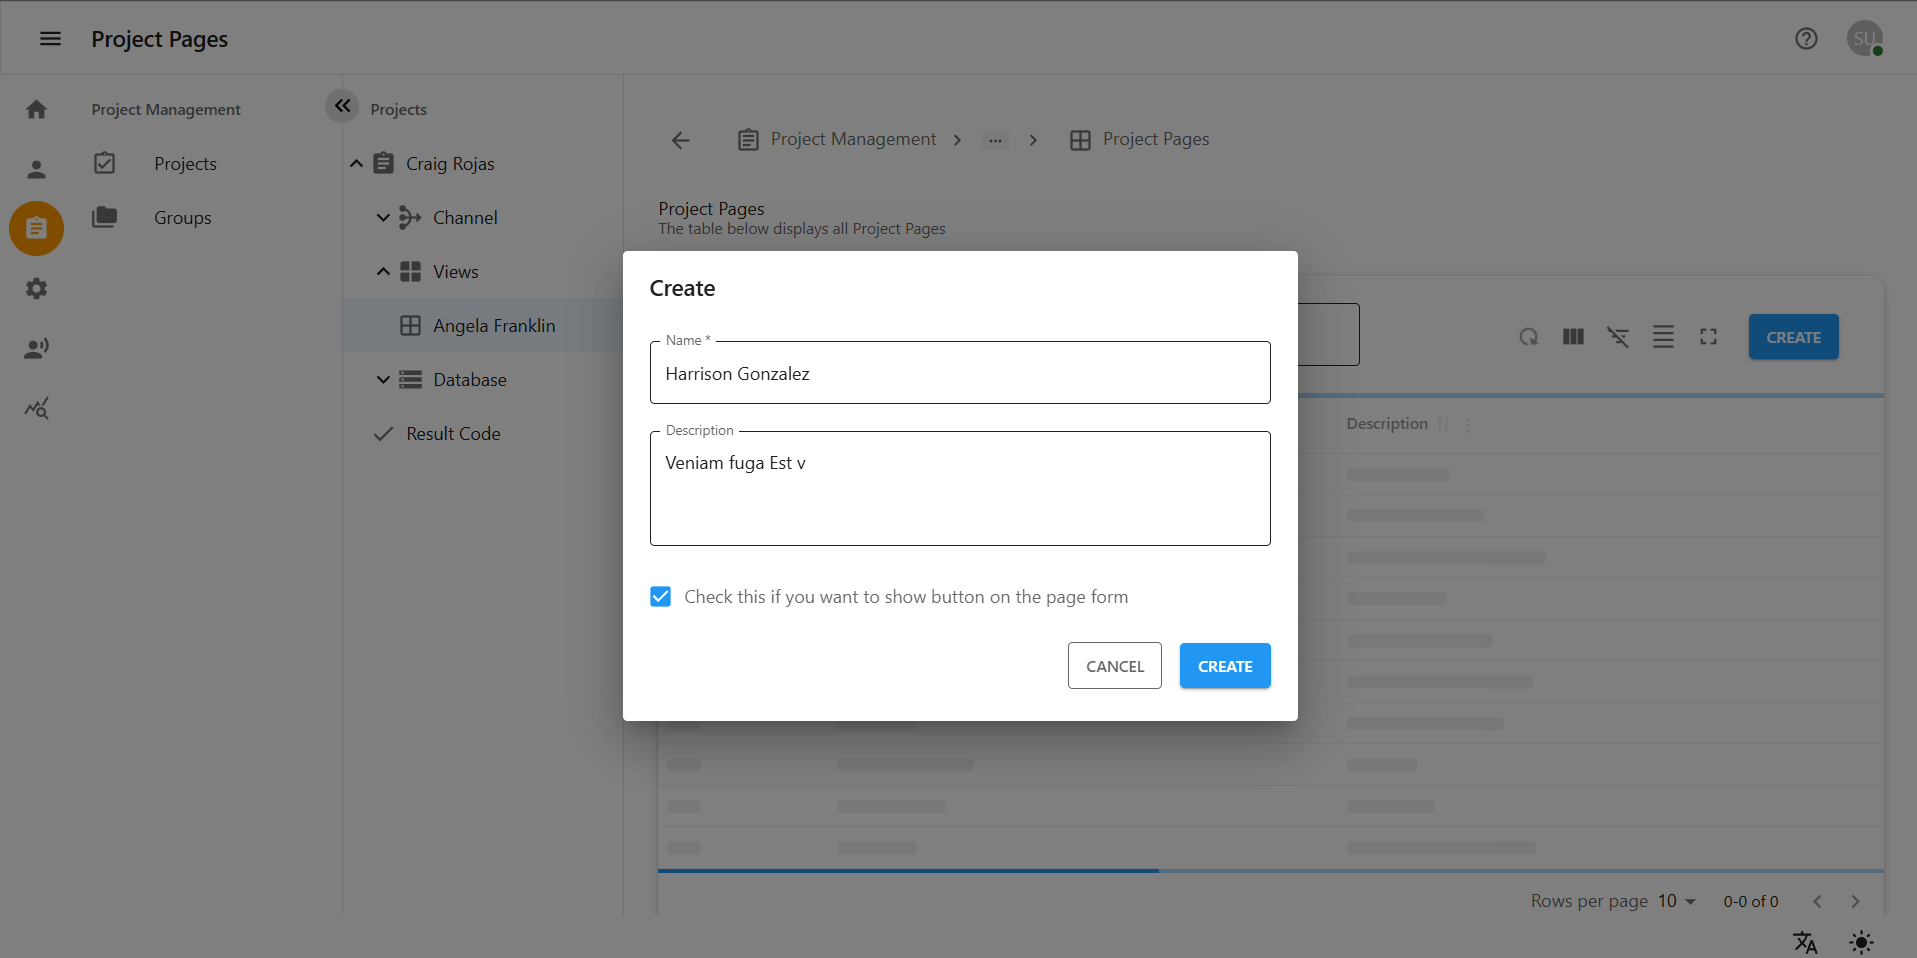
4.1 Creating a Project View
-
Click on a project under One Project.
-
On the left side, click on Project Views.
-
Click the Create button located above the table.
-
A popup form will appear asking for the necessary information.
-
Fill in the following fields:
-
View Name: Name of the project view
-
Description: (Optional) Short description of the view
-
-
Click Create to save the new project view.
-
The new view will now appear in the list under Project Views.
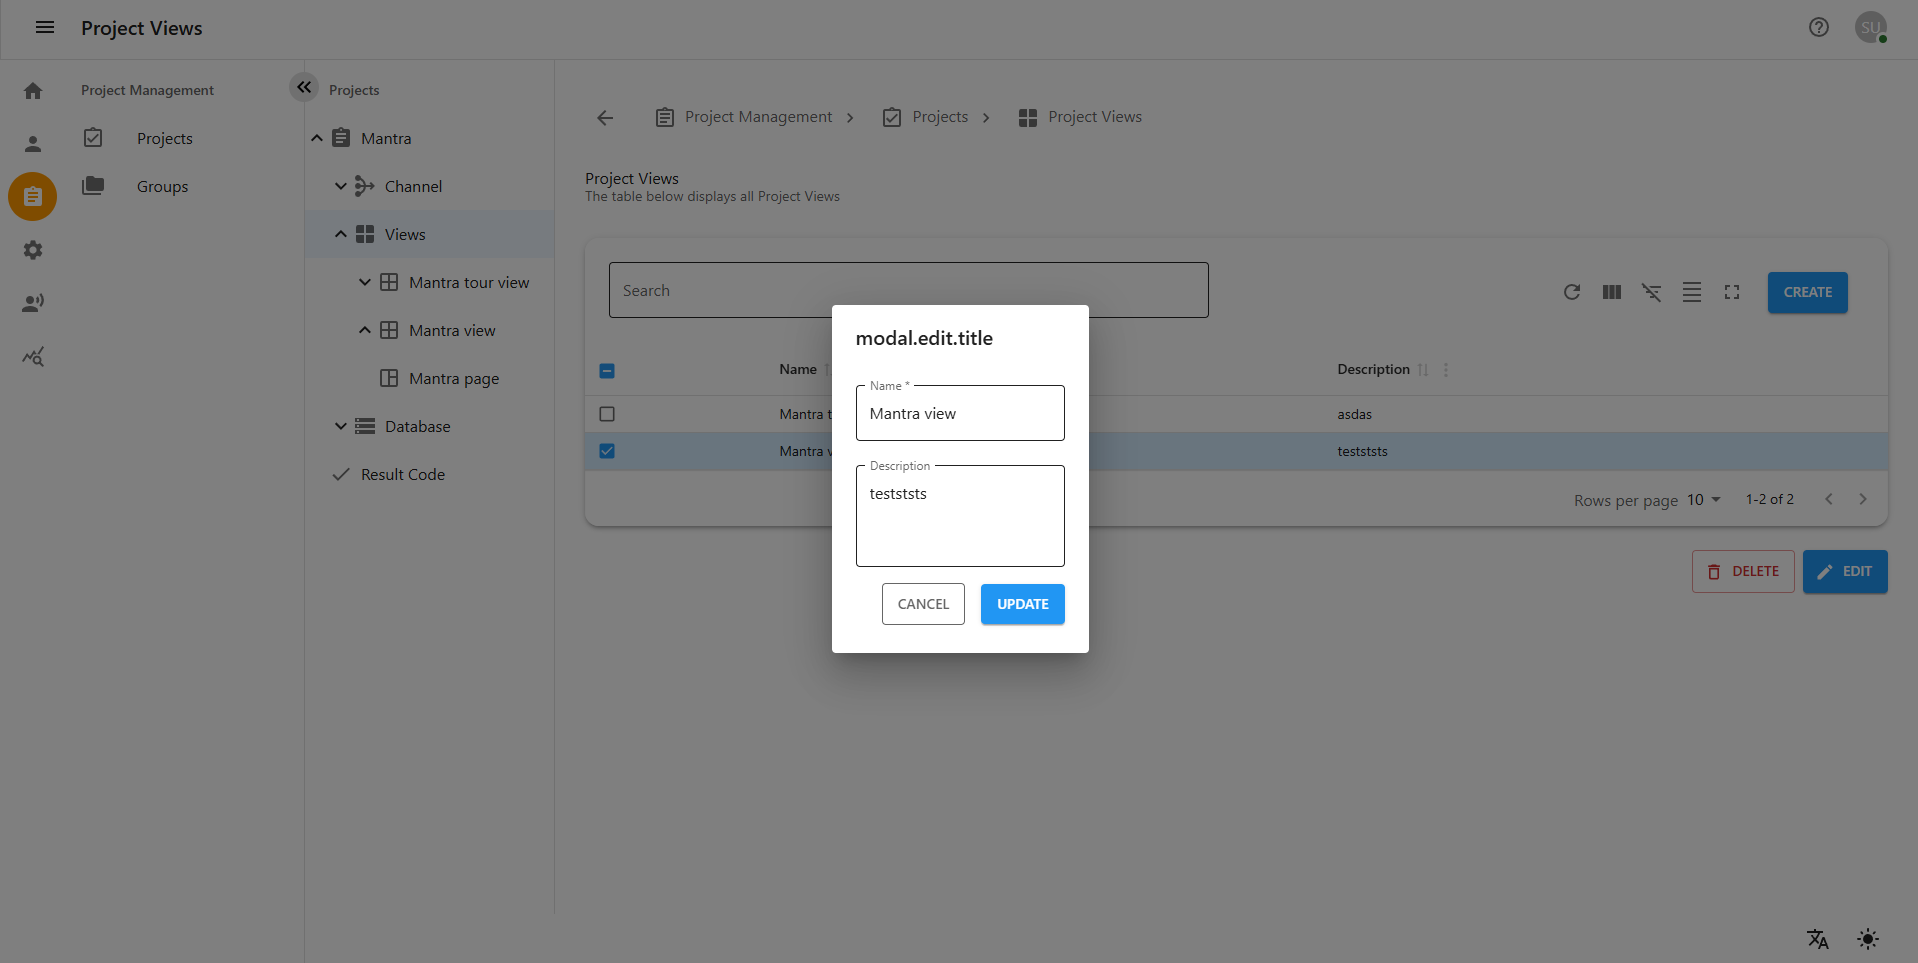
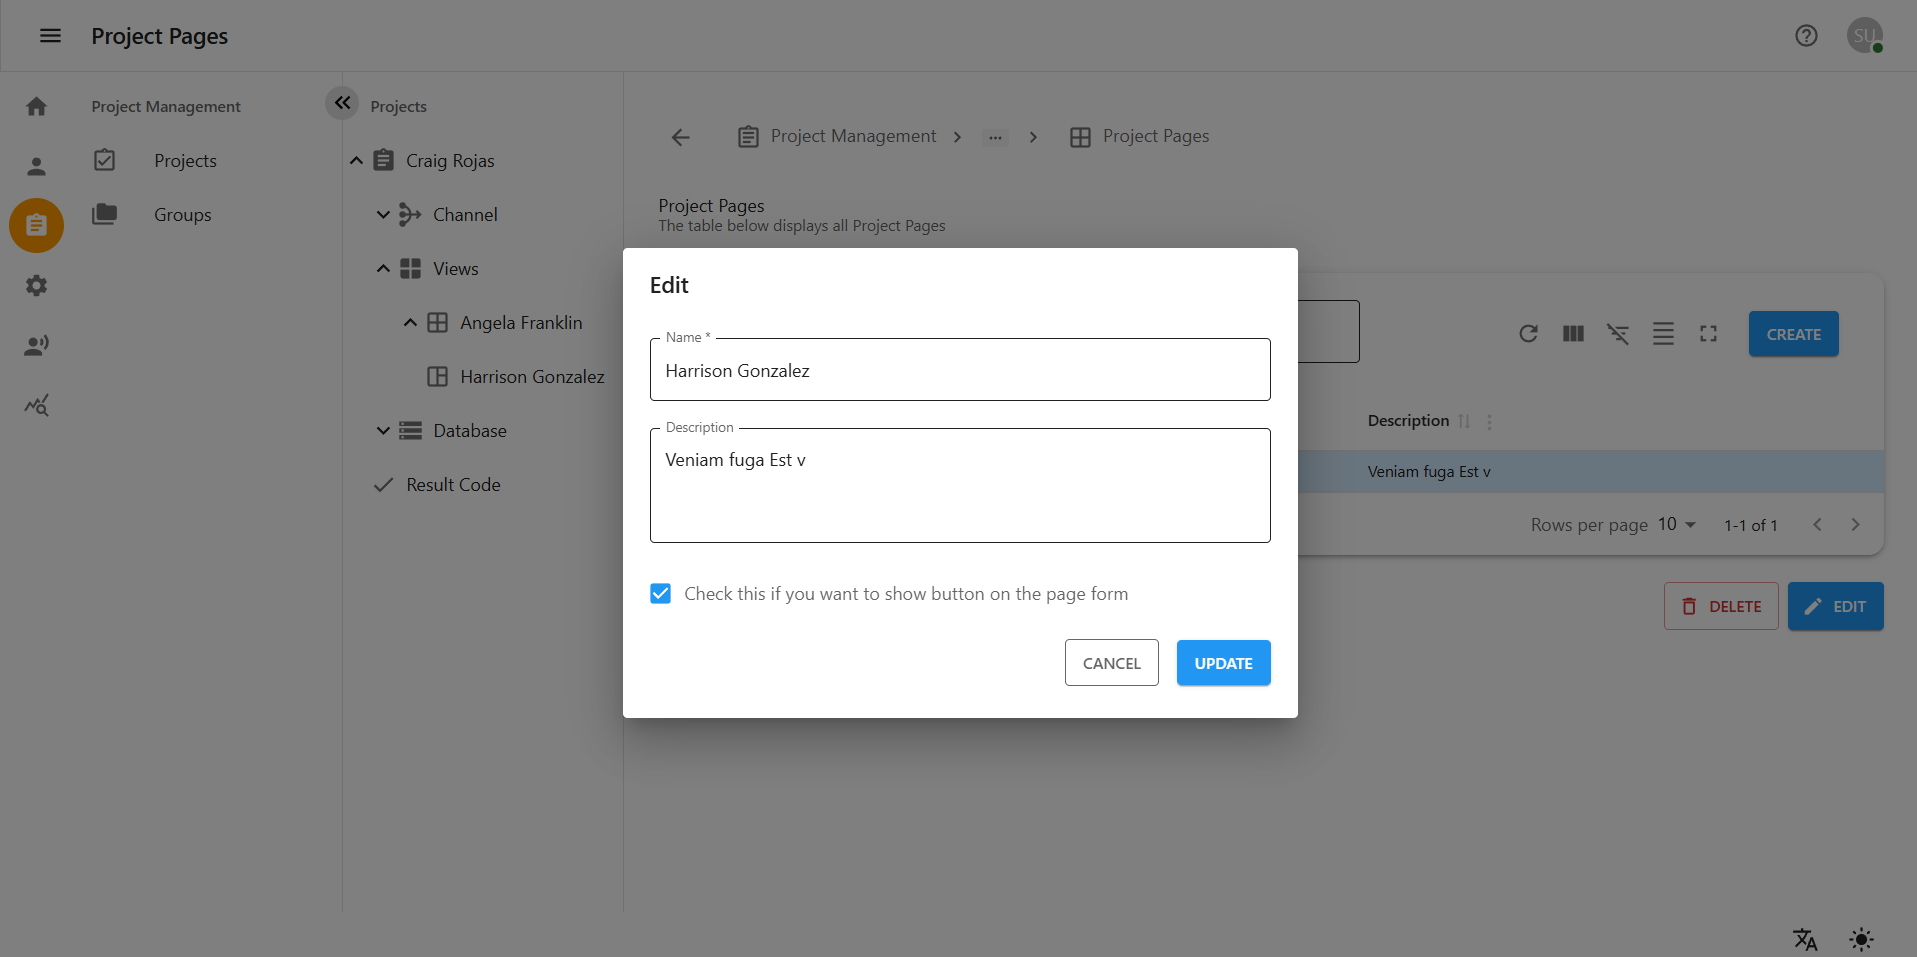
4.2 Updating a Project View
-
From the Project Views list, select the view you want to update.
-
Click the Update button located below the table or next to the view.
-
A popup will appear with the current data.
-
Modify the fields as needed.
-
Click Update to save your changes.
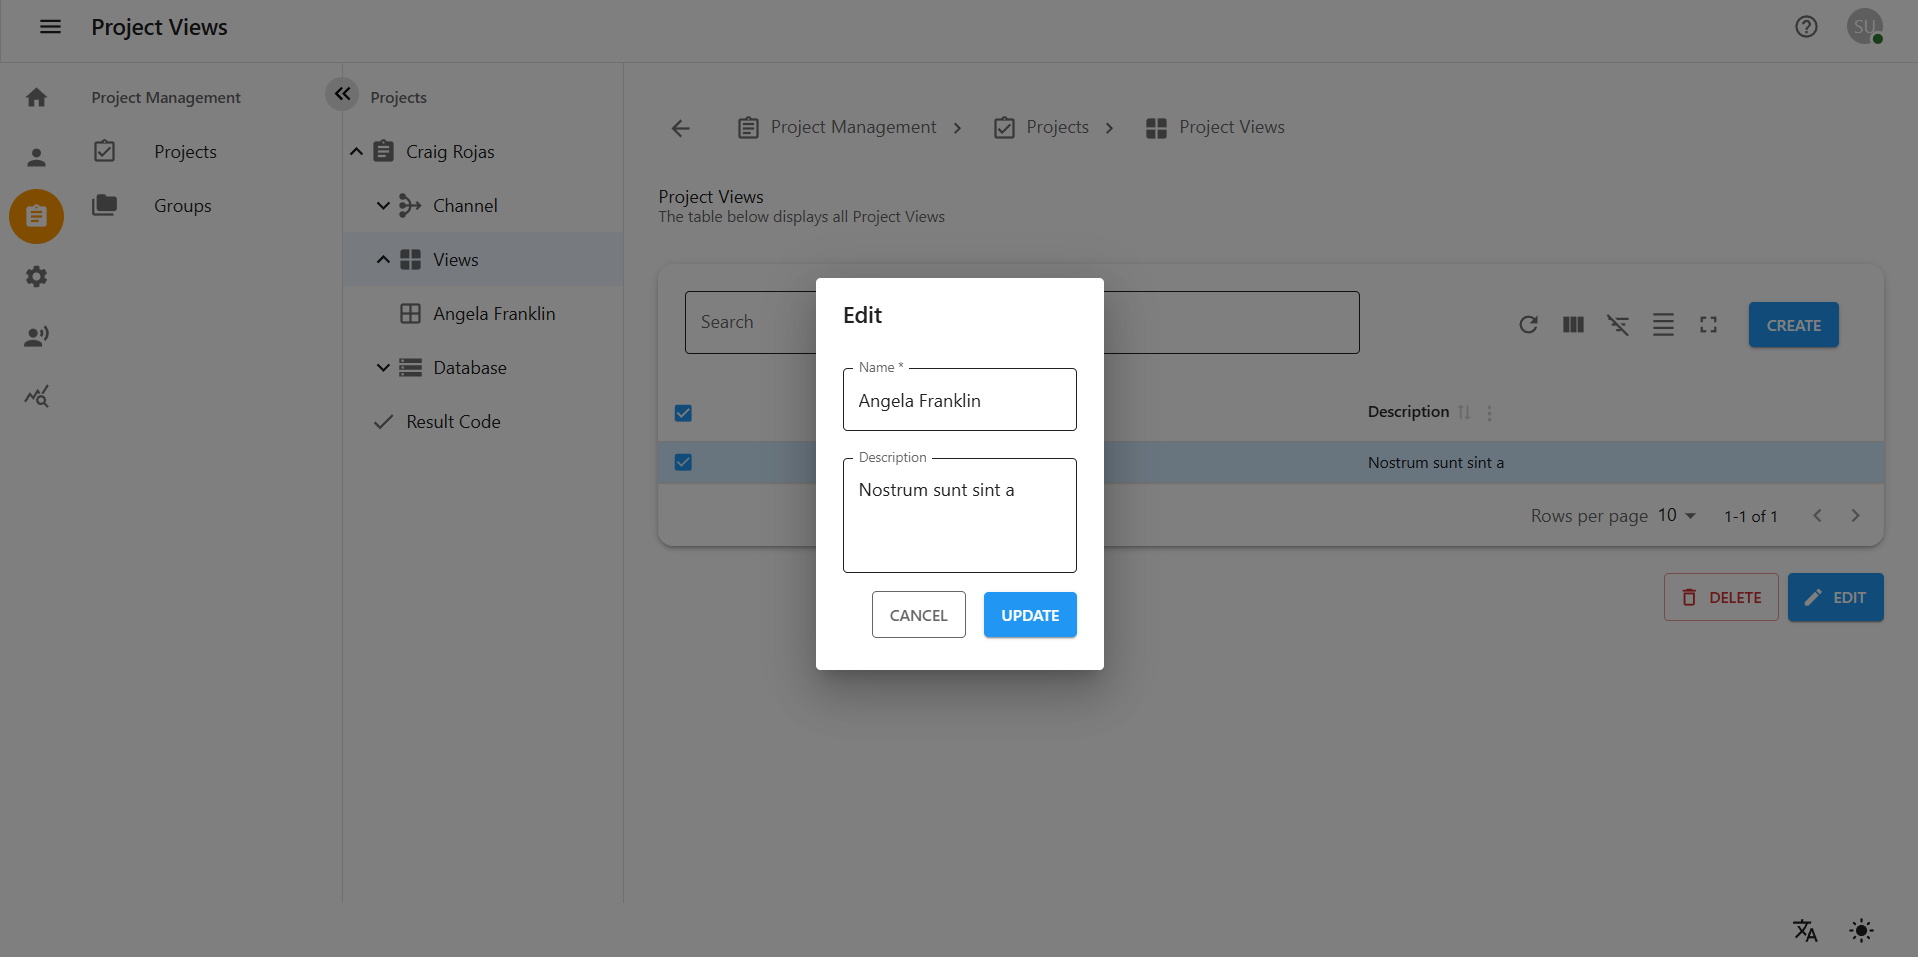
4.3 Editing a Project View
-
In the Project Views table, locate the view you want to edit.
-
Click the Edit icon/button beside the view.
-
A popup form will open pre-filled with the current information.
-
Modify the necessary fields such as name or description.
-
Click Save or Update to apply the changes.
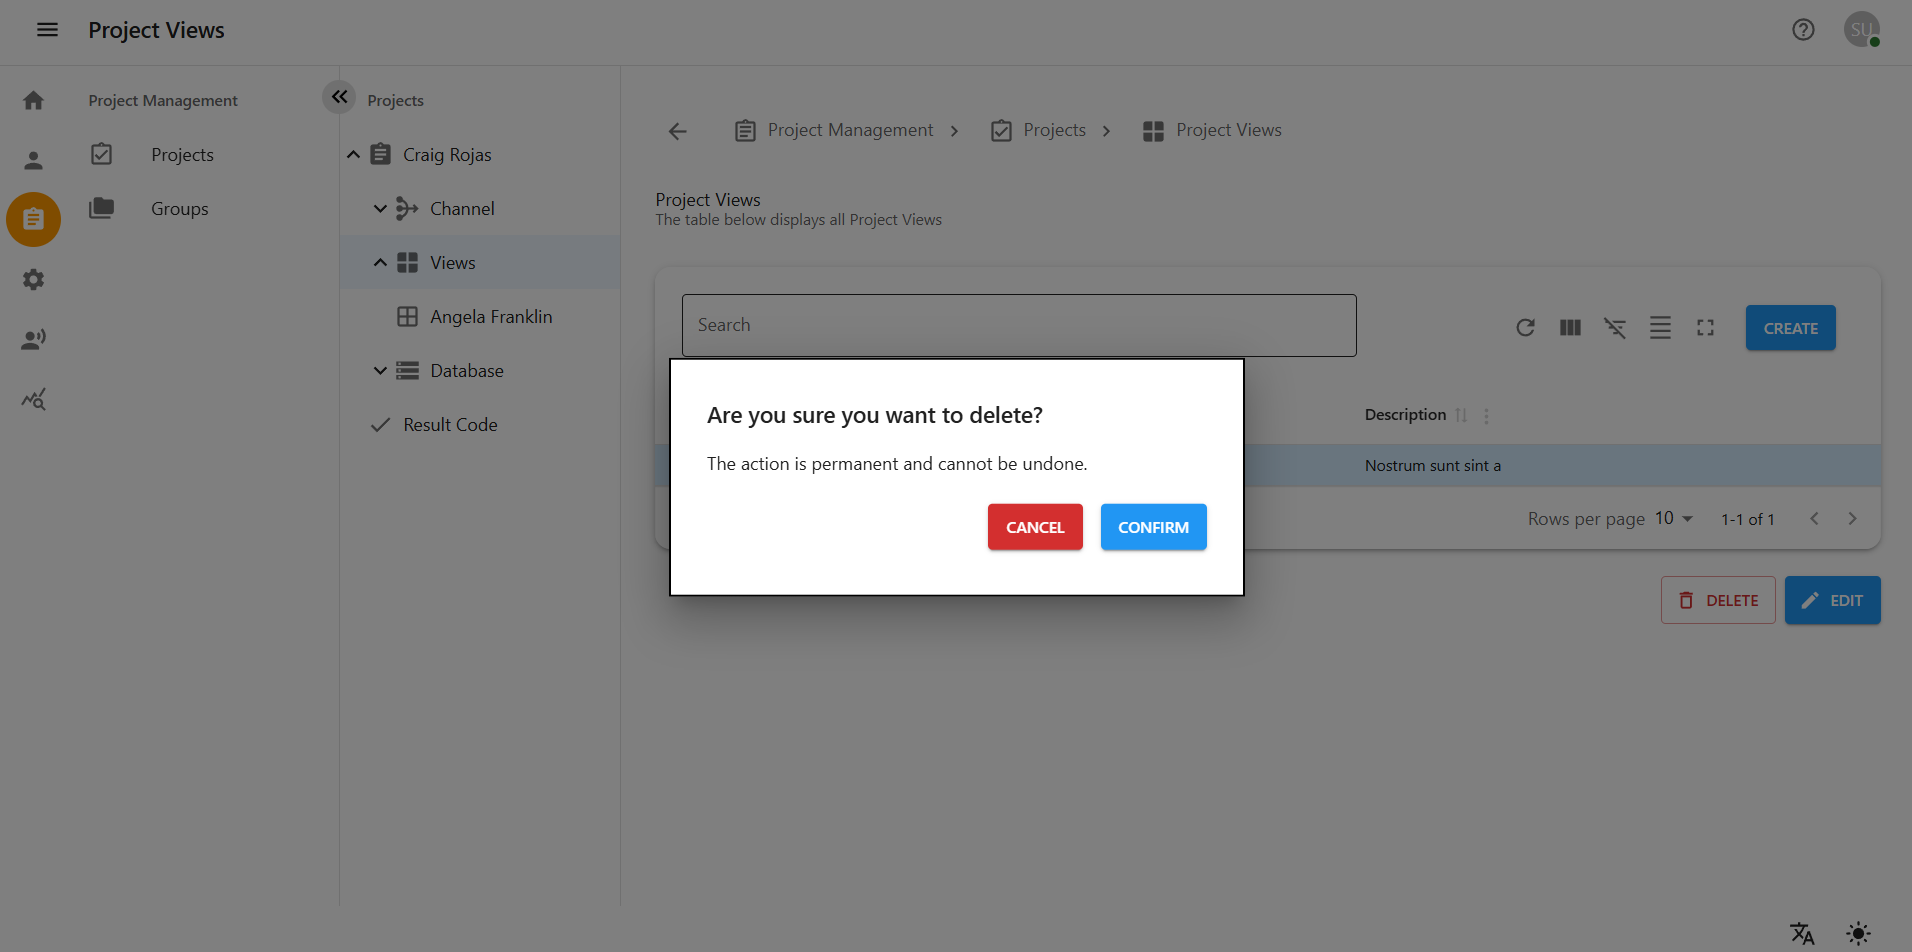
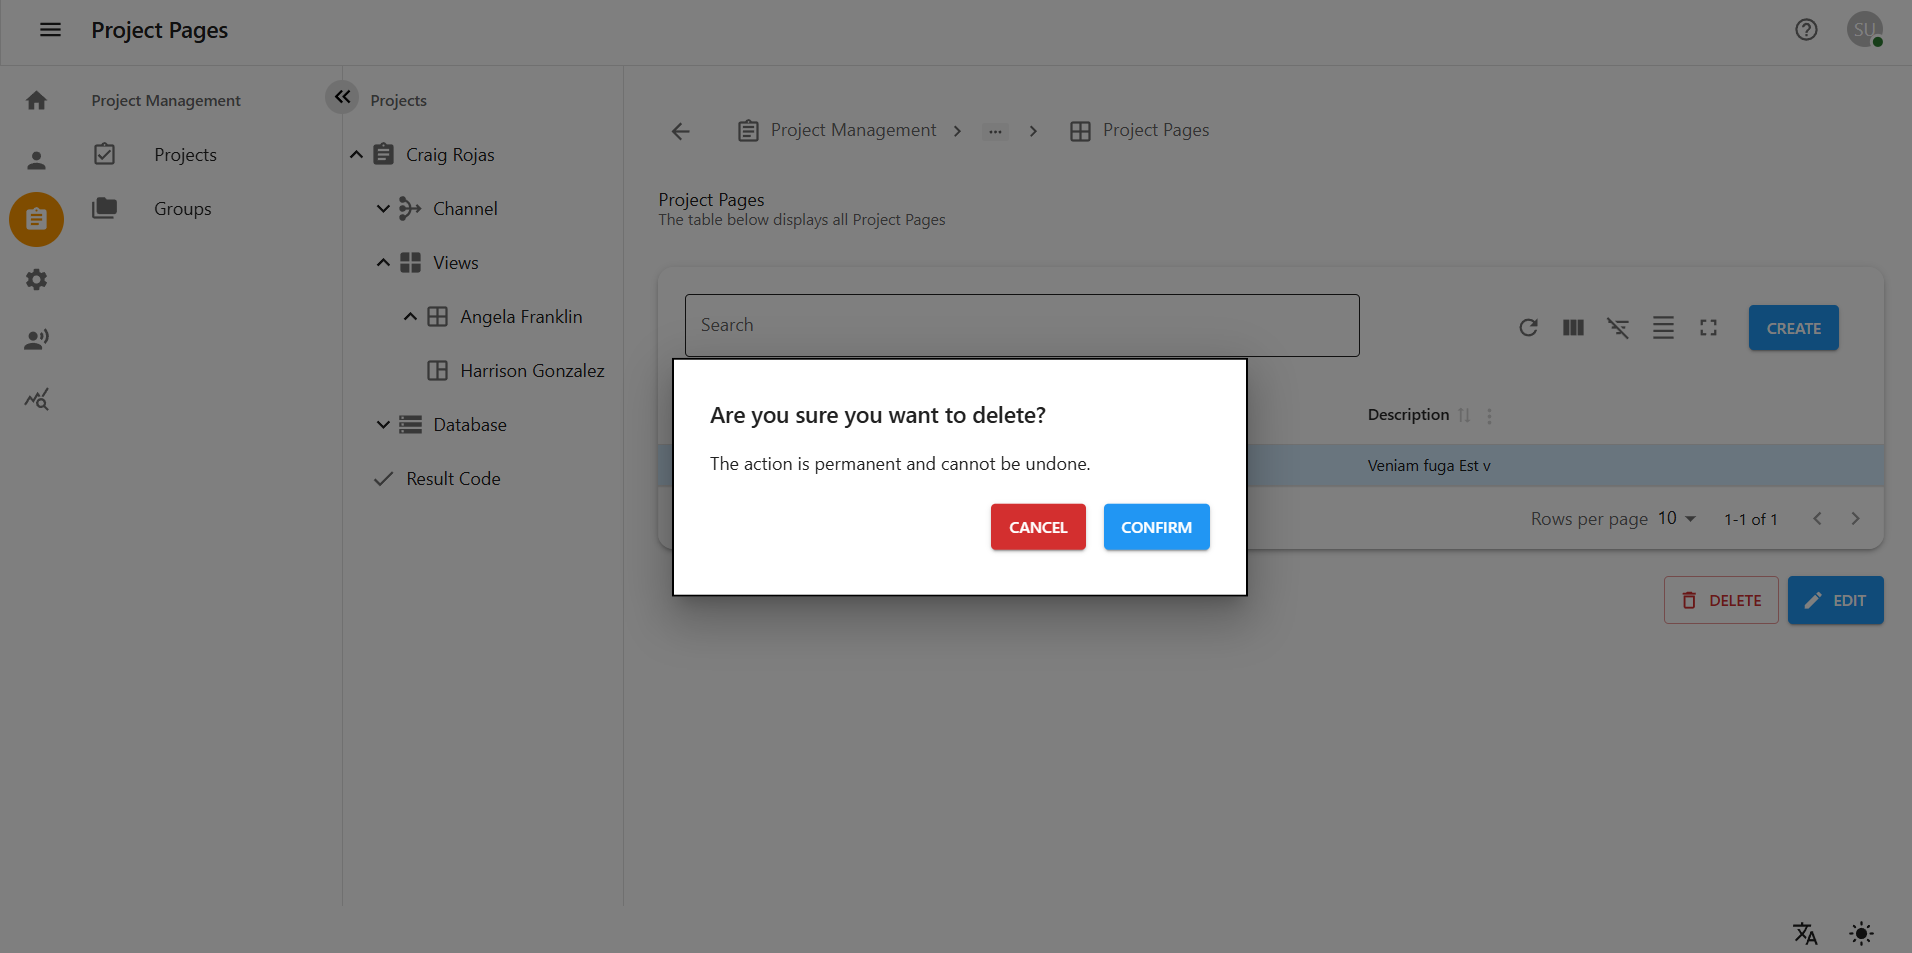
4.4 Deleting a Project View
-
In the Project Views list, find the view you want to delete.
-
Click the Delete icon/button next to the view.
-
A confirmation dialog will appear.
-
Click Yes or Confirm to permanently delete the view.
-
Note: Deleting a Project View will also remove all associated pages.
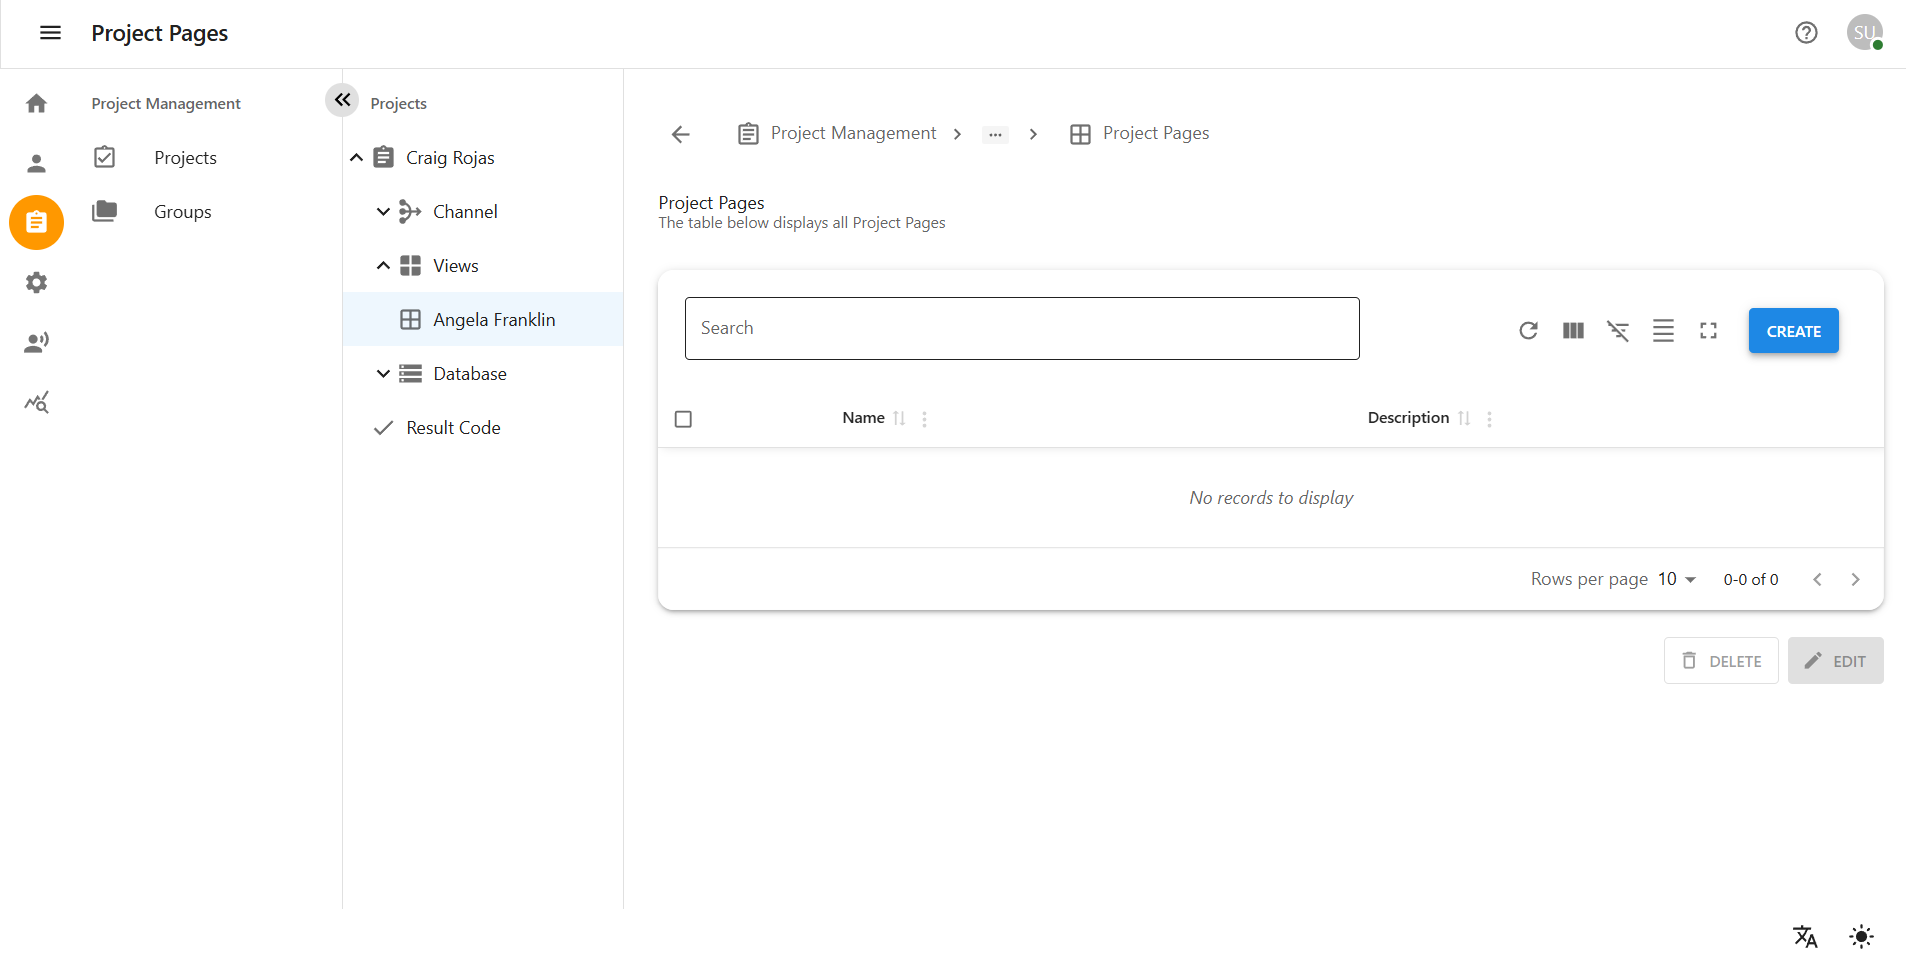
4.5 Creating a Page Within a Project View
-
After creating a Project View, click on the view name in the list.
-
You will be taken to the view’s details page.
-
Click on the Create Page button.
-
In the popup form, fill in the following:
-
Page Name: Name of the new page
-
Content/Description: (Optional) Page content or summary
-
-
Click Create to save the new page.
-
The page will now appear under the selected view.
4.6 Editing a Page
-
From the list of pages under a Project View, locate the page to be edited.
-
Click the Edit icon/button next to the page name.
-
A popup form will appear with the current content.
-
Modify the fields such as page name or content.
-
Click Save or Update to apply the changes.
4.7 Deleting a Page
-
From the list of pages under a Project View, locate the page to be deleted.
-
Click the Delete icon/button next to the page name.
-
A confirmation dialog will appear.
-
Click Yes or Confirm to delete the page.
-
The page will be removed from the view.
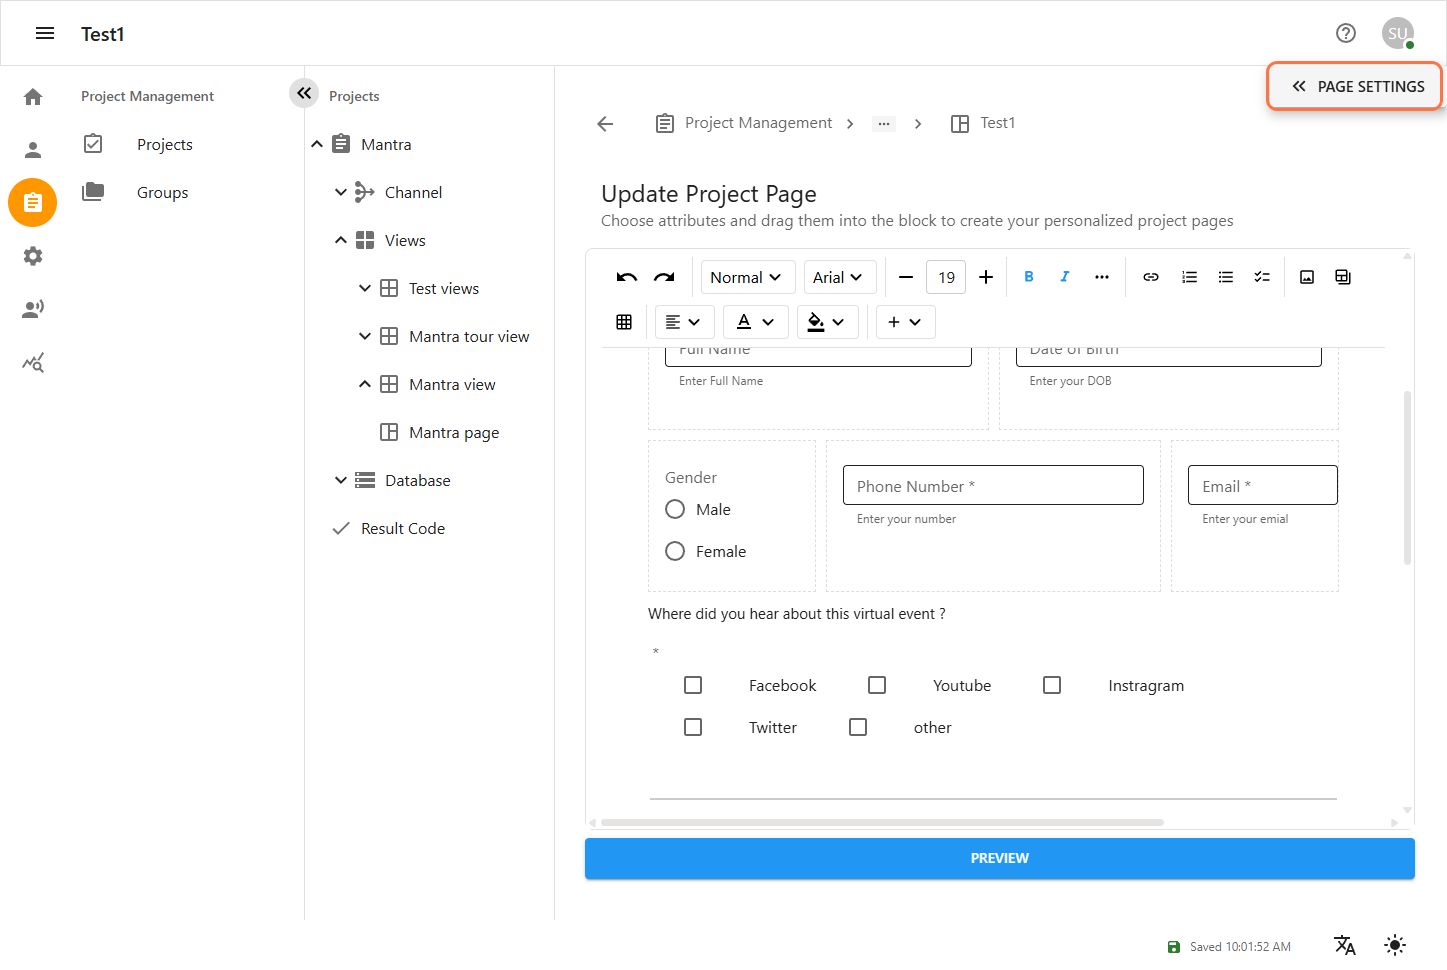
4.8 Page Settings
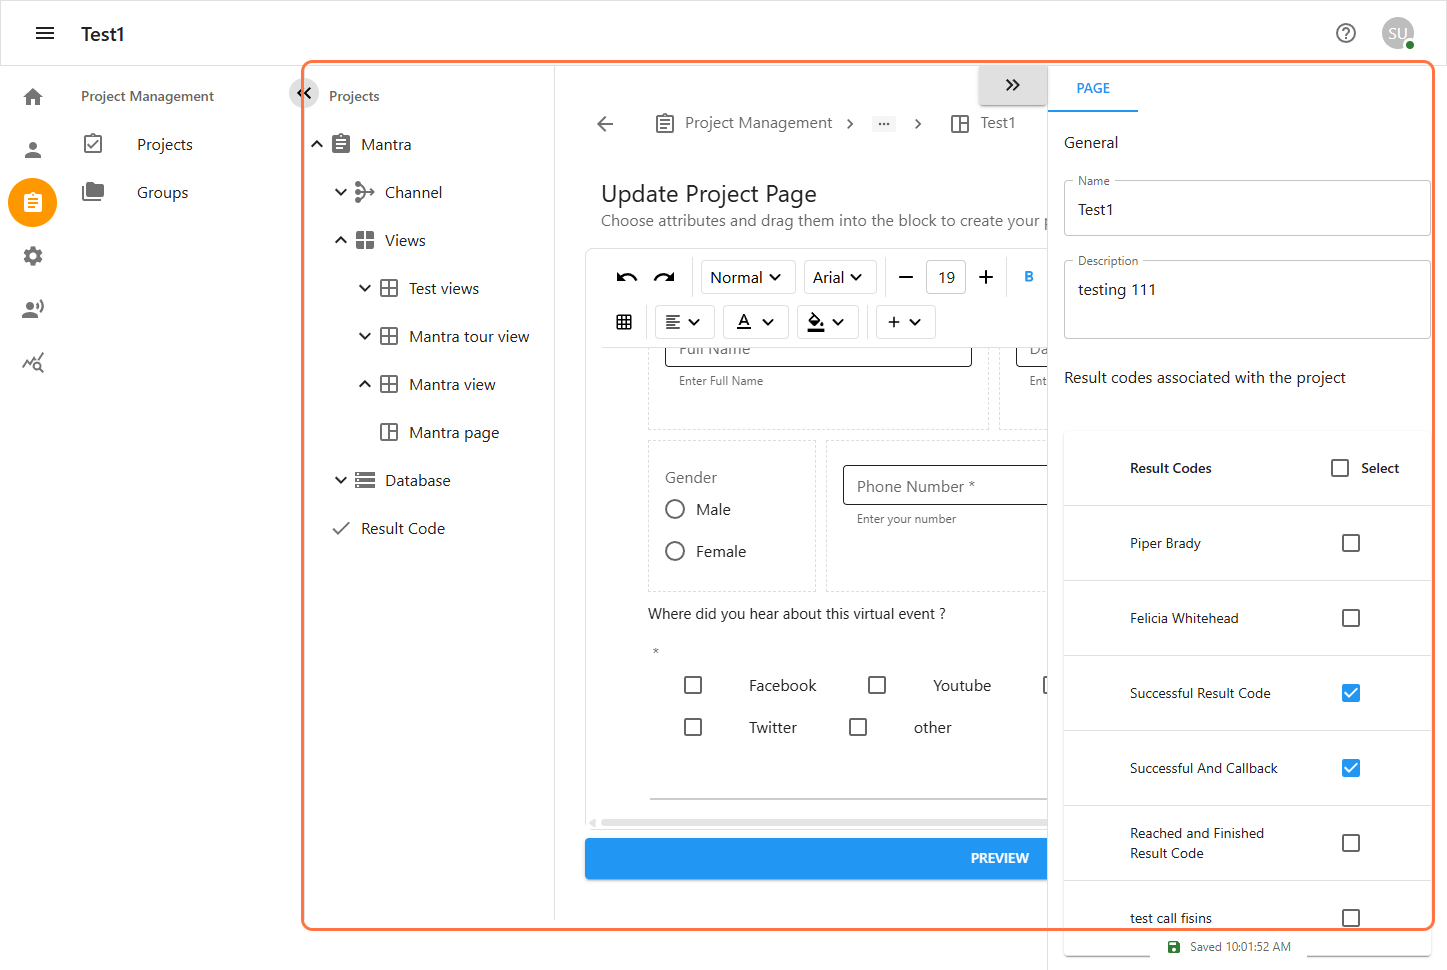
Within each Project View, the Page Settings section will appear in ride side of the view page, it allows configuration of key options, including the association of Result Codes. These result codes help define the outcomes of calls and ensure that actions are tied to appropriate call results.
On the right side of the Views page, you can also access the Project Settings, where you can configure additional project-specific preferences and behaviors.
5 Manage Project Export in Database
To Navigate export call records, first select a single project from the Project Management section. Then go to the Database tab of that project. Inside the database, click on the Export option. There, you will see all the records of calls related to the project, which you can view and export as needed.
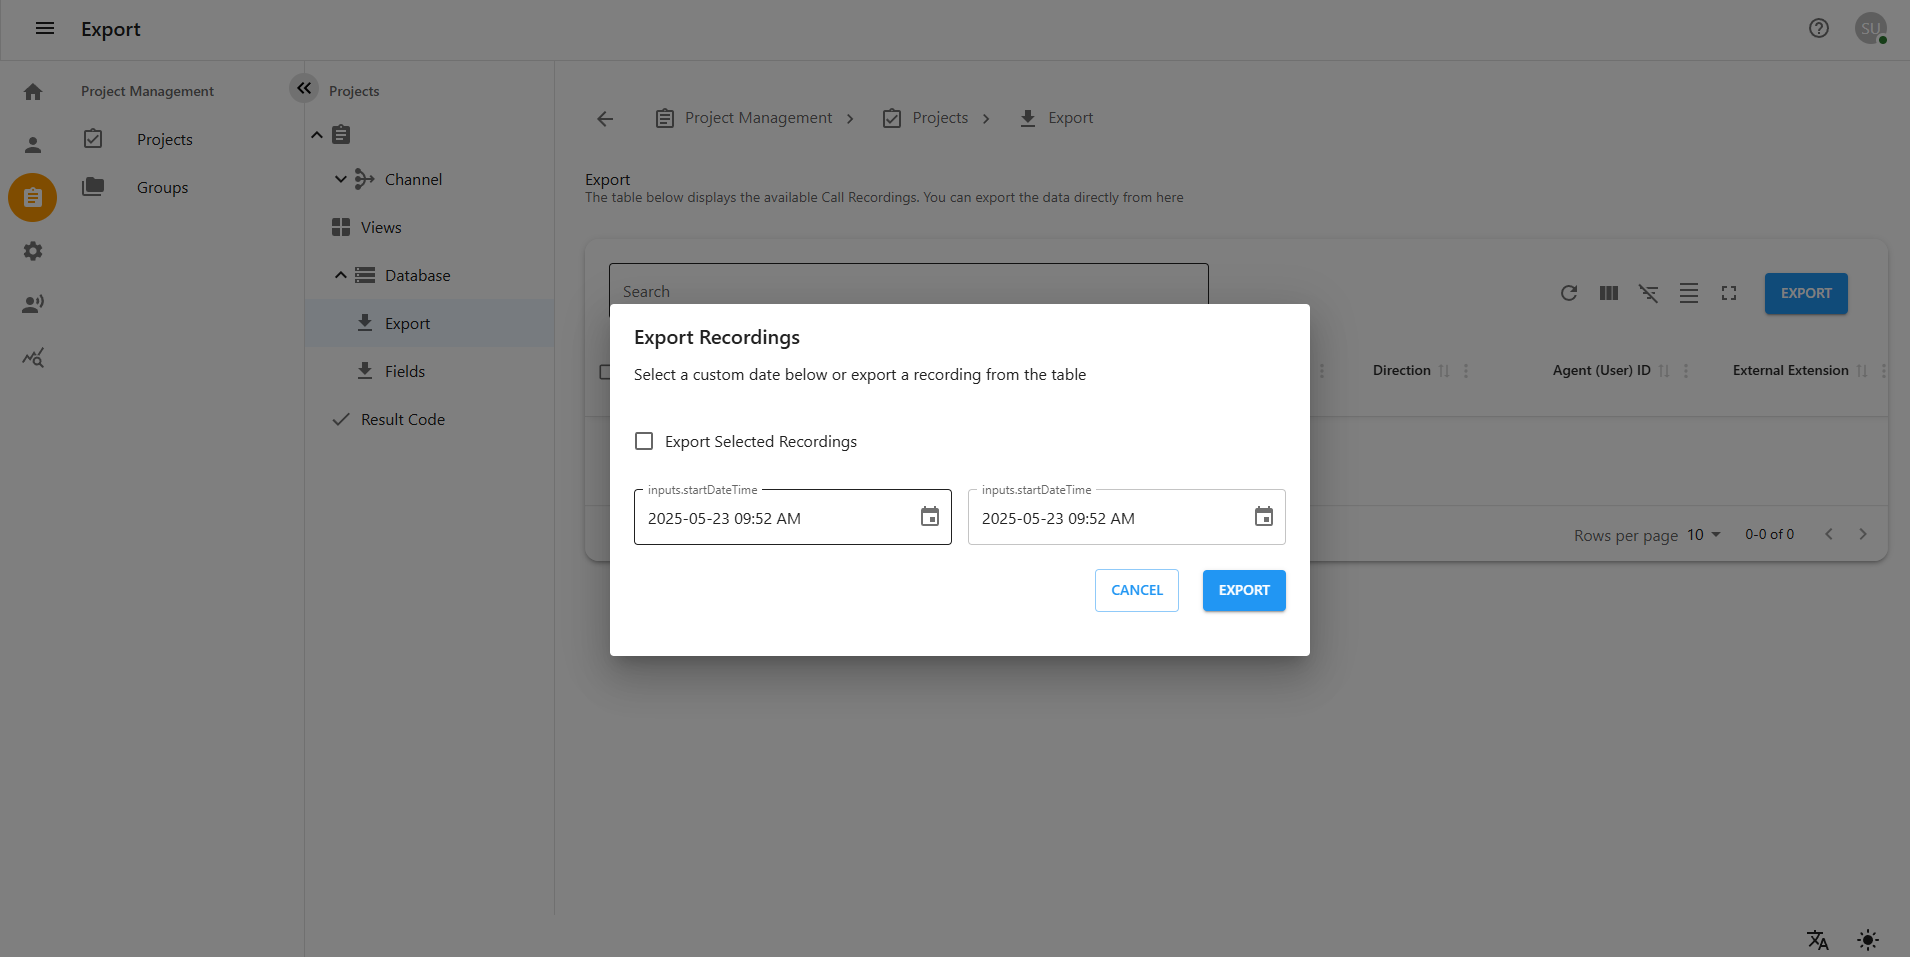
5.1 Exporting Call Records
Once inside the Database, click on the Export button.
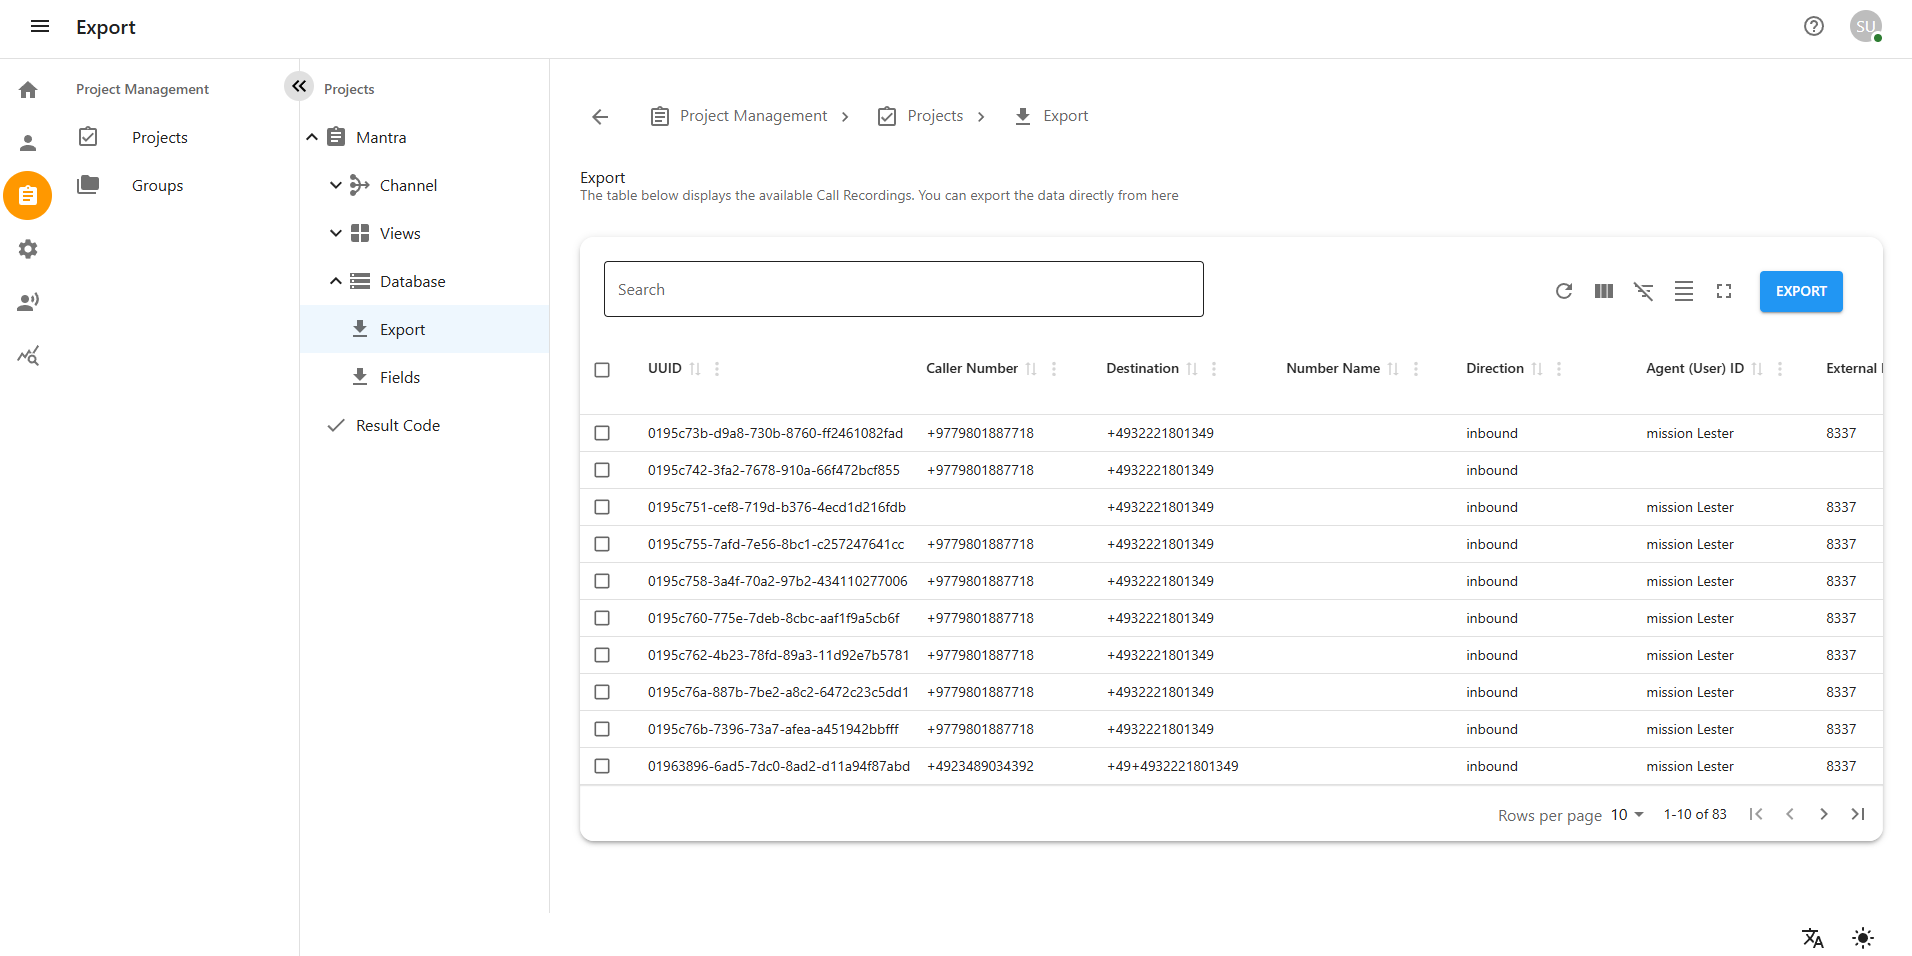
-
You will see detailed call records for the selected project.
-
Use the date range selector to filter call records based on a specific time period.
-
The system will display the filtered call data according to the selected dates.
-
Click the Export button located at the top right corner to begin the export process.
-
The system will generate a report based on the chosen date range.
-
You can download the report in Excel format for further analysis.
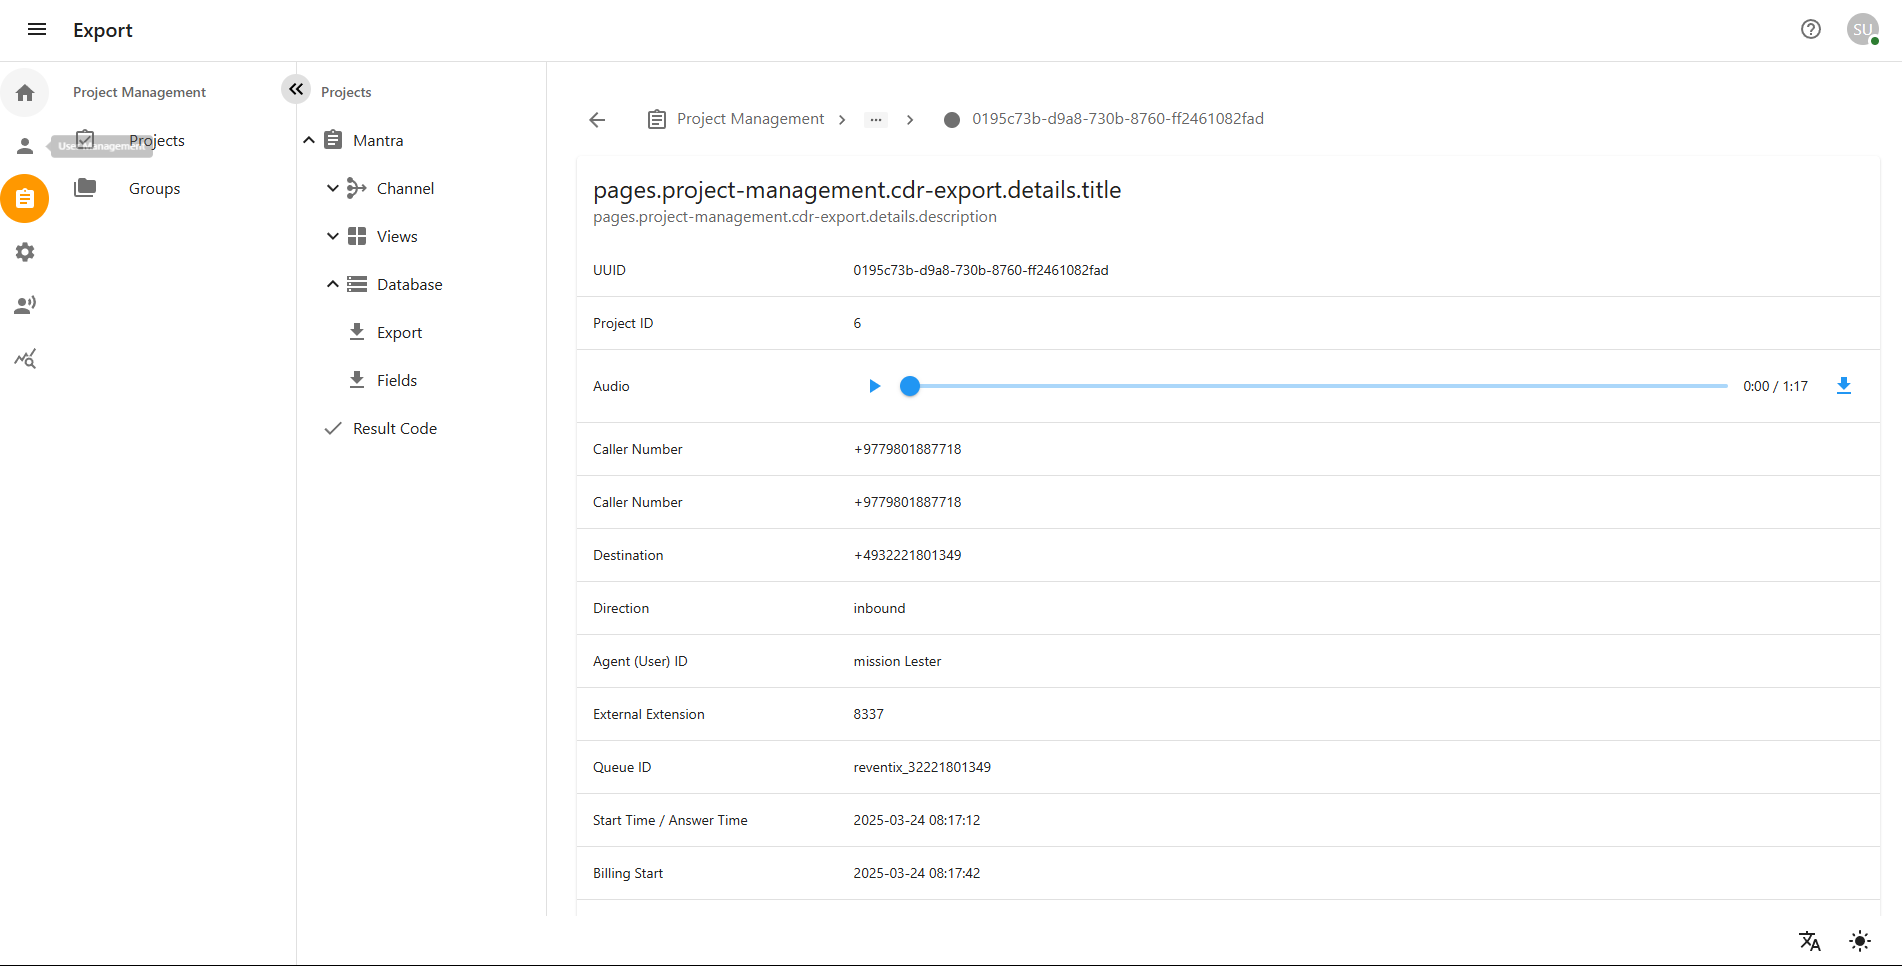
5.2 Viewing Exported Reports
Once inside the Database, click on the Export button.
-
After selecting a project, you will see a list of all call records related to that project.
-
Each call record displays detailed information, including the following fields:
-
UUID – A unique identifier for each call entry.
-
Project ID – The internal ID associated with the selected project.
-
Audio – Playback option for the recorded call.
-
Caller Number – The phone number from which the call originated.
-
Destination – The number or endpoint the call was directed to.
-
Direction – Indicates whether the call was inbound or outbound.
-
Agent (User) ID – ID of the agent or user who handled the call.
-
External Extension – External device or number used, if applicable.
-
Queue ID – The call queue or service line associated with the call.
-
-
Use the date range selector at the top to filter call records by a specific time period.
-
Click the Export button to initiate the export process.
-
The system will generate a downloadable Excel file containing the filtered records.
-
You can use the exported Excel sheet for further data analysis or reporting.
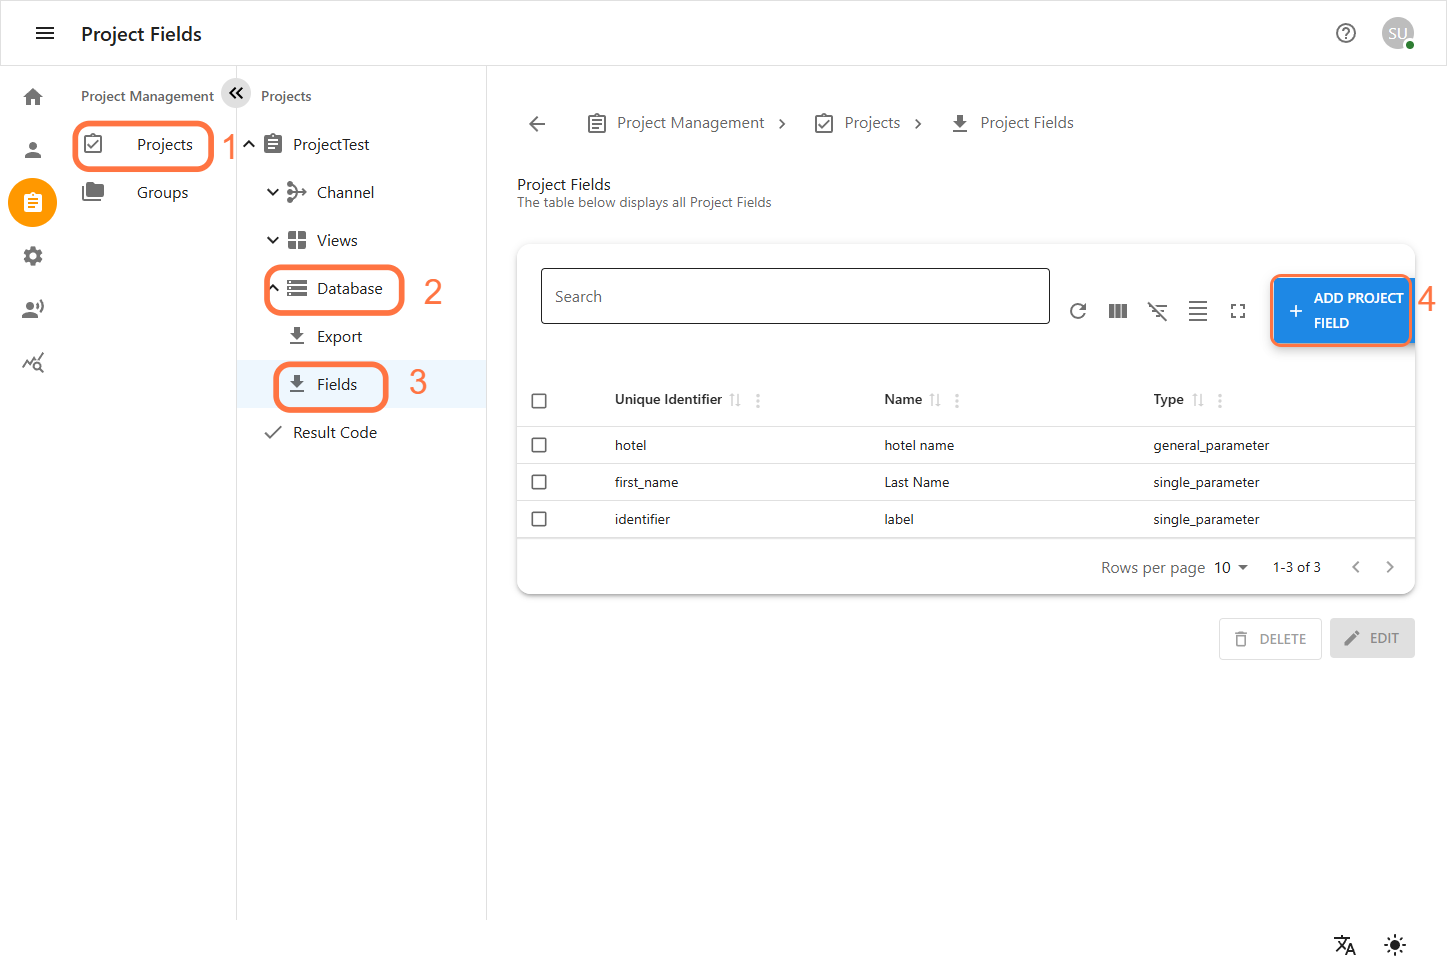
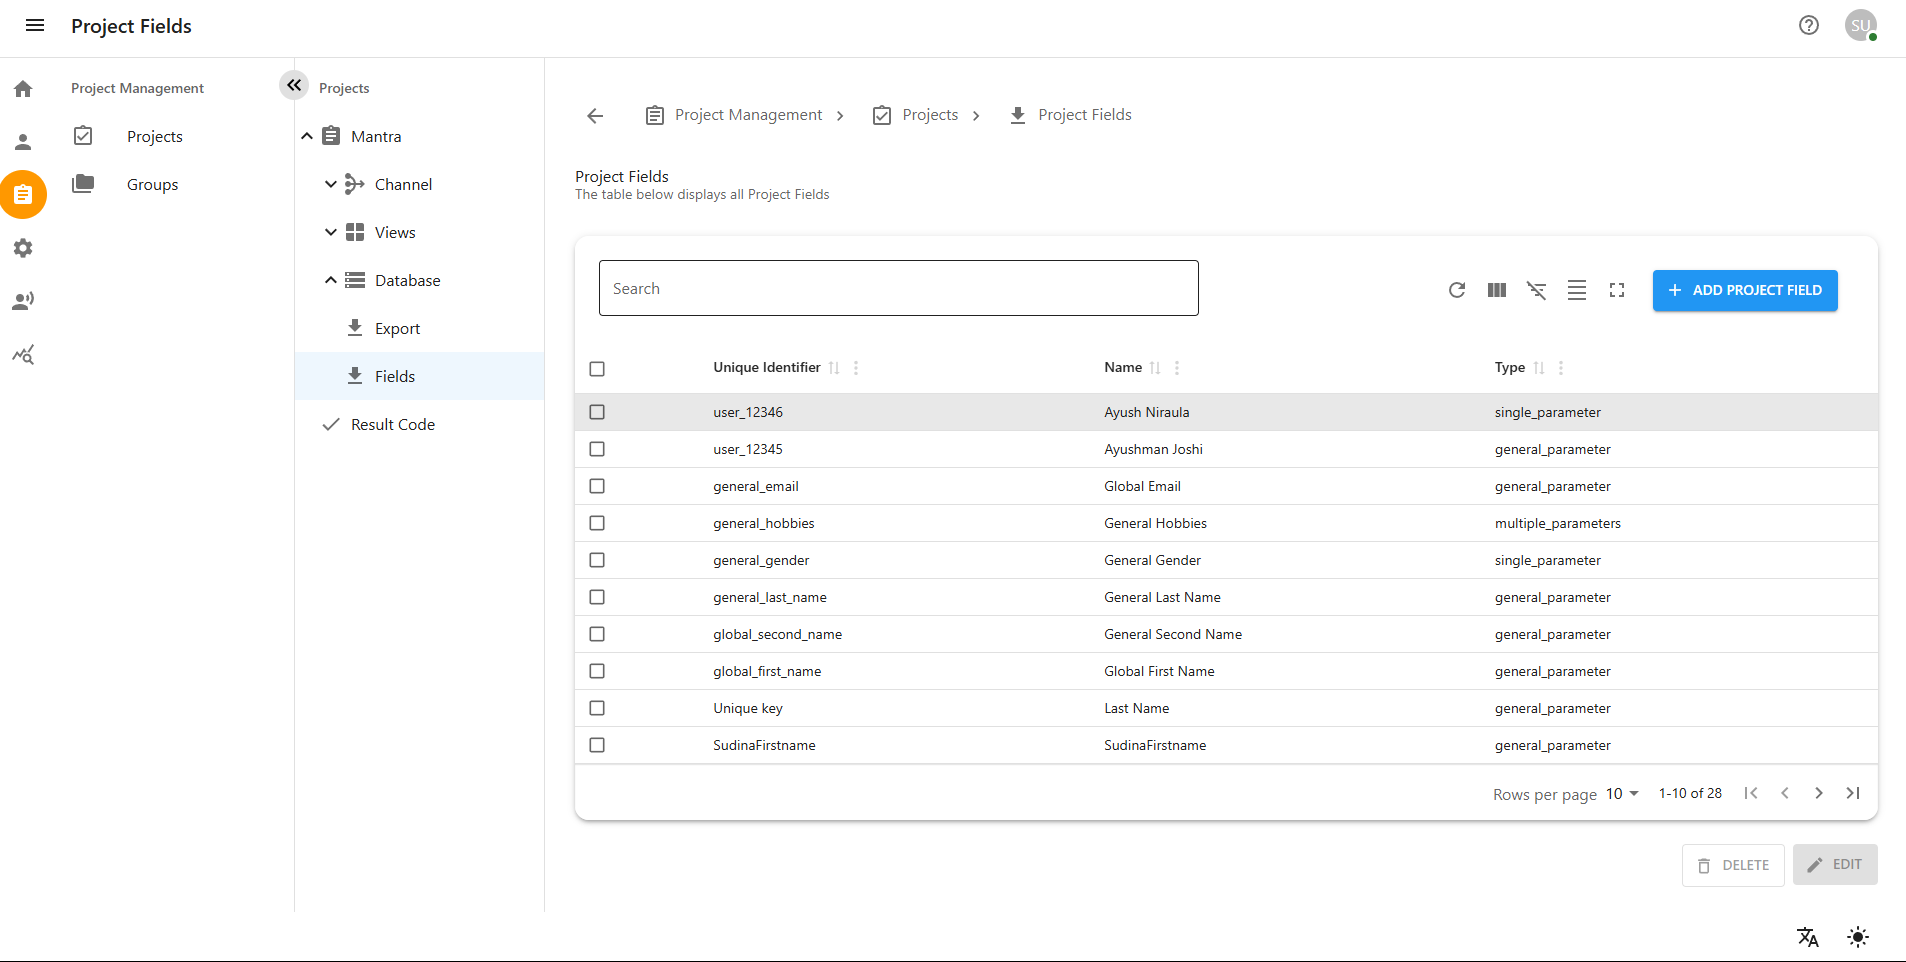
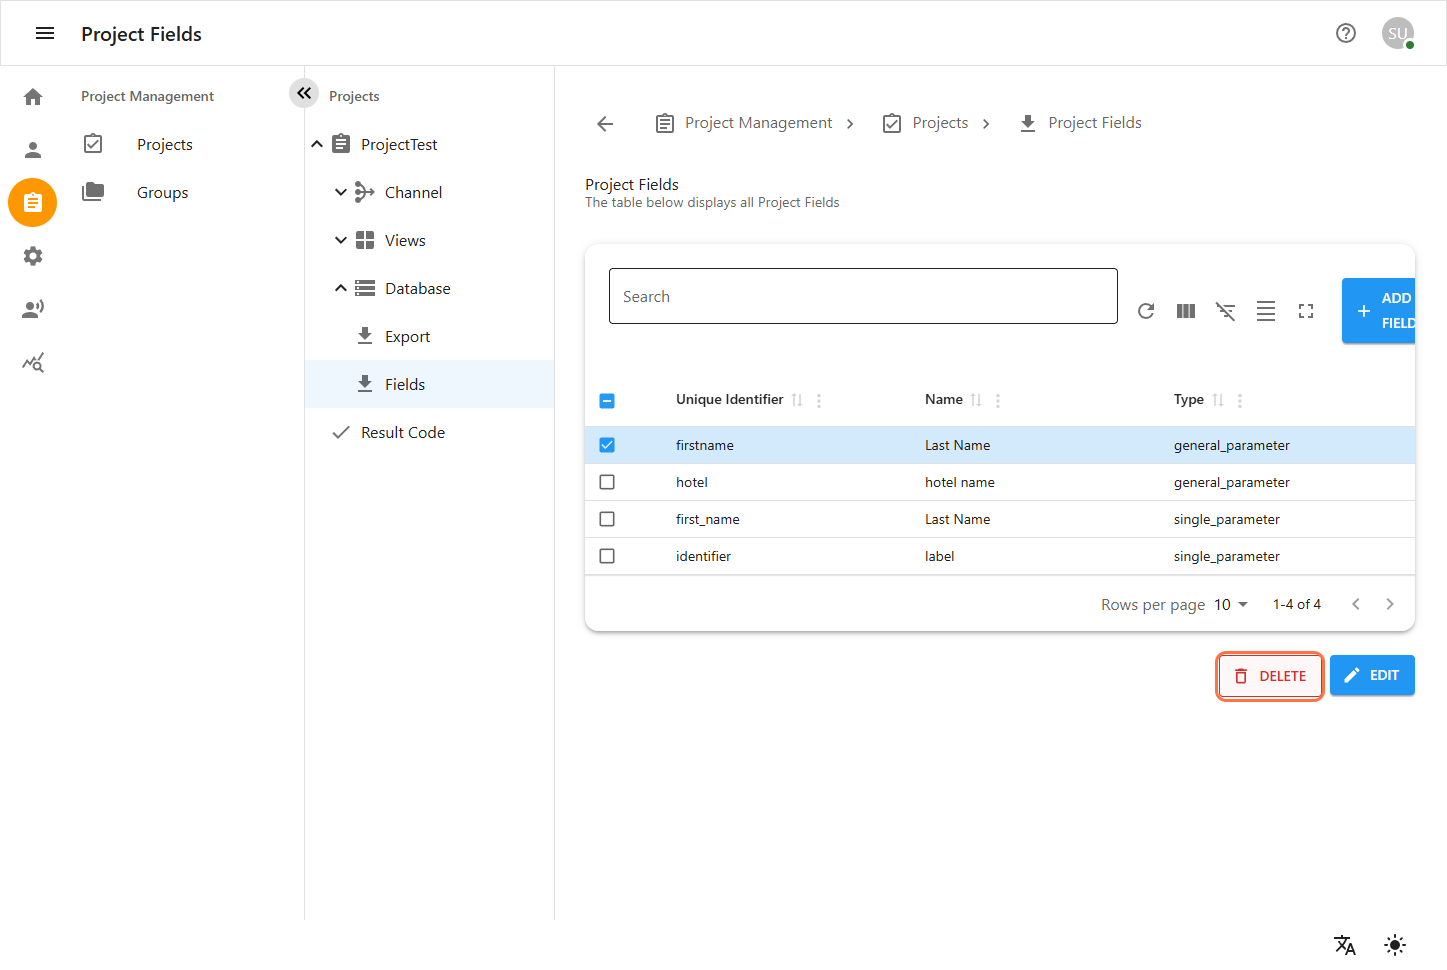
6 Manage Project Fields in Database
This manual guides users through the process of creating, editing, and deleting Project Fields in the Database section of a project. Project Fields are used to store custom data attributes related to your project and are accessible from the Fields tab under Database.
Each Project Field represents a single custom form used to collect specific project-related data. This means that one field corresponds to one custom form, allowing teams to tailor data collection according to the needs of each project.
In addition to this, Project Fields can also be used in emails and views. This allows users to dynamically include field values in email templates for personalized communication and to display or filter information in the project views based on those fields.
Accessing the Fields Section
-
Log in to the system.
-
In the left sidebar, click on Projects to expand it.
-
Select your project (e.g., Mantra).
-
Navigate to Database > Fields.
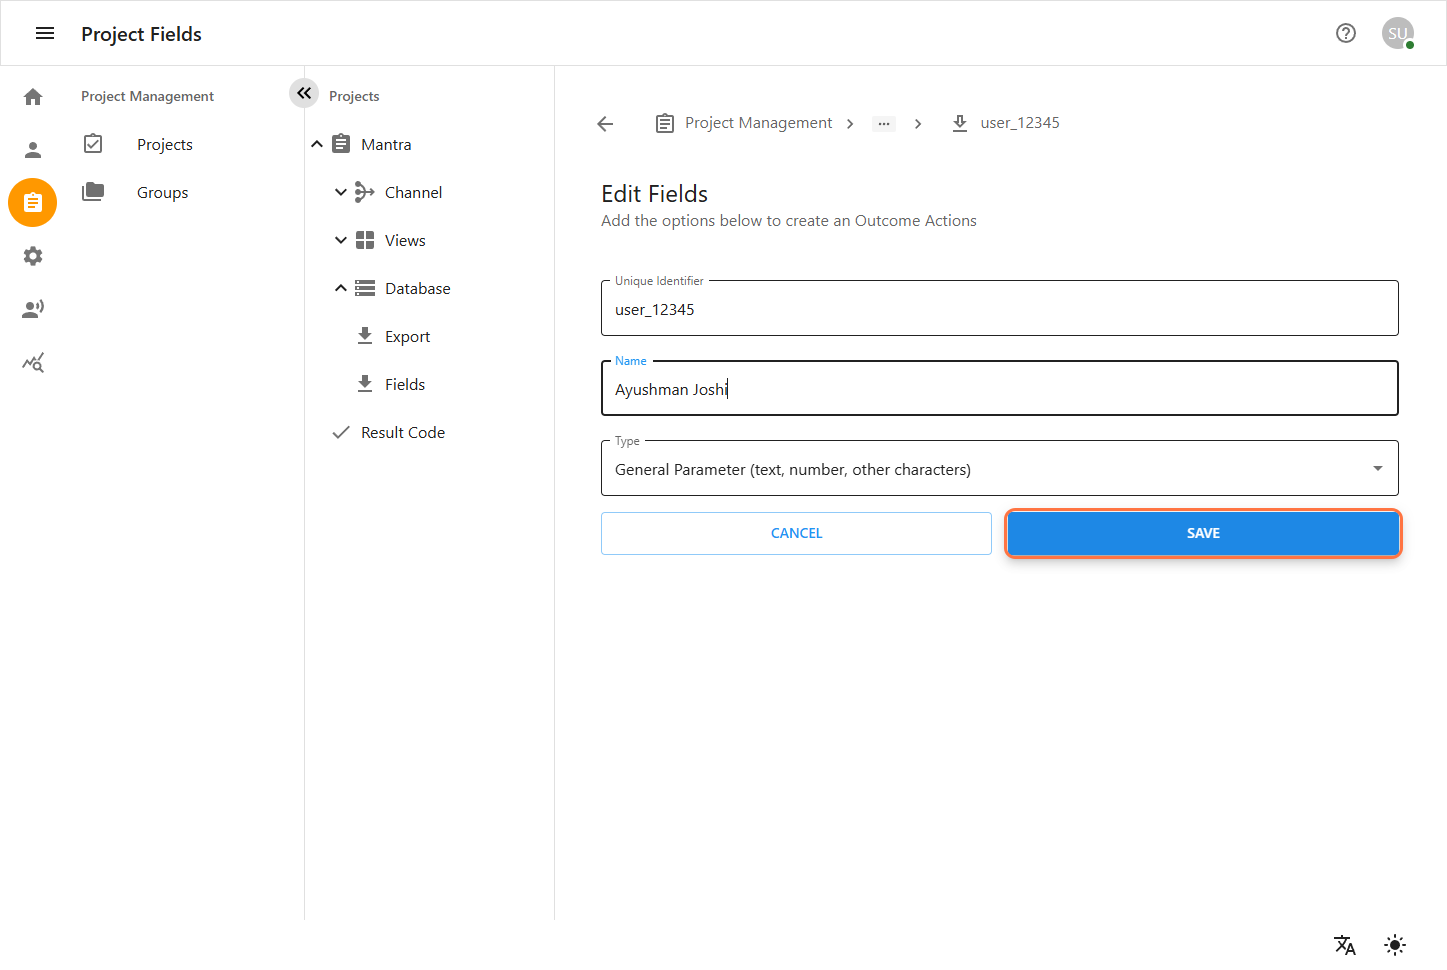
6.1 Creating a Project Field
-
Click the
+icon or the Add Project Field button. -
In the Add Fields form, fill out the following:
-
Unique Identifier: A unique internal name for the field.
-
Name: A user-friendly name shown in the UI.
-
Type: Select the type of field (e.g.General Parameter(text,number,other character),Single Parameter,Multiple Parameter).
-
|
When creating a new Project Field, you are required to select a Type. This determines the format and behavior of the data the field will accept. Below are the available field types and their detailed descriptions: |
-
Click CREATE to finalize the field creation.
-
Click CANCEL to exit without saving.
Adding a General parameter
Used to store general-purpose information in basic formats. These are ideal for simple entries that require text or numerical input.
-
Text: Accepts alphanumeric characters (letters, numbers, symbols). Use this for names, descriptions, IDs, or any textual content.
-
Number: Only accepts numerical input (integer or decimal). Suitable for fields like quantity, amount, or measurement values.
-
Other Characters: For special or structured character inputs (e.g., symbols, codes, etc.). This allows for flexibility in input beyond standard text or numbers.
Adding a Single Parameter
Used to capture a single value from a defined set of options. This is commonly implemented as a dropdown menu or radio button.
-
Useful when the user must select only one option (e.g., Status: Active/Inactive, Priority: High/Medium/Low).
-
Helps maintain consistency and data validation across entries.
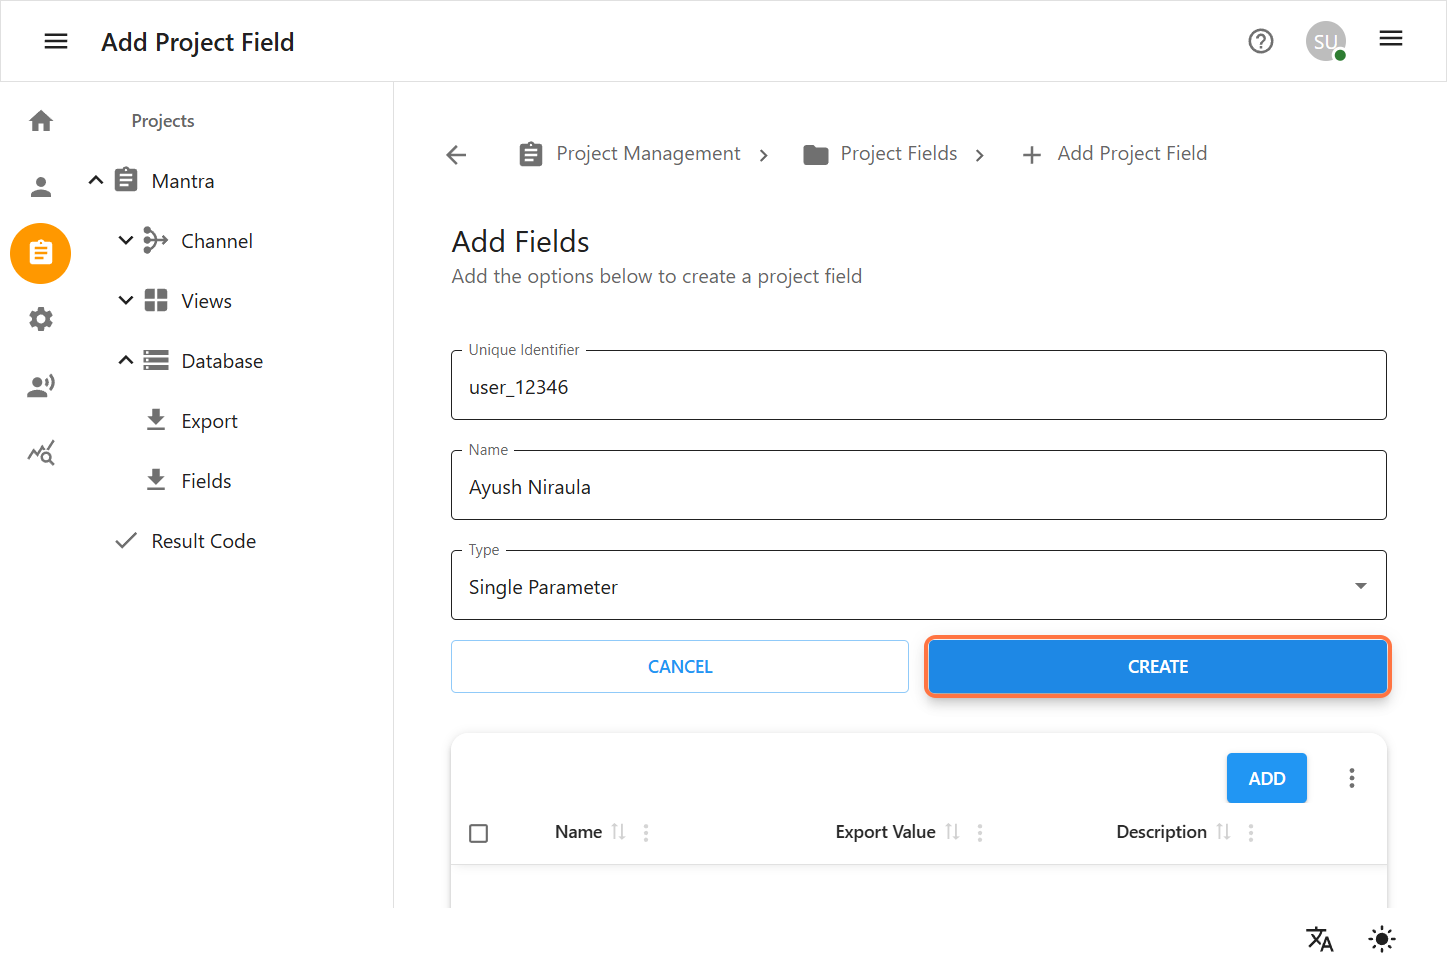
Steps to Configure:
-
Select Single Parameter from the field type dropdown.
-
After selection, you will see a table with available configuration options.
-
Click the Add button to proceed.
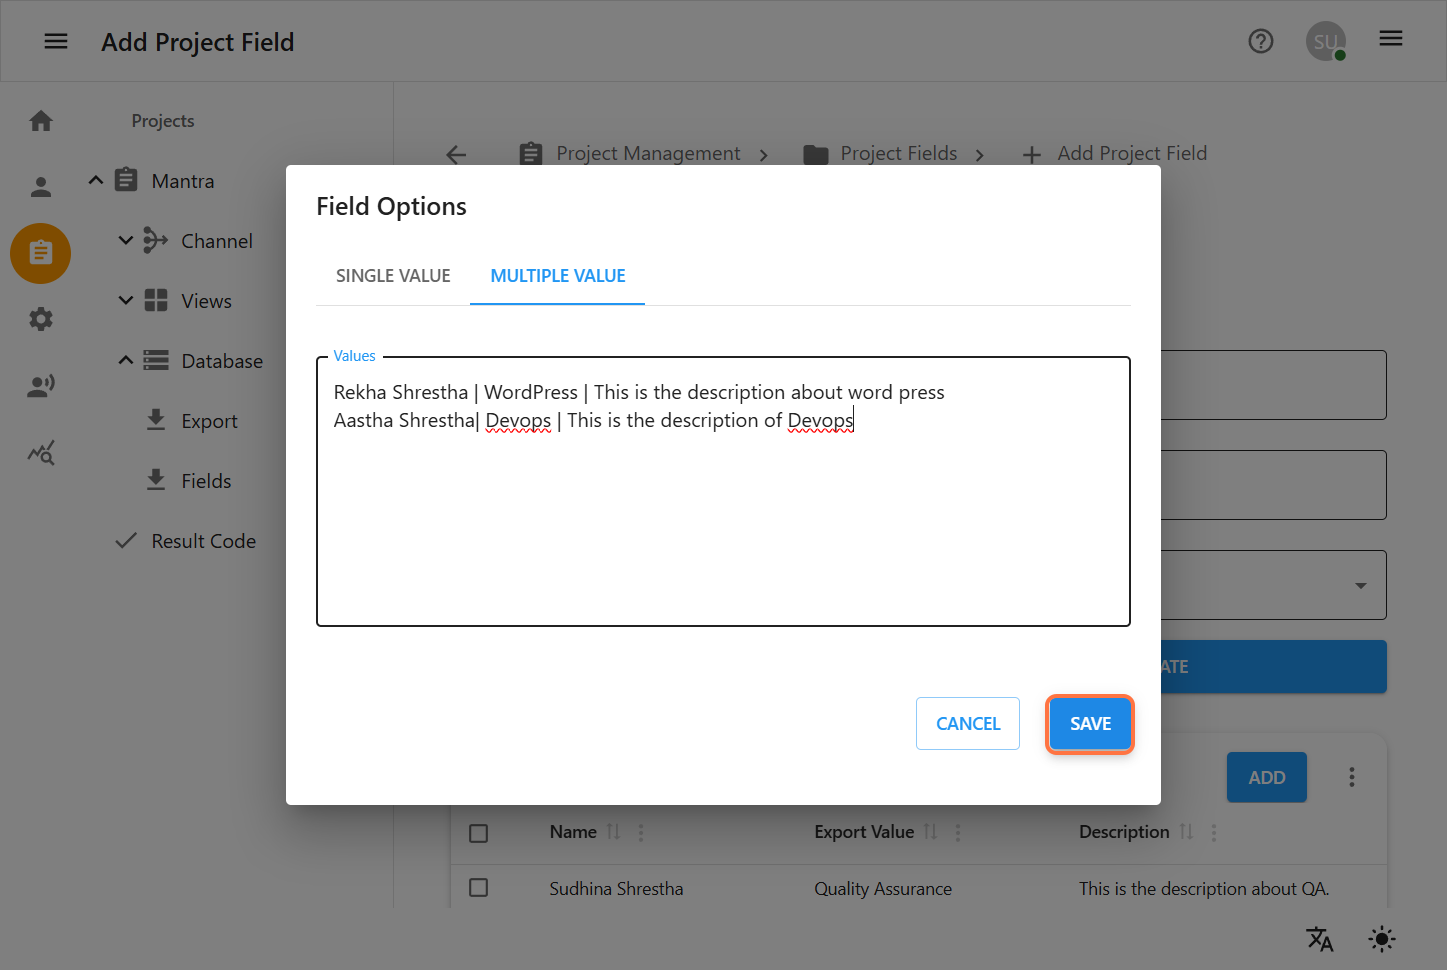
-
A popup or section will appear, allowing you to choose between:
-
Single Value: This allows you to define only one selectable value for the field.

-
Multiple Value: This option lets you define multiple values at once.
Adding a Multiple Parameter
Allows selection of multiple values from a predefined list. Typically shown as a multi-select dropdown or checkbox list.
-
Ideal for cases where a project field may need to store several applicable values (e.g., Tags, Categories, Departments involved).
-
Ensures users can select more than one relevant attribute without duplicating the field.
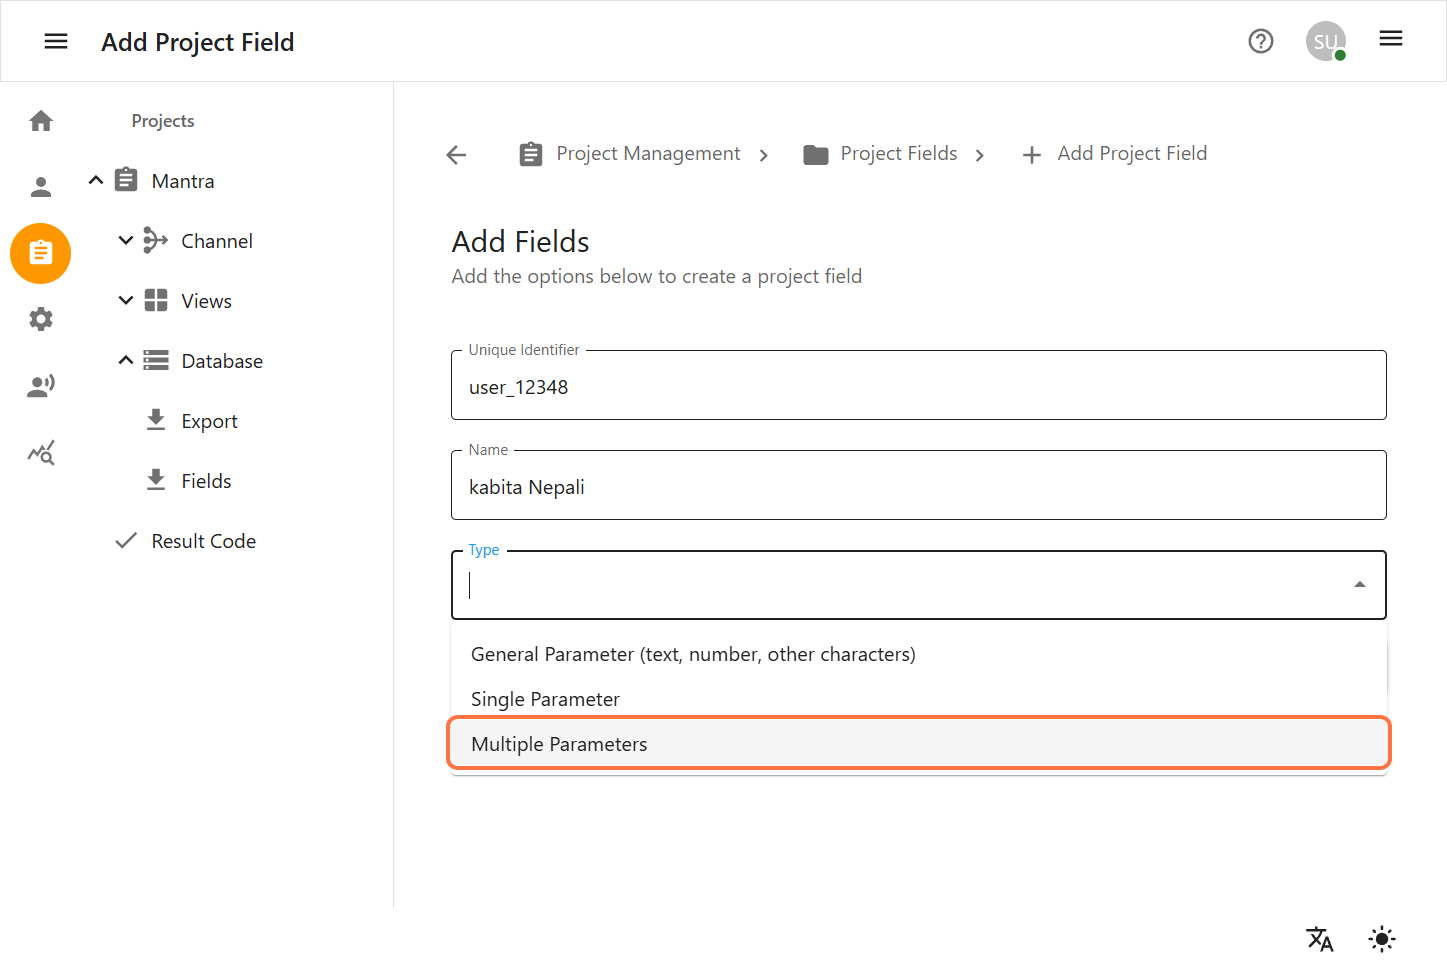
Steps to Configure:
-
Select Multiple Parameter from the field type dropdown.
-
After selection, you will see a table with available configuration options.
-
Click the Add button to proceed.
-
A popup or section will appear, allowing you to choose between:
-
Single Value: This allows you to define only one selectable value for the field.
-
Multiple Value: This option lets you define multiple values at once.

6.2 Editing a Project Field
-
From the Fields list, locate the field you want to modify.
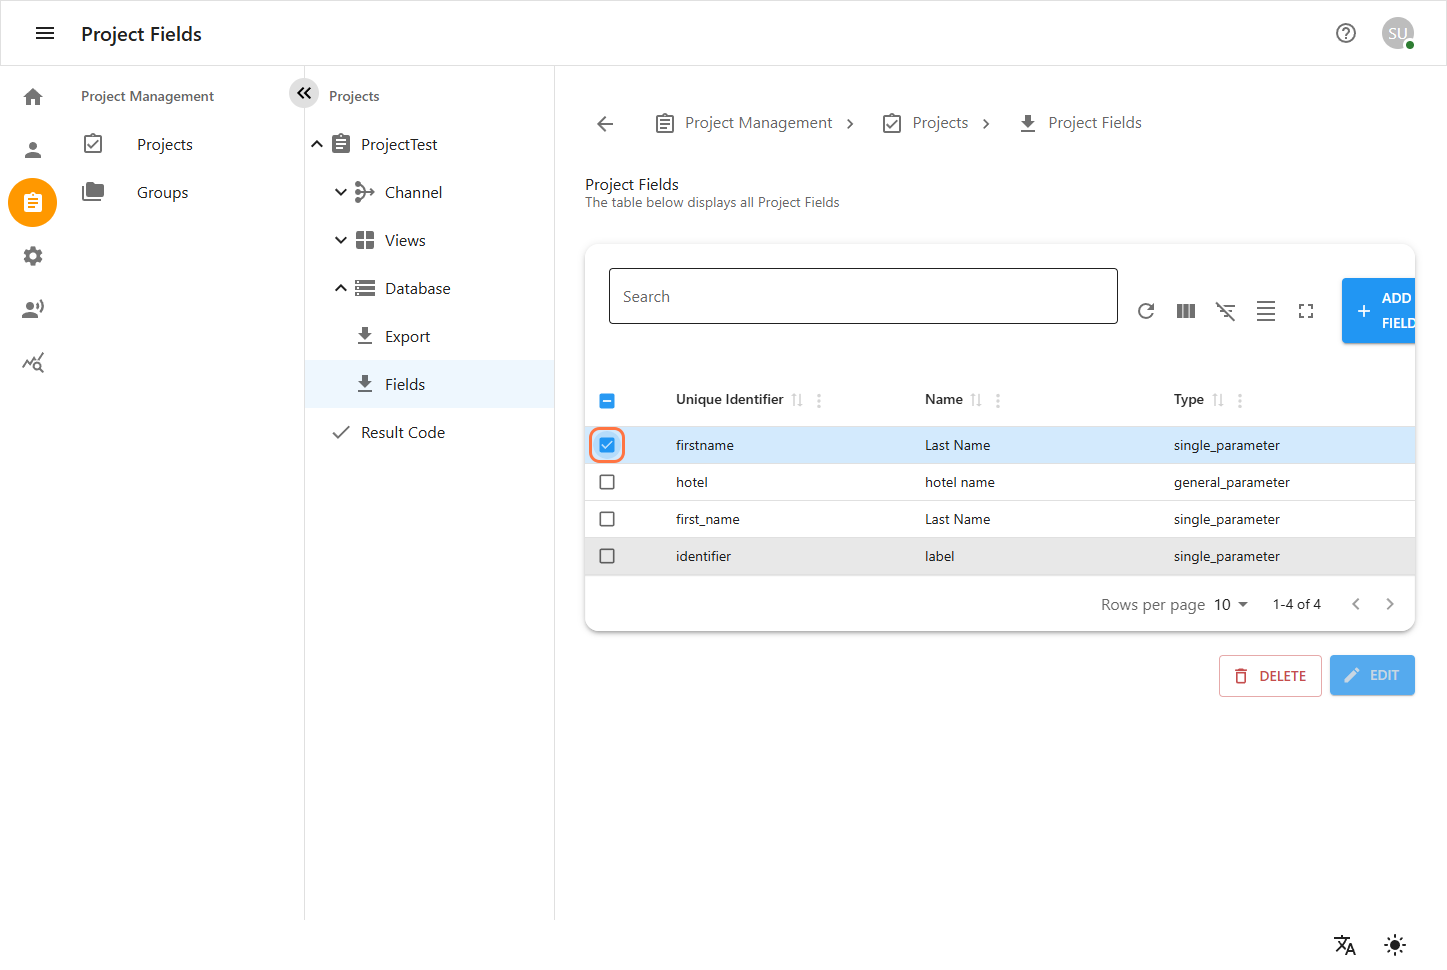
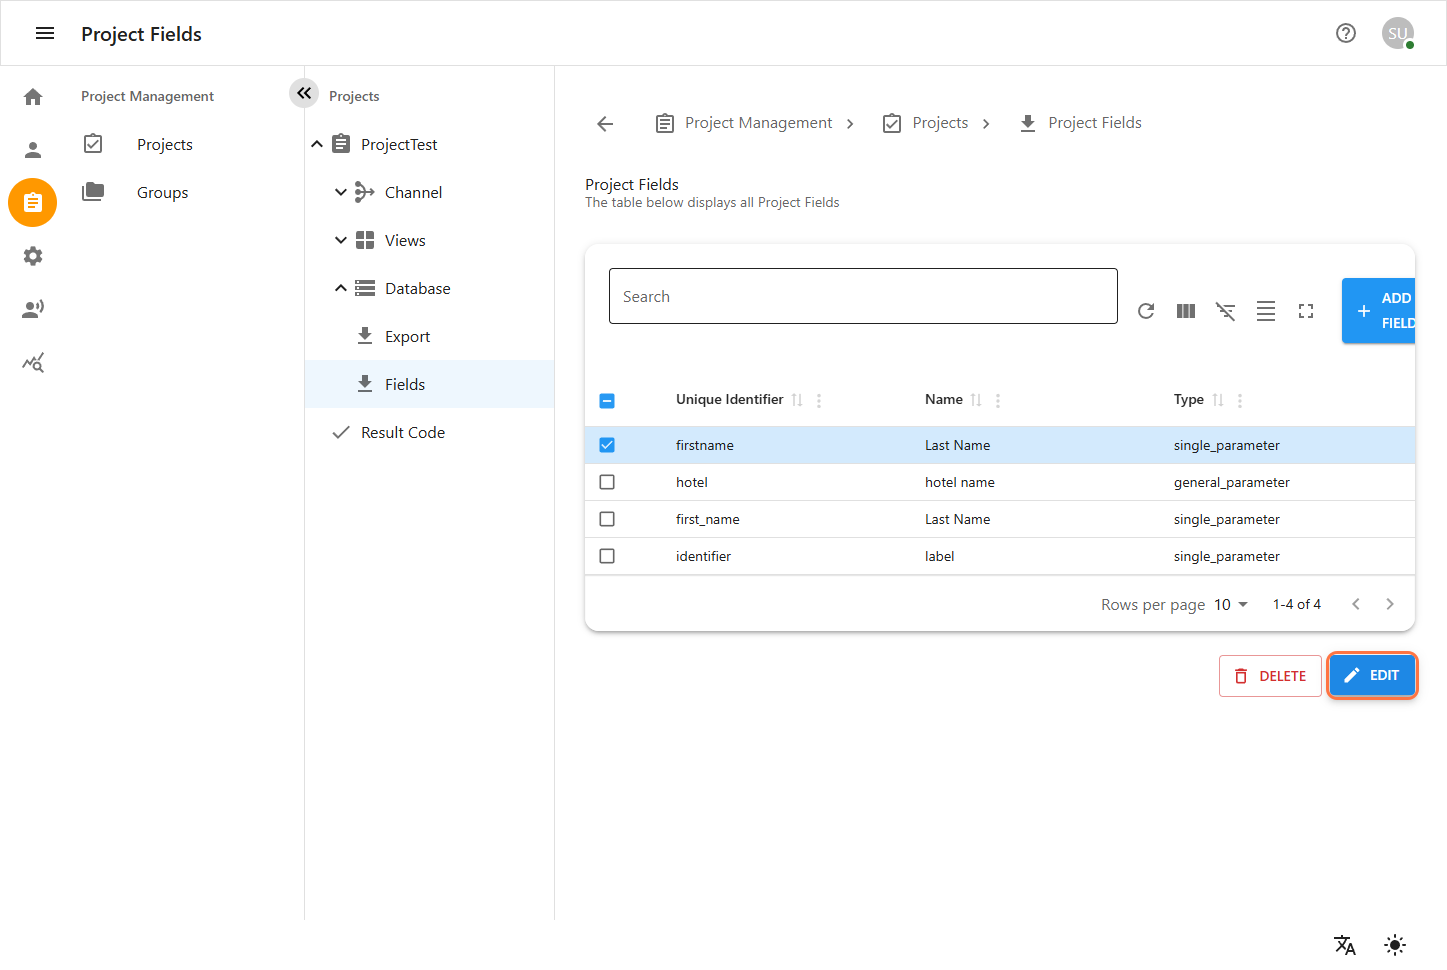
-
Click on the field to open its details.
-
Update the following as required:
-
Label
-
Type : (e.g.General Parameter(text,number,other character),Single Parameter,Multiple Parameter).
-
Option entries (add, modify, or remove dropdown values)
-
Click UPDATE to save changes.
-
Click CANCEL to discard unsaved edits.
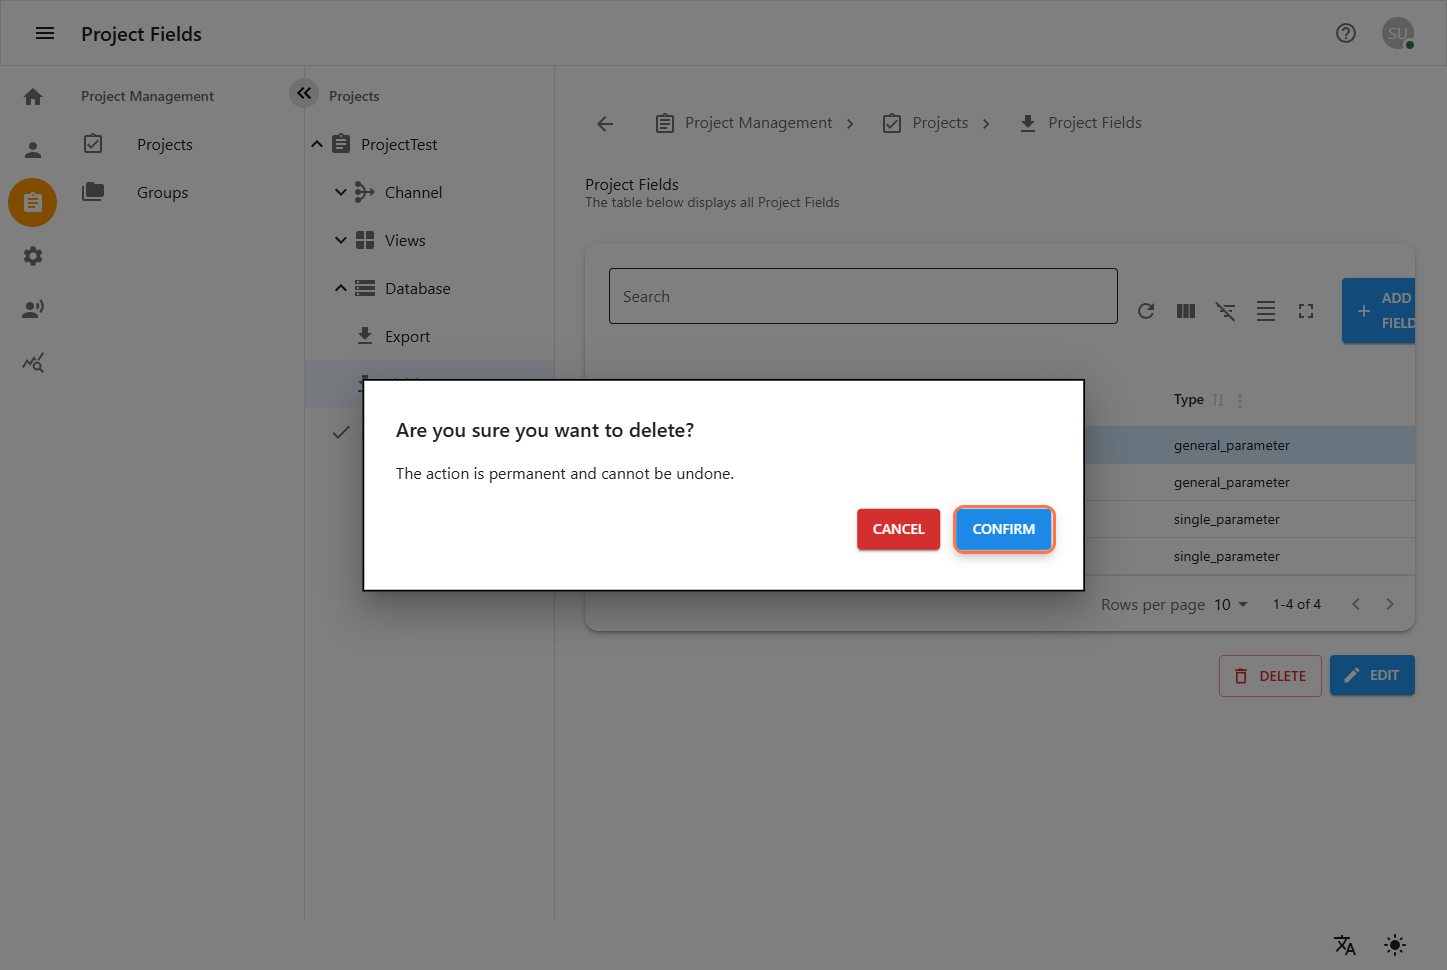
6.3 Deleting a Project Field
-
In the Fields list, find the field you want to delete.
-
Click the delete (trash can) icon next to the field entry.
-
A confirmation prompt will appear. Confirm the deletion to remove the field permanently.
-
The field will be removed from the list and no longer available in project forms or data exports.
7. Creating and Managing Result Codes
To create or manage Result Codes, first select a project from the Project Management section.
Navigate to:
Project Management > Projects > [Your Project] > Channel > Result Codes
Here, you will see a list of existing Result Codes for the selected project.
You can select any existing Result Code to view its details or create a new one.
7.1 Creating a New Result Code
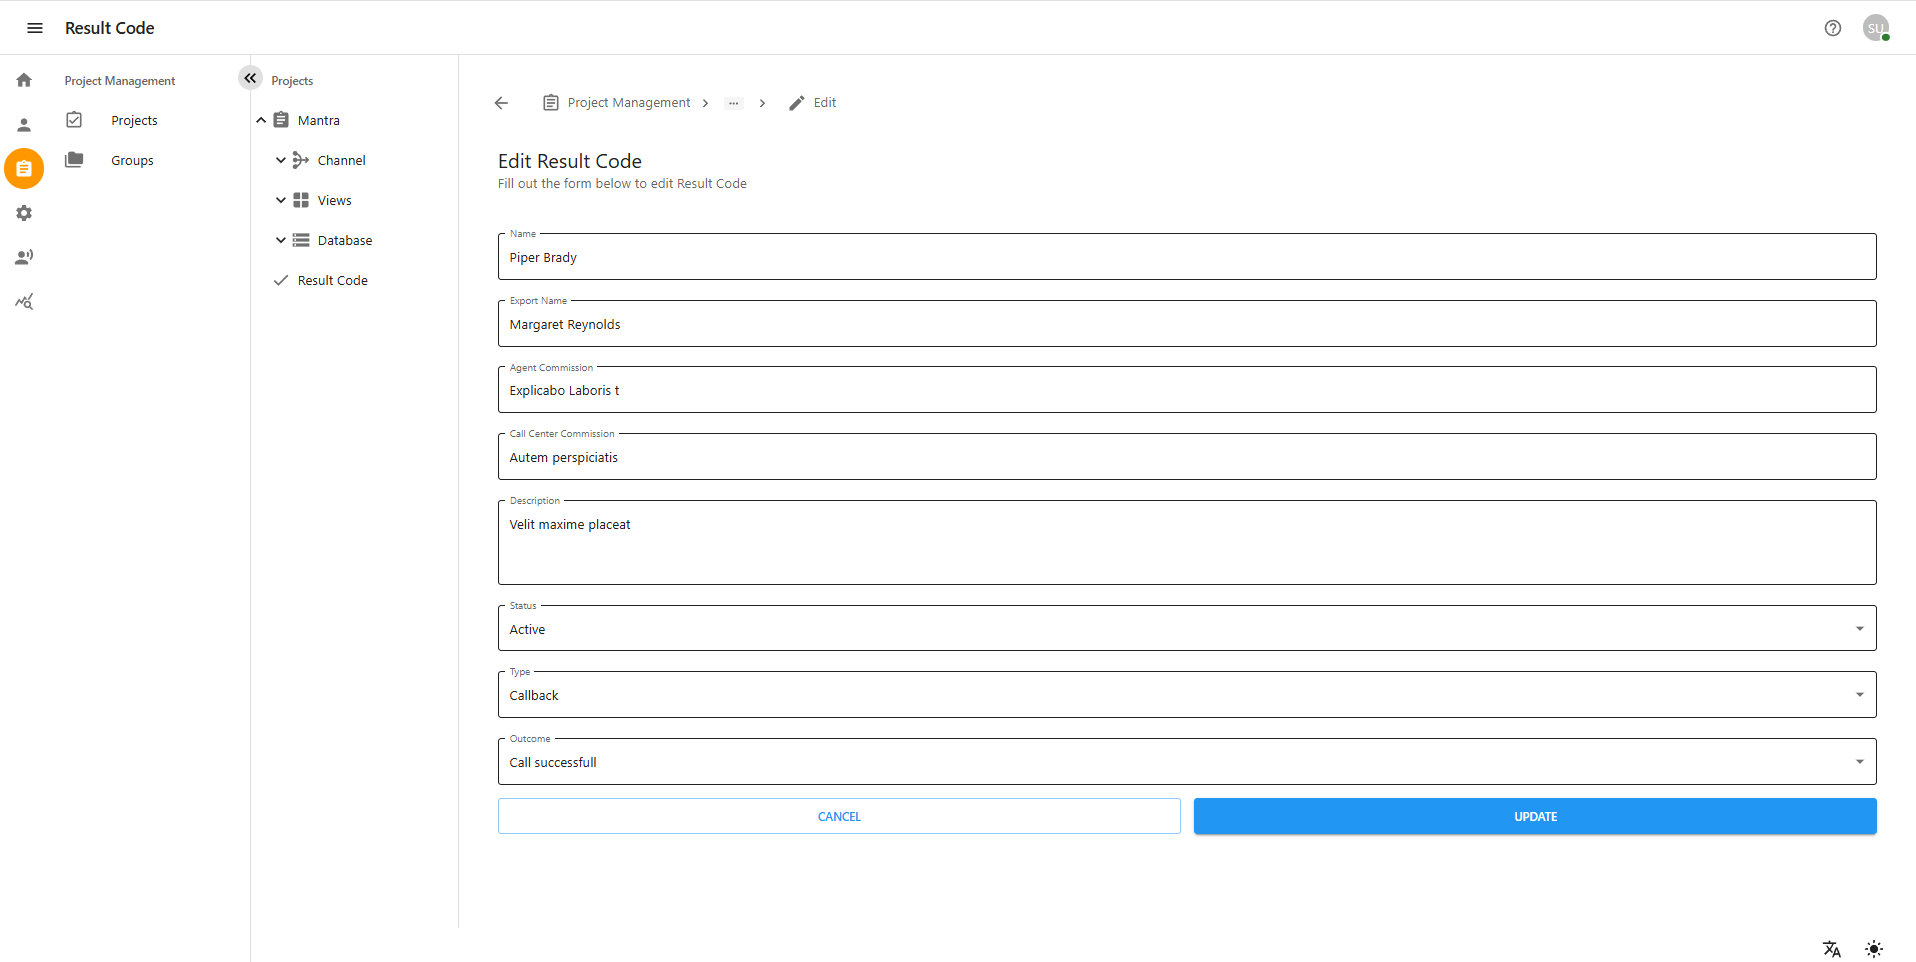
Fill out the form below to create a new Result Code:
-
Name – The display name of the Result Code.
-
Export Name – The name used when exporting data.
-
Type – The category or call type associated with this Result Code. This is linked from the predefined Call Types configured within the project to classify different types of calls.
-
Outcome – The outcome linked to this Result Code, selected from the predefined list of possible call outcomes (e.g., successful, failed, no answer). This helps categorize the result of a call or interaction.
-
Agent Commission – Commission percentage or amount allocated to the agent based on this Result Code.
-
Call Center Commission – Commission percentage or amount allocated to the call center for calls associated with this Result Code.
-
Description – Additional notes or explanation about the Result Code.
Result Codes created here can be linked to email templates and reports to track call statuses and automate communication workflows.
For managing Call Types and Outcomes used here, navigate to:
Project Management > Projects > [Your Project] > Settings > Call Types and
Project Management > Projects > [Your Project] > Settings > Outcomes
This ensures consistency and reusability across your project.
After filling out the form, save the Result Code to make it available for linking with email templates, reports, and call tracking.
7.2 Edit Result Code
-
Select the result code you want to edit by clicking the checkbox next to it.
-
Click the EDIT button (bottom right).
-
Update the fields as needed in the form.
-
Click UPDATE or SAVE to confirm the changes.
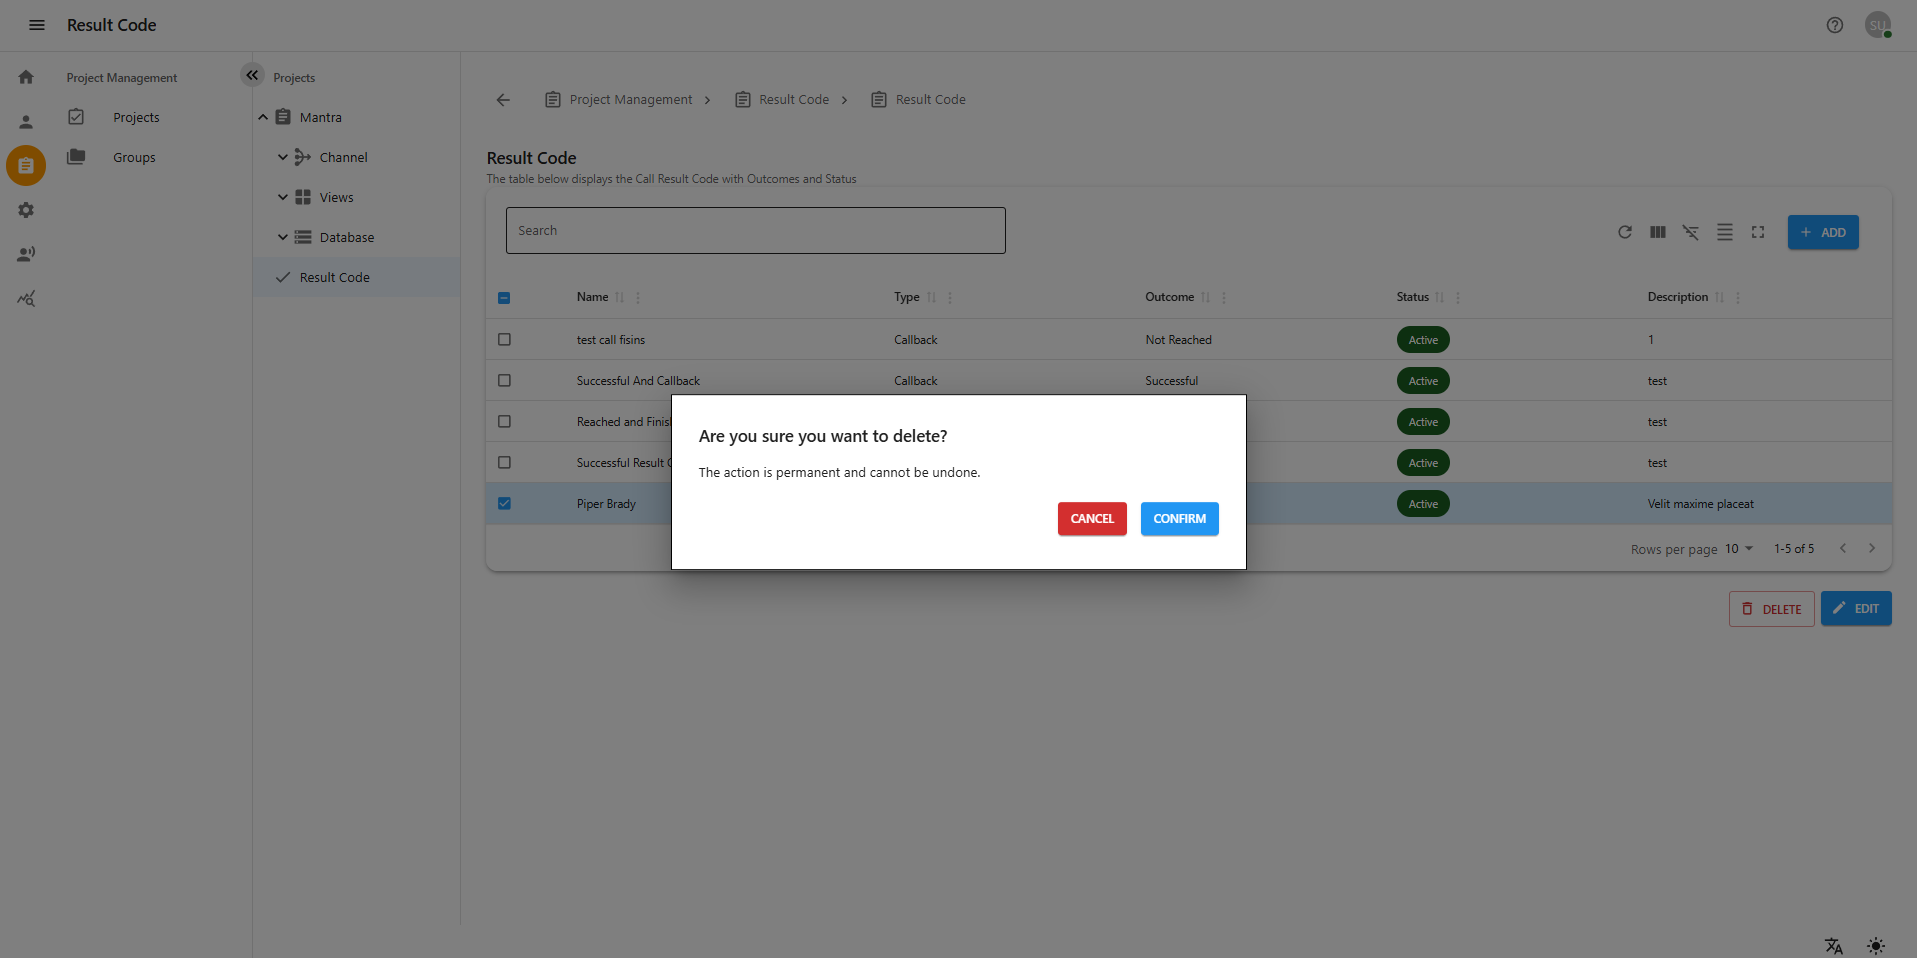
7.3 Delete Result Code
-
Select the result code you want to delete.
-
Click the DELETE button (bottom right).
-
Confirm the deletion when asked.
8. Manage Project Groups
Project Groups allow you to organize multiple projects under a single group for easier management and team assignments. To Navigate Progect Groups, first select a single project from the Project Management section. Then go to the Project Groups tab of that project. Inside the Project Groups, you can create, edit, and delete project groups as needed.
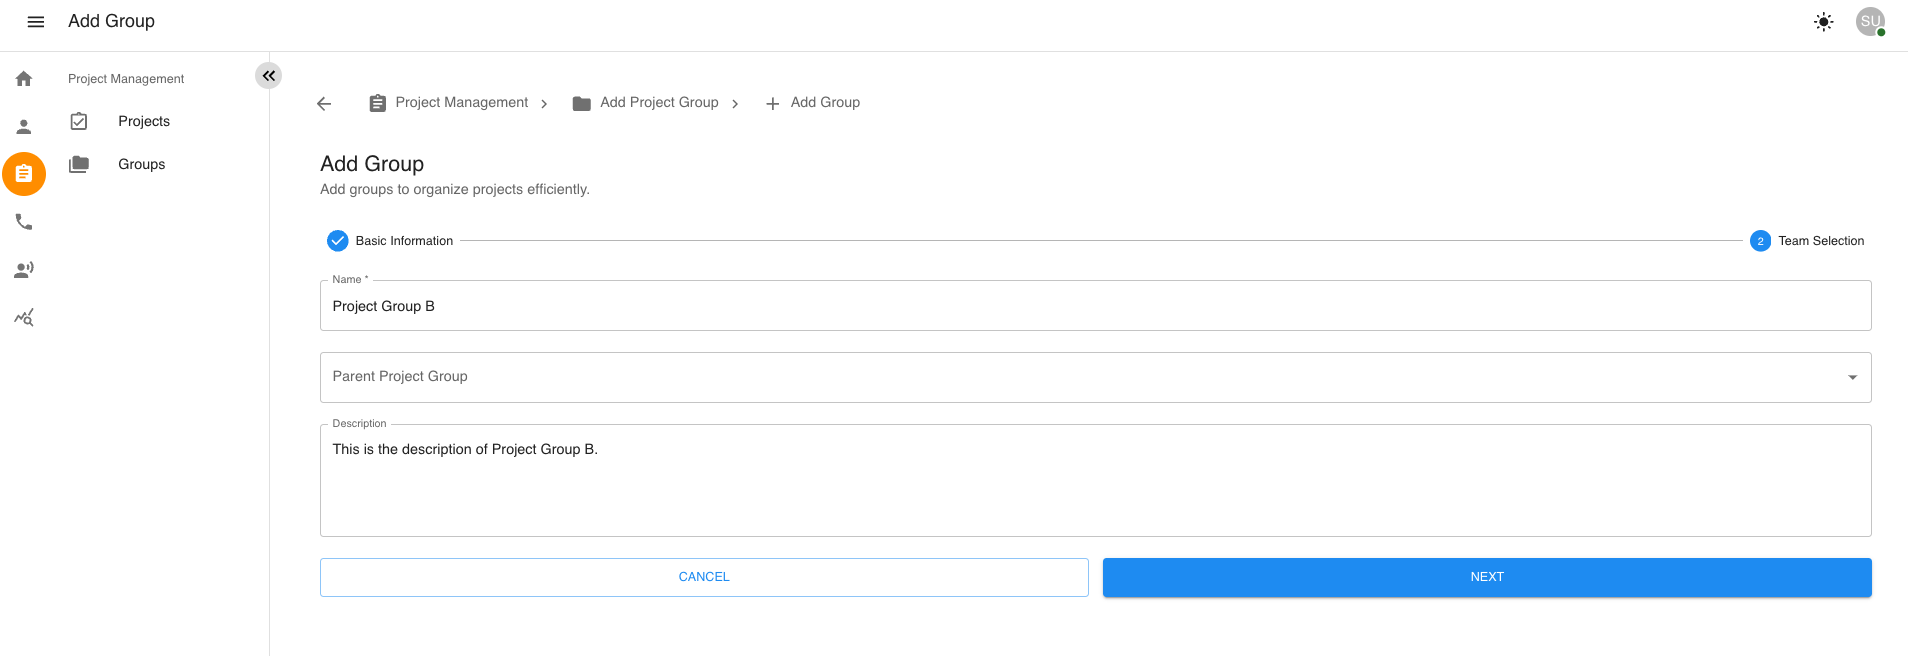
Filling the Project Group Form
-
Enter the required details such as Name,Parent Group Description, etc.
-
Click the Next button to proceed.
Assigning Teams to the Project Group
-
Check the Teams checkbox to assign teams to the group.
-
Click the Create Project Group button.
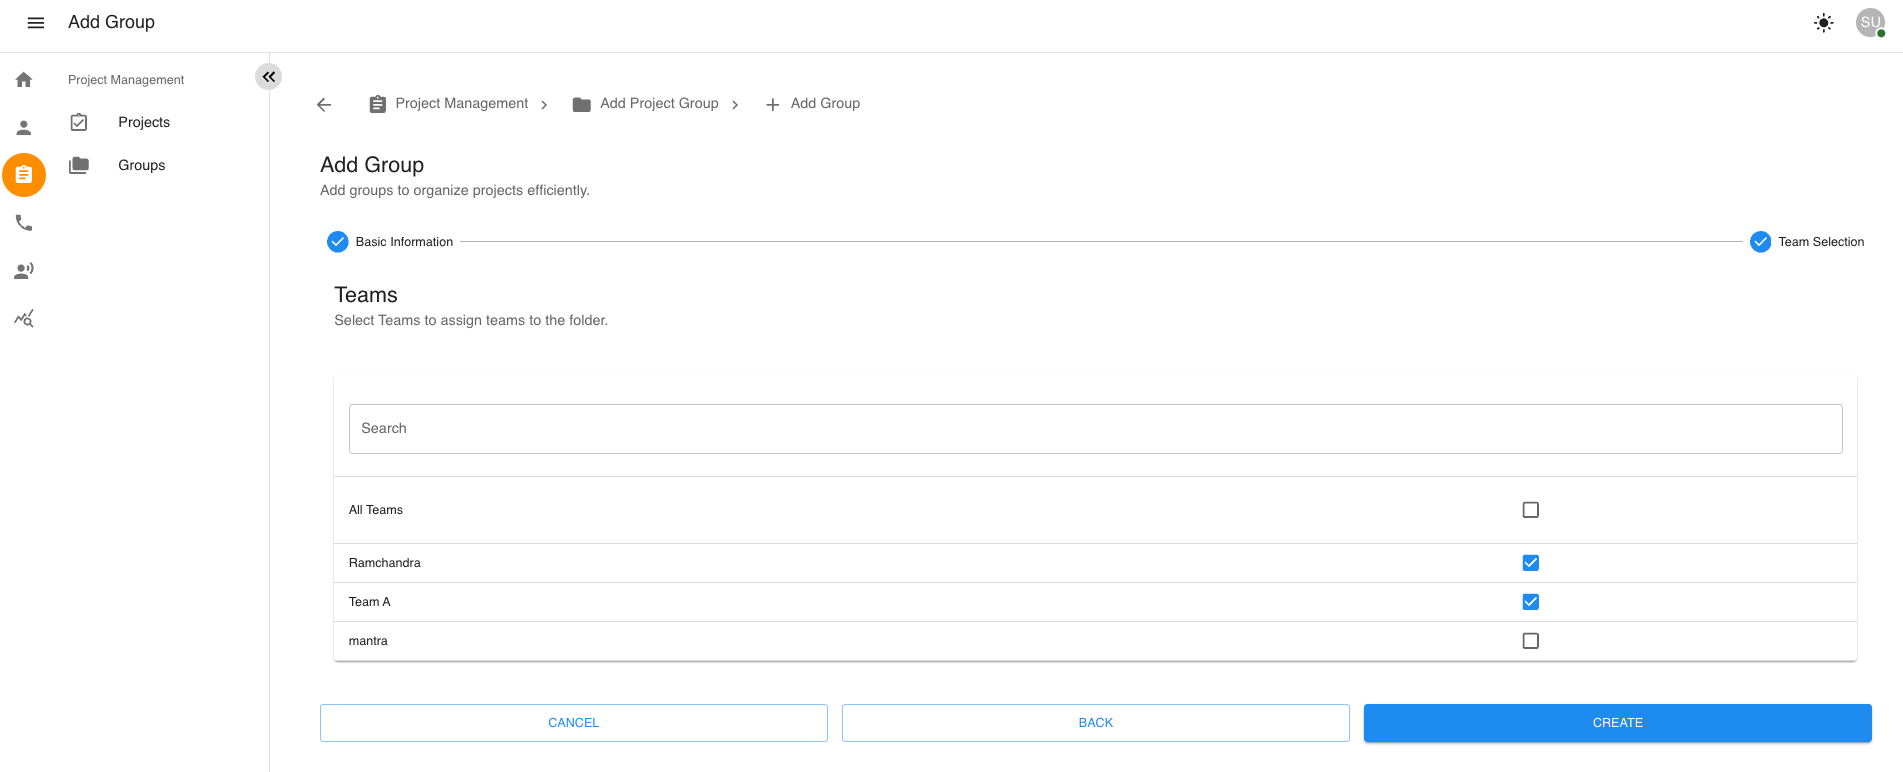
Saving and Redirecting
-
After successful submission, you will be redirected back to the Project Group page.
8.3 Editing a Project Group
-
On the Project Group list page, locate the group you want to edit.
-
Click the Edit (pencil icon) beside the group name.
-
Update the necessary fields in the form.
-
Click Update to save changes.
-
You will be redirected back to the updated list.
8.4 Deleting a Project Group
-
On the Project Group list page, locate the group you want to delete.
-
Click the Delete (trash icon) beside the group name.
-
A confirmation dialog will appear—click Confirm to permanently delete the group. WARNING: Deleting a project group cannot be undone.
After deleting a project group, you will be redirected back to the Project Group list page.